Solar PV panels have reduced in price by approximately 40% as a result of falling manufacturing costs and increased competition in the market. This means you can now get a decent sized solar PV system installed on your roof for between £4,000 and £6,000.
We would always recommend trying to maximise the number of solar panels that you go for – but this is often limited by the size of the roof space.
A 250w solar panel will typically cost between £300 and £500 and each panel is approximately 1.7m2. Therefore for a 3.5kW system, you are looking at a price of between £4,200 and £7,000, and this would take up approximately 23.8m2.
For a smaller 2.0kW system, you are looking at paying between £2,400 and £4,000 and this size system would take up approximately 13.6m2.
Obviously, the more solar panels you have on the roof, the more electricity you can produce. This therefore means you need to buy less electricity from the grid (as you can use the electricity you produce).
You can also get payment from your energy supplier, provided they are signed up to the Smart Export Guarantee (SEG).
The SEG is a legal obligation for any electricity supplier that supplies at least 150,000 customers to offer an export tariff to those with solar panels for each kWh produced.
The actual export tariffs these energy companies offer can be flat, variable or smart rate (adjusting based on wholesale prices), however the tariff must always be greater than zero (even when wholesale prices of electricity are negative).
There is quite a large discrepancy between the different SEG rates from the different providers – for example in August 2020, Utility Warehouse offer £0.02 / kWh, while Octopus are offering £0.055 / kWh.
SEG versus FIT
The SEG was introduced in January 2020 to replace the older Feed in Tariff (FIT) scheme, which closed to new customers on 31st March 2019.
The main difference between SEG and the FIT scheme was that the FIT scheme paid the owner of the solar panels for both producing the electricity and also for exporting it, while the SEG only pays for exporting it – therefore the SEG is far less generous.
Eligibility for the SEG
To be eligible for the SEG, the solar system being installed needs to be under 5MW (or approximately 20,000 solar panels – so most homes should be okay!). The solar system must also be installed by an MSC certified installer. Finally you need to have a smart export meter installed to measure how much of the electricity is being exported back to the grid.
SEG Tariff vs. using the electricity at home
To maximise the return from the solar PV installation, you will want to use as much of the electricity you produce in your home as possible. In the most basic terms, if you use the electricity you produce in the home, then you don’t need to buy it from your energy provider (a saving of around 15p/kWh). If you export it, you only get paid a fraction of this (£0.05 at most!) – so if you can use it in the home, then it is strongly recommended to use it!
By incorporating battery storage technology into your solar system setup – it allows you to store the electricity you produce to use as and when you need it. You can learn more about battery technology by clicking here.
Solar PV worked examples
So, to start with, we will look at a typical 3kWh system (installed on a new build with a ‘higher’ energy efficiency requirement rating) and see the annual return, based on the percentage you use in the home versus how much you export. Over a year, a 3kW system would expect to be around 90% efficient and generate about 2700 kWh of electricity (an average home used 4,800 kWh per year).
Worked Examples – % of Electricity used in the Home : % of Electricity Exported to the Grid
100% : 0%
75% : 25%
50% : 50%
25% : 75%
Total kWh/year
2700kWh
2700kWh
2700kWh
2700kWh
SEG (@£0.05/kWh)
£0
£33.75
£67.5
£101.25
Used by household (£0.15/kWh)
£405
£303.75
£202.5
£101.25
TOTAL RETURN
£405
£337.50
£270
£202.5
These numbers are correct as of 18th August 2020.
What impacts the initial cost of your solar PV installation?
The cost of your solar PV system is dependent on two things:
1. The size of the installation
Obviously the larger the system you install, the more electricity it has the potential to produce. The average solar PV system installed in the UK now is 3.5KW, which – working at 90% efficiency – will produce approximately 3150kWh of electricity (depending how much sun you get in your part of the country). As reference, an average house uses approximately 4,800kWh. The number of panels you can install will probably be limited by either the amount you can afford or the size of your roof. Suppliers will also charge different prices for their installation services and it’s important to ensure they are MCS-accredited to qualify for the SEG
2. The quality of the solar panels used
Not all solar panels are the same!
See our guide to the different types of solar panels for more details, but in a nutshell there are three types:
Monocrystalline solar cells (made from single crystals grown in isolation) are the most efficient at 15-22%, but they are also the most expensive type of solar cell.
Polycrystalline cells are cheaper than monocrystalline, but their efficiency is far lower at just 13-17%.
The cheapest solar cells of all are amorphous solar cells, which also have the bonus of being more efficient in low-light (great if you live in the UK!) but they are the least efficient overall at 9%.
How are the efficiency figures calculated? Well it is determined by how many watts of power are produced in a square meter. 100% efficiency means that a square meter of panel would create 1,000 watts. Therefore a panel rated at 18% would create 180 watts from every m2; it follows that panels with higher efficiency ratings create more electricity (per meter squared) and this is reflected in the price.
As you can see in the table above, the actual price of your installation varies depending on the types of panel you get installed, so a 4kW system could cost as little as £4,800, or as much as £8,000. In the table below we have assumed we are exporting 50% (so this is eligible for the SEG) and 50% is used within the home (so a saving on the electricity bill).
System A
System B
System C
Cost
£4,800
£6,400
£8,000
Type of Panel
Amorphous
Poly
Mono
Efficiency of Panel
9%
15%
20%
Output (kWh)
3200
3500
3700
SEG (£)
80
87.5
92.5
Savings on electricity bill (£)
240
262.5
277.5
Annual Return (£)
320
350
370
Payback of your Solar System
So looking at ‘System A’ in the table above, the system costs £4,800 and the annual return is £320 per year, so it will take approximately 15 years to pay back. In addition, electricity prices are expected to go up over time, so the £0.15 you save for every kWh of electricity you use in your home will actually increase – and could be nearer 20 pence in just 5 years – therefore the absolute return could actually become bigger.
Once you have ‘made your money back’, then any money you make is paid directly to you as profit – so you will be in line to receive the SEG indefinitely while you are exporting electricity.
There are a few other costs to think about with solar PV
Maintenance
There are maintenance costs associated with your solar PV installation, including cleaning them at least twice a year to ensure they are working as efficiently as they can.
Replacing Inverters
In addition, despite the solar panels being good for 20 years plus, the inverters have a lifespan of about 10 years, and replacing these will cost just shy of £1,000 – so factor this in to your calculations when your solar installers give you a quote.
You will need to insure you solar PV array as part of your home insurance, so your insurance premium payments will slightly increase.
Planning Permission
Installing solar panels on your roof does normally not require planning permission. However if you live in a conservation area or world heritage site, you will need to speak to your planning authority to get the necessary permission. Note: there will also be legal fees associated with this.
Installing Solar PV
Are you thinking about installing a solar PV system at home? We have scoured the country for the best tradespeople, so that we can make sure we only recommend those we really trust.
If you would like us to find you a local installer to help install a solar PV system in your home, just fill in the form below and we will be in touch shortly!
10 Things to Consider When Purchasing an Air Source Heat Pump (ASHP)
August 9, 2020
Air source heat pump technology rose in prominence in the 2010s in the UK, with the help of the Renewable Heat Incentive (RHI) – a subsidy paying for the low carbon heating generated to the improver, incentivising the take-up. Now in the 2020s the UK Government is looking to update the heating regulations to further accelerate the take-up of low carbon heating in exchange for the current gas boiler network.
Here we look at ten things to consider when deciding to purchase the air source heat pump for your home.
Installation cost consideration of Air Source Heat Pumps
Prior to installing what can ultimately be an expensive Air Source Heat Pump, ensure you have sufficiently insulated your house (see Solid or Cavity Wall Insulation, Loft Insulation, Floor Insulation), as otherwise the heat generated is not going to be efficiently used to heat your house. Insulation takes the heating demand down for your property, which allows ASHPs to be effective, given their low flow temperatures.
Buy certified MCS products and services
Only buy Air Source Heat Pumps certified under the Microgeneration Scheme or the MCS (make sure you check your supplier is signed up to the scheme), as this ensures the Air Source Heat Pump will be of suitable quality to fulfil your needs.
Offset cost of running Air Source Heat Pumps if possible
Air Source Heat Pumps require electricity to operate (unfortunately). But you can offset this to a degree by having Microgeneration technologies installed in your home, e.g. Solar Photovoltaic Cells, Micro Hydro Electric or Wind Turbines.
The Coefficient of Performance is a very important consideration
The Coefficient of Performance (CoP) is a measure of how efficient your heat pump is. For example if 1 unit of electrical energy is input into the Air Source Heat Pump, it should provide about 3.5 of useful heat energy (therefore it has a CoP of 3.5). The CoP varies between different Air Source Heat Pumps, so when buying a unit, remember the higher the CoP the better. The higher CoP Air Source Heat Pumps are usually more expensive (not always the case but check the manufacturer).
Air Source Heat Pumps perform poorly in low temperatures
Be aware that although Air Source Heat Pumps can still extract heat from the air in temperatures as low as -250c, the amount of heat they will provide at these temperatures will be much lower than if you live where there is an higher ambient temperature. So if you live somewhere that has a very cold ambient temperature, potentially look at other self generation energy solutions.
“Top-up” or secondary heating may need to be installed
The temperature of the water that an Air Source Heat Pump will produce is not as hot as a traditional boiler system, so you may need to consider secondary heating sources that act as a “top-up” heat form. Very popular is a log wood burning stove or an infrared heating panel.
Air Source Heat Pumps may irritate your neighbours
Air Source Heat Pumps produce noise, not a lot, but best to ensure it is not situated directly outside your bedroom or too close to the boundary of your next door neighbour. We filmed this short video clip on YouTube about Air Source Heat Pumps, therefore decide for yourself on the potential noise levels.
Always follow the latest planning guidelines prior to installation
In terms of planning permission, Air Source Heat Pumps are normally listed under permitted developments so no specific planning permission is actually required, however for this to be the case you do need to adhere to certain criteria of which the main one is related to neighbours and ensuring there is a suitable distance between your heat pump unit, and their house (please check with your installer / planning authority to make sure you adhere to building regulations).
Positioning of the system will drive its performance
You need to install your Air Source Heat Pump outside where there is a sufficient ambient air flow (we suggest doing so on ground level so it is easy to reach if it needs maintenance). Air Source Heat Pumps work by taking heat out of the air, so if you were to position it in an enclosed space, then it wouldn’t be effective.
Ensure you have a few quotes before you make a decision
As with all serious investments it is worth getting several quotes before investing in an Air Source Heat Pump. We also recommend speaking to other customers of your proposed installer, get their views and put your mind at rest when they tell you they have had a job installed to satisfactory standards.
If you are unsure about where to read up further about Air Source Heat Pumps because the whole thing sounds like a bit of a minefield, then we suggest going onto the MCS website and clicking on the section about manufacturers. It is worth speaking to a number of manufacturers so you get a feel for what the unique capabilities are of the systems you are looking to have installed in your property.
Biomass boilers are very similar to conventional gas boilers that you will be familiar with, providing you with space heating and hot water for the entire home, but instead of using gas (or oil) to produce the heat, they combust sustainably sourced wood pellets.
Using wood in place of fossil fuels helps to prevent long-term climate change, since the carbon dioxide released during the combustion was actually absorbed while the tree was growing, so they are essentially carbon neutral.
Each year, approximately 8.5 million tonnes of wood goes into landfill in the UK; this waste wood could be used in either biomass boilers (if converted into the pellets) or burned in wood burning stoves. This would not only provide heat and hot water, but in doing so, it would also ease the pressure on landfill capacity.
How does a biomass boiler work?
A biomass boiler works in a very similar way to conventional boilers, combusting fuel to produce heat that is then used to heat water. Biomass boilers are normally substantially bigger than their fossil fuel-burning brothers though, for a number of reasons. Firstly since they are burning wood pellets as opposed to gas, the boiler needs to be larger to hold the larger volume of fuel.
In addition, you may wish to install an automatic feed hopper on your biomass boiler, which will require additional room. This hopper stores a large volume of the wood pellets that are then automatically fed into the boiler as required, meaning that the boiler needs to be refuelled very infrequently.
It is also a good idea to have a store of the wood pellets at your property so you can keep producing heat if for some reason there is an issue with your fuel supplier. Ideally this should be close to where the fuel is delivered to your home, to minimise the distance you have to carry it.
Most residential biomass boilers can also run on logs as well as the wood chips, so if these are in plentiful supply or if you can source them cheaply or even for free, it will dramatically reduce the operational running cost of your biomass boiler.
Every four weeks or so, the biomass boiler will need to be emptied of the ash. This can be put straight onto a compost heap to help fertilise the soil.
Biomass boilers are designed to work all year round; however you may choose to turn them off in the summer. They can be coupled with solar heating or an electric shower, providing you with your hot water for washing only, during the warmer summer months.
How does biomass measure up against traditional fuels?
Biomass boilers measure up very favourably in terms of running costs vs. natural gas, heating oil and especially electricity. The numbers can all be seen in the table below.
Figures courtesy of Biomass Energy Centre
Fuel Type
Price per Unit
kWh per unit
Pence per kWh
Wood Chips
£100 / tonne
3,500kWh / tonne
2.9p / kWh
Wood Pellets
£200 / tonne
4,800kWh / tonne
4.2p / kWh
Natural Gas
4.8p / kWh
1
4.8p / kWh
Heating oil
60p / litre
10kWh / litre
6.0p / kWh
Electricity
14.5p / kWh
1
13.4p / kWh
Standalone boilers
A biomass boiler might simply be too big for your home, but smaller standalone wood burning stoves are also available, which are normally used to heat one room by burning logs or waste wood. These wood burning stoves can be fitted with a back boiler that uses the heat produced when the wood is combusted to heat water, that can then be used for either space heating elsewhere in the home or for hot water only.
Both standalone wood burning stoves and biomass boilers will need a vent, designed specifically for wood fuel appliances, with sufficient air movement for proper operation of the stove. Your existing chimney can be fitted with a lined flue, which is relatively inexpensive.
Can I get a free biomass boiler?
Under the Domestic Renewable Heat Incentive scheme, you will be eligible for payments towards the cost of installing the technology. These are quarterly, and over seven years, so you will still have to find the money to cover the upfront costs. How much funding you will receive depends on how energy efficient your home was before you installed your biomass boiler. You will start by having an EPC survey, and then payment rates are calculated by multiplying the ‘heat demand figure’ on your report by the current rate for biomass boilers. This means that some models will eventually be paid for fully by RHI payments, but many – especially top-end models – will not be covered completely. Find more information here.
Remember a carbon monoxide detector
It is really important when burning any type of hydrocarbon fuel (natural gas, coal, biomass) that you install a carbon monoxide detector in your home. In theory if all the fuel is 100% burned you produce heat, water and carbon dioxide, but in reality not all of the fuel burns. This means sometimes harmful gases like carbon monoxide can be emitted, which can be deadly. As long as you have a working carbon monoxide detector, you will be able to make full use of all the benefits a biomass boiler can bring.
Benefits
Biomass fuels are considered a renewable fuel – the carbon dioxide they produce when they are burnt is offset by the carbon dioxide they absorb while they are growing. Savings in carbon dioxide emissions are significant – up to 9.5 tonnes per year when a wood boiler replaces a solid (coal) fired system or electric storage heating.
Fuel savings are less significant, and if you replace a gas heating system with a wood burning system you may end up paying more for your fuel. But if you replace solid fuel or electric heating with the cheapest biomass fuel you could save between £170 and £390 per year. Typically, heating and hot water costs for a year will be around £1,000 in a detached property.
If you have a ready supply of logs at home you can effectively heat your home for free.
Limitations
There are increased maintenance requirements with this technology; for instance the wood pellets must be loaded on a regular basis to ensure it continues to provide energy. In addition, the ash bins need to be emptied from time to time.
You will need storage space to store the fuel at your home.
Wood costs often depend on the distance from your home to a wood supplier and whether you can buy and store wood in large quantities. If you have your own supply of wood fuel then this can significantly reduce your costs.
Cost
A standalone pellet stove may cost about £4,300 including installation; however for an automatically fed pellet boiler the cost is considerably higher at about £11,500.
A wood burner will cost anywhere between £500 and £3,000 depending on the size and style.
Installing a biomass boiler
Are you thinking about installing a biomass boiler? We have scoured the country for the best tradespeople, so that we can make sure we only recommend those we really trust.
If you would like us to find you a local installer, just fill in the form below and we will be in touch shortly!
Introduction to Solar Thermal
Renewables
What is solar thermal?
Solar thermal (also known as solar heating) harnesses the energy provided by the sun to provide thermal energy to heat water. The hot water produced by the solar heating can be used to supplement your domestic hot water (although the temperature might need to be topped up by a boiler), larger stores of water (like swimming pools), underfloor heating, and for space heating/cooling.
Unlike a solar photovoltaic cell array, which is designed to produce electricity, a solar heating system is designed simply to produce heat. A well-designed solar heating system will provide approximately 55% of your annual domestic hot water requirement. However, as it is reliant on the sun, your solar heating system will produce more heat in the summer months.
Types of solar thermal system
Solar heating systems all have a few components in common: a solar collector, insulated heat transport piping and heat storage. More complex systems also have electronic controls and freeze-prevention mechanisms (when situated in colder climates). There are three main types of solar collectors:
1. Flat panel solar collectors
These are the most common type of solar heating technology and consist of a box with a piece of glass on the top and a dark absorber plate on the bottom. Sunlight passes through the glazing on the top of the box, heating up the absorber plate and converting the solar energy into thermal energy. Copper pipes are attached on the top of the absorber plates, and the liquid flowing through these pipes absorbs the heat, which is then pumped away and stored until it is needed in the house.
2. Evacuated tube solar collectors
The evacuated tube systems tend to be more efficient, especially in cold or cloudy climates; however their advanced design makes them more expensive. These solar collectors consist of rows of parallel, transparent glass tubes. Each tube contains an absorber assembly and the entire tube is evacuated of any air (so it operates within a vacuum). The sunlight enters the glass tubes and hits the absorber assembly where it is absorbed. As this is operating within a vacuum, heat does not travel back from the absorber to the glass, so these are more efficient. A fluid transfers the heat from the absorber assembly through to the storage tank, where it can be used.
The two major advantages of evacuated tube collectors are that they can produce warmer water (so you will not need to supplement the temperature with a boiler) and they can also produce more hot water than flat-panelled solar collectors.
3. Plastic collectors
These are the cheapest type of solar collector and consist of black plastic pipe treated to withstand UV degradation. Hot water is simply pumped through the black plastic pipes, where it warms up (as the plastic absorbs the suns energy). Plastic collectors are most susceptible to ambient temperatures as there is no insulation in place, so if the outside temperature is cold, very little heat will be produced.
These are an ideal solution for swimming pools though, as they amplify the effects of the weather and its seasons. For example, most swimming pools are used in the summer, so installing plastic collectors will allow you to use the pool sooner in the year, and it will keep the temperature consistently higher.
Things to consider before installing a solar thermal heating system
As with solar photovoltaic cells, solar heating technologies require sunlight, so ideally you would install the technology on a south-facing roof that receives sunlight for most of the day to maximise the benefits. Likewise, the amount of heat you can produce is directly proportional to the amount of installed surface area you have; therefore if you only have a small roof, then this technology may not be appropriate.
In addition, you will produce more hot water in the summer, as the energy from the sun is more intense at this time, therefore you may well have to supplement the temperature of the water in the winter using a boiler. To boost the system, your boiler must be compatible with your solar heating system, but currently most combi or CHP boilers are not compatible. It is therefore very important that you check with your installer before undergoing any works.
If you live in much colder climates you may need to have some sort of antifreeze within your system (when water freezes it turns to ice it expands, potentially causing cracks in the pipes).
If you live in a listed building please note the restrictions. Like with many green technologies, it is worth contacting the local planning office to get permission to place the panels, to save yourself problems further down the line.
Installing solar thermal normally requires a new hot water tank
For many of us with old heat-only boilers, we have a hot water tank hidden away in the airing cupboard. Typically these hot water tanks are heated by a boiler and were purpose-built.
Since the introduction of the RHI, there has been a huge increase in the number of people installing solar thermal in their homes.
If you decide to install solar thermal in your home you will need a hot water tank to store the hot water produced from your collector – the problem though, is that you can’t plumb one of these systems into the older hot water tanks that are historically found with boilers.
Twin coil cylinders
The reason for this is that inside the hot water tank there needs to be a separate coil for each ‘hot water source’. In this case you would need a coil for the solar thermal and one for the hot water. Normally in a residential solar store (i.e. a hot water tank with a solar coil), the solar is connected to the lower coil and the boiler (or main heating source) is connected to the top coil.
Solar coils are much larger than traditional boiler coils because they need a far bigger surface area to transfer their heat into the water compared to a boiler. The reason is that the hot water travelling through the solar thermal coil is at a much lower temperature than the water travelling through a boiler coil.
As a guide, the surface area of a solar thermal coil needs to be in excess of 1.5m2, while a boiler coil can be as little as 0.6m2 – this increased surface area maximises the opportunity for heat transfer and is a must based on the lower water temperature flowing through the coil.
If you cast your mind back to your GCSE science, you will know that heat rises and therefore within a hot water tank, the water at the top of the tank is far warmer than the bottom of the tank.
In a solar thermal store, it is important that this temperature differential is maximised and this is achieved by making the hot water tank rather large and tall. So while the top of the tank could achieve temperatures of 600C plus, the water at the bottom of the tank might be as low as 150C degrees. What this means is that even if the solar thermal is only producing water to 200C degrees, it will still contribute to the hot water demand of the property.
Storing the hot water you produce on sunny days
Since the hot water tanks used for solar thermal systems tend to be big, they tend to be able to store far more hot water than is actually required by most families that install one of them. Since solar thermal is intermittent, (i.e. it produces much more hot water when the sun is shining), this oversized heat tank allows you to store the hot water; thereby taking advantage of favourable conditions a day or two later to help minimise the need to use the boiler.
Maximising return on your investment
The Renewable Heat Incentive (RHI) is now up and running, which works in a similar way to the Feed-in Tariff, rewarding you for any hot water you produce from renewable sources. You can find all the information you need about the RHI on our page here.
Benefits
Solar water heating will provide hot water throughout the year, although less so in winter.
Once you have installed the equipment, it provides a free source of hot water.
Limitations
All solar technologies are reliant on the sun shining; hot water will not be produced at night.
The maximum water temperature that can be achieved via solar heating is significantly lower than that achieved with gas or electricity-based water heaters.
Cost
The cost of installing a solar hot water system ranges from approximately £1,500 for a DIY system, to £2,000-£5,000 for a commercially installed system. These prices however, are dependent on the size of the system. The savings resulting from the installation will be approximately £50 – £90 per year.
Installing Solar Thermal
Interested in installing a solar thermal system at home? We have scoured the country for the best tradespeople, so that we can make sure we only recommend those we really trust.
If you would like us to find you a local installer to help install a solar thermal system in your home, just fill in the form below and we will be in touch shortly!
Windmills (now in the form of wind turbines) have been used for millennia to convert the wind’s kinetic energy into mechanical energy. As early as 200 B.C., mechanical energy was used for specific tasks including grinding grain and pumping water. Nowadays, wind turbines harness kinetic energy from the air and convert it into electricity via a generator.
Much like solar PV installations, you can purchase a domestic wind turbine to supply as much or as little electricity as you want. If you are hoping to limit your dependence on the mains as much as possible, you will need a larger turbine, or multiple smaller turbines. If you are simply looking to produce enough electricity for a light in your garden shed, you can get away with a very small turbine.
Below we look at the different types of wind turbine system you can install in your property.
Battery-less grid tied systems
Battery-less grid tied systems are the simplest, most effective and most environmentally-friendly wind turbine systems. Their role is simple: to produce the most electricity possible to provide electricity for your home and also feed into the grid. Due to the availability of grants such as the feed-in tariffs in the UK, this type of system has grown enormously in popularity in recent years. In these installations, the home owner can effectively sell the surplus energy back to the utility company. There are no batteries in the system, so this removes a lot of the system complication and maintenance. The lack of batteries also makes it cheaper to install.
If your aim is to become completely unreliant on the grid, then you need to ensure the electricity produced by your battery-less grid tied system is in excess of your total electricity usage for the year. However, this system should suit most budgets, because it will reduce reliance on the energy companies, by significantly reducing your bills. If you cannot produce all your electricity, the shortfall is simply made up with electricity from the grid.
There is one major drawback with this setup, and that is that if there is a electrical power cut then you will have no power for your home, because the inverter your energy goes through is connected to mains power, so you may require a generator (powered by diesel or oil) as a back-up policy.
Grid-tied system with battery backup
This is essentially the same as the grid-tied system above, but has a bank of batteries which means that if there is a grid power cut, the inverter can still get the electricity it requires to operate, so the installation will keep providing you with electricity. The constraints of this system are primarily associated with the batteries, which are expensive and require regular maintenance. Finally, add extra inefficiency into the system (ranging from 5 – 40%) and this is added to the constraint side.
Off-grid systems
This system has no connection at all to the grid, relying instead on batteries to operate if no wind is blowing. However if the capacity of these batteries is too low, then you could be without any power for a prolonged period of time. Having a system off-grid presents an ideal situation as you become completely independent from the grid, and you produce all the electricity you need. However, this type of system tends to be the most expensive and also is maintenance-heavy. If you have a garden shed that needs lighting then this system can work out relatively cheaply, but as soon as you are looking to upscale then it becomes very expensive.
In the next section we look at the components that you need for a successful wind turbine installation.
Benefits
Wind turbines allow you to produce 100% clean, free electricity.
Limitations
Wind turbines can be considered a bit of an eyesore and often have to be limited to rural areas.
Cost
Entirely dependent on the size of the wind turbine, from £1k – £10k.
Unlike the previous Green Deal scheme which was loan operated, the Green Homes Grant offers grants of up to £5000 and £10,000 to wholly or partially cover the full cost of the energy saving measure.
The Green Homes Grant was set up to help improve the energy efficiency of properties across the UK, since many of the properties we live in are very inefficient, with solid walls, old heating systems and very little insulation. This scheme allows people to improve their homes without having to stump up the entire upfront costs of the works.
How does the Green Homes Grant work?
The Green Homes Grant is divided in to two separate grants, which each have different eligibility criteria.
£5000 – available to any home in England that fits the correct criteria for the specific measure. This grant covers 2/3’s of the full cost and caps at £5000. There will be a remainder in all cases using this grant and it will be paid as a customer contribution.
£10,000 – available to any homeowner receiving certain benefits listed here, and whose home fits the correct criteria for the specific measure. This grant covers 100% of the full cost up to £10,000 and the remainder is paid as a customer contribution.
e.g. Fitting external insulation on a small terraced house (approx 50sqm), using the £5000 green homes grant
The average supply and fit cost of external wall insulation is £120 per sqm (inclusive of materials, labour, VAT, skip hire, any extra remedial work required, scaffolding). Therefore, a 50sqm house would cost £6000.
In this case, 2/3’s of the full cost is £4000, so this is how much the Green Homes Grant would cover. The homeowner would pay the remainder of £2000.
e.g. Fitting external insulation on the same size house (50sqm), using the £10,000 Green Homes Grant
As above, the total cost of the works would amount to £6000. With the £10,000 grant, the whole £6000 would be covered by the Green Homes Grant and there would be no customer contribution.
If the house were bigger (for instance, 100sqm) the total cost would be £12,000, the Green Homes Grant would cover £10,000 of the amount and the homeowner would have to pay £2000.
Who can get the Green Homes Grant?
In theory, any home in England can access the Green Deal considering you are eligible, but the scheme has been specifically tailored to the private home owner or the private rental sectors. The reason being is that the social housing sector already has several ways in which improvements are funded and undertaken – namely the ECO scheme.
The following section talks a bit more about how the Green Homes Grant process works end-to-end – starting with a finding a Trustmark approved installer to quote for the works.
Find a Trustmark approved installer to quote you for the works. The installer will also have to be registered to specific certifications regarding the measure they are installing – MCS/PAS2035. It is recommended to get three quotes for comparison.
When you have submitted your application, it will take a few weeks until you receive your Green Homes Grant voucher. Work must not start before you receive the voucher.
Your installer will be notified when you receive the voucher, however it is always a good idea to let them know yourself and arrange a start date for the work to begin.
An installer will complete the work and you as the customer should be benefiting from the energy improvements.
How does the Green Homes Grant help improve homes?
By installing energy efficient measures in your home, it will help protect the environment, and lower your energy bills.
Types of measures currently covered in the Green Homes Grant scheme:
How does the Green Homes Grant help improve energy awareness?
The Green Homes Grant provides homeowners with knowledge of energy efficient home improvements. In turn, better energy awareness should drive occupiers to use their energy more wisely, which should drive down the cost people pay. For example: reducing the temperature of the hot water cylinder thermostat, installing central heating thermostats in the correct location, reducing water levels in kettles, washing clothes in ‘eco-mode’, and turning off unused high energy usage appliances like chest freezers should all help with lower energy bills.
We list 100 ways to save energy in the home here – even if you adopt a few, you should see some nice energy savings on your utility bills.
Solar prices are crashing – great for consumers!
June 26, 2013
Solar Prices are Getting Cheaper
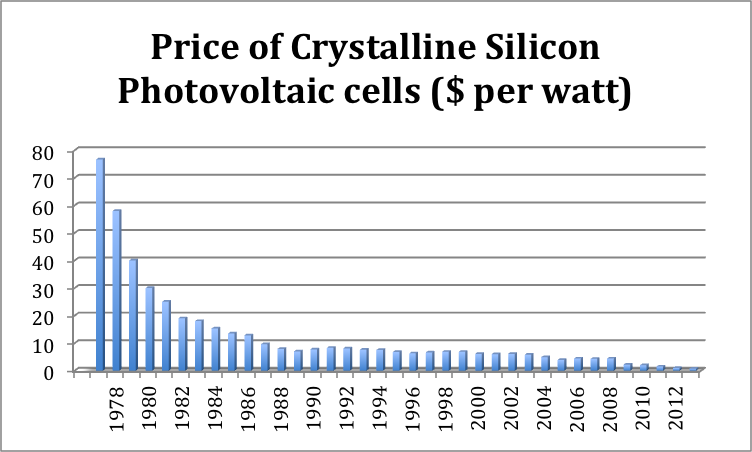
In a world that seems to be getting more expensive on a daily basis it is refreshing to read that one of the great hopes for our future energy security is significantly reducing in price across the globe.
The following graph shows the price of crystalline silicon photovoltaic cells when they came onto the market in 1977 and how the price has decreased over ever since.
The rule of thumb for this decrease is that the cost to generate the photovoltaic cells falls by 20% with each doubling of global manufacturing capability.
Solar – A maturing market
The solar industry is a funny one, since only a few years ago installing solar panels on your roof was seen as somewhat of a luxury because they were prohibitively expensive and the financial payback was 15 – 20 years or more.
Then all of a sudden, the Chinese Government invested heavily in solar via the Chinese Development Bank, which provided very cheap debt to solar manufacturers as well as tax breaks and subsidies. In 2010 alone, $30bn was handed out to 5 solar companies in China, allowing them to expand their operations very rapidly, leading to a much higher manufacturing capacity.
This move by the Chinese effectively turned the whole industry on its head, but quickly resulted in supply vastly outstripping demand, resulting in solar cell prices tanking.
Now obviously this isn’t good news for the big solar manufacturing companies outside of China who are looking to make profits from the goods they are selling. Only a few weeks ago, Suntech, one of the world’s biggest solar panel manufacturers, defaulted on a $500m bond payment.
In fact, in an effort to slow the massive influx of Chinese manufactured solar panels, the EU has imposed anti-dumping duties on Chinese solar imports having found that they were selling them in Europe at 88% lower than cost. This tax import rate is currently set by the EU at 11.8%, however if China refuse to stop their solar panel dumping the rate will go up to 47.6% in August.
This unfortunately has created an issue for many UK based installers who get their panels directly from China, since they will no longer be able to import them so cheaply; a situation that could mark the end of the cheap home solar PV installation
The Tanking solar Price is (currently) great for Consumers
Thus far, this fierce competition introduced by the influx of new Chinese solar companies has been great for consumers (driving down prices of solar panels), but if UK installers need to start paying almost 50% tax on the panels they import then their prices will need to increase accordingly.
It is currently possible to buy a 4kW system in the UK for approximately £7,000 – £8,000. A system this size should produce about 3,400kWh of electricity per year. If you were to use half of this yourself and sell half back to the grid you would make approximately £850 per year as per the calculations below.
Payment (£)
kWh
Cash to you
……………………………………………………
0.154
3400
524.96
Generating Tariff (part of FiT)
0.045
1700
76.50
Export Tariff (assumed 50%)
0.140
1700
238.00
Saving on electricity bill
…………………
Total
839.46
Therefore the payback is less than 9 years, and then you will continue receiving the subsidies for the next 10/11 years (20 years after installation).
This is obviously the situation as it is today, but this could change in a matter of weeks – so act quickly to ensure you get the best deal on your solar panels. The Feed in tariff is also reviewed on a quarterly basis, so is likely to continue to fall over the coming years, so now is the perfect time to install a solar system.
Looking Forward to the Future
Despite the issues surrounding the cost of the panels resulting from the sudden increase in Chinese manufacturing capacity and the EUs decision to tax panels made there, the technology that goes into making the panels is improving on a seemingly daily basis.
Even last week, the Stanford Institute for Materials and Energy Sciences announced massive efficiency improvements (about a 100 fold increase) on a solar cell that can convert all solar wavelengths into electricity (current PV only uses the visible spectrum). Where heat negatively impacts traditional solar PV cells, this new technology performs substantially better in warm conditions.
I have written before that it will be a big day for solar when installed it can produce electricity at the same price as traditional fossil fuels (which is almost the case in California now) – known as grid parity. And hopefully one doesn’t have to look too far into the future to a time when grid parity could be reached in sunny UK too, there just might be a few speedbumps along the way!
Micro Hydroelectric Power
Renewables
Hydroelectric power on a residential scale
It is well known that energy is generated by building dams over giant underwater turbines; however it is possible to use micro hydro generators (<100kW) or pico hydro generators (<5kW) on more modest water flows. In this section we explore where the technology can be used in a small scale area, for example the home or a community project. More about industrial size dams and solutions can be found in the green commercial section.
Obviously, there is a fundamental requirement on a steady stream of moving water, however they have an advantage over solar power (both solar PV and solar heating) and wind, in that they can run day and night and in any weather conditions provided the we don’t have a prolonged drought period where streams and brooks can dry up.
The amount of energy produced is reliant on two things:
The flow of water
The flow of water is simply the quantity of water flowing in the water source, which is measured in litres per second.
The head
The other key factor is the head – this refers to the pressure at which the water hits the turbine blades, and is the vertical distance from the water source to the generator. The larger the distance that the water falls before it hits the blade, the higher the head. Ideally both the flow and the head will be high, however if one of these is particularly high, while the other is low there is still the potential for a rich source of electricity.
You can estimate the number of kilowatts of energy produced by multiplying the flow (litres/sec) by the head (m) and multiplying by 9.81 (gravitational constant). Remember a typical house uses 4500kWh per year.
The type of turbine that is used varies depending on the type of flow available, however typically a residential generator uses a pipe to collect water from a river or a stream. Using gravity the water moves through the pipe ‘downhill’ and a generator situated within the pipe acts to change the kinetic energy from the water flow into electrical energy.
When you have high head (the vertical distance from the water source to the generator), you are best using an impulse turbine (such as a Pelton turbine). This turbine is not submerged in the water, instead it sits in the air, and consists of buckets around a central hub. The nozzle at the end of the pipe converts the water into a fast moving jet. This jet of water is directed at the buckets, and the force of the the water causes the turbine to spin generating the power. The smallest type of high head turbine requires a head of at least 10-14 metres, and a water flow of 3-4 litres/ second, and this is rated at producing 200 watts of power.
For medium head water flows, it is best to use a reaction turbine. With a 3-12 metre head and a water flow of 45 litres/ second, you can get a reaction turbine that will produce about 3000 watts of power. Obviously as with the high head turbines, if either the head or the flow increases, you will see dramatic increases in the potential electricity your system is capable of generating.
For low head water flows, you obviously require a high flow rate, and in this situation an old style water wheel is the best. So the water fills the buckets which fill up, then pulling the wheel down, so the next bucket is filled, and this process is continued so the wheel spins (albeit very slowly). However the advantage of this type of system is that any potential blockages just simply wash through the system. Gearing can be used in conjunction with water wheels to increase the speed that the generator spins to help electricity production. Water wheels are also aesthetically pleasing on the eye!
Summary of micro hydroelectric power
If you are lucky enough to have a water flow source on your property that either has high head or sizeable flow, a micro hydroelectric generating system may be the perfect solution for your energy needs. Despite potential seasonal fluctuations in flow and head, a micro hydroelectric system will provide you with electricity 24/7, with very little maintenance necessary.
To maximise the electricity contribution that a wind turbine can provide you with, two interlinked questions need to be considered:
How much electricity you would like to produce?
How much electricity you can produce on your property?
How much electricity do you need your turbine to produce?
You first you need to decide exactly what you are trying to achieve by installing a wind turbine on your property. Are you trying to become completely independent from the grid? Are you simply trying to decrease you electricity bills having received a capital lump sum that you can invest? Do you simply want a wind turbine to power a light in your garden shed? Obviously the larger the turbine, the more electricity it will produce; however larger turbines will be more costly.
By looking at utility bills from previous quarters, you can get a feel for your total electricity usage over a year. You can get more accurate readings if you go around your property and complete an energy assessment of your current load (simply the total energy that each appliance in your house uses over a certain period of time). This involves producing a table with each appliance, its draw in watts (measured using a watt plug in meter – sometimes known as a wattmeter), and the estimated time of use in a 24 hour cycle. With all this information you can complete a much more accurate total yearly assessment of usage of your house (by multiplying usage for a 24 hour cycle by 365 days).
Having a feel for your total energy usage should help you decide what you are trying to achieve with your turbine. There are several wind turbine setups which we have described in more detail below.
How much electricity can your system produce?
It is really important that you have a target electricity figure in your mind that you are aiming to achieve, be it 50% of your total energy requirements, or becoming fully self sufficient. However, this may not be possible if there are constraints on your property, such as lack of space or low average wind speed.
Wind speed
This is the key factor and we usually use average wind speed as the measurement for your particular location. You cannot directly affect the average wind speed at your home; however your choice of site and tower height can have a dramatic impact on the wind resource. The power available for the wind that is blowing is the cube of the wind speed – this is absolutely fundamental, and this can be seen in the simple sums below:
3mph – 3 x 3 x 3 = 27kWh
6mph – 6 x 6 x 6 = 216kWh
12mph – 12 x 12 x 12 = 1,728kWh
This is excellent news, as the further you get away from the surface of the earth and its many obstructions (e.g. houses), the higher the wind speed: therefore the more power in the wind. This means it is important to try and maximise the height of any tower you use, to try to maximise the wind potential of your wind turbine system.
Swept area
The swept area is the circle that the turbine produces when spinning, so this is the diameter of the blades. The blades are driven by the power in the wind, so the larger your swept area, the more energy you can harness. Again the easiest way to illustrate this is with some more simple sums (apologies for those adverse to maths!), where the area of a circle is half the diameter2 x π. (π = 3.14)
3 foot diameter = 1.5 x 1.5 x 3.14 = 7ft2
6 foot diameter = 3 x 3 x 3.14 = 28ft2
12 foot diameter = 6 x 6 x 3.14 = 113ft2
Taking into account these two factors, you can see the maximum electricity you can produce. Remember that wind speed is free (although towers obviously cost more money the higher they are), while investing in bigger and bigger turbines gets more expensive.
What size turbine should you be looking at?
The size of your wind turbine is therefore determined by the amount of electricity you are looking to produce (but potentially constrained by windspeed and space), and secondly the amount of cash you have available.
Unlike solar photovoltaic cells that can be added to fairly easily as additional funds become available, the turbine blades would need to be replaced, and potentially the generator changed if you want to produce more power in the future. Home scale generators normally are between 8 and 25 feet in diameter (so a swept area of between 50 – 500 feet2). If you have an average wind speed of 10 mph, these could produce between 1,000 and 15,000 kWh. An average house uses approximately 4,800 kWh per year, so a 25 foot diameter turbine is going to produce a serious excess of power to sell back to the grid, or power more than one house.
Final thoughts on wind turbines
Planning permission
Contact your local council to ask about planning permission if you’re considering installing a wind turbine. The majority of local authorities are keen to encourage the installation of renewable energy systems. However it is a good idea to consult your neighbours before investing time and money into the planning phase, to allow them to voice any objections.
Average wind speed
Before you even consider investing in a wind turbine, you need to check your average wind speed. The Carbon Trust have created a tool that allows you to estimate the wind yield at your home location. You are looking for an average wind speed in excess of 5m/s. By providing simple information regarding your location and type of turbine, the tool will give you average wind speed and potential energy output.
Subsidies
In the UK, as a wind turbine owner you can benefit from the Feed-in tariffs. There are different allowances depending on the power output of your equipment. Wind turbines above 5MW are classified as commercial and alternatively benefit from the Renewable Obligation Certificates. The Feed-in tariffs basically provide you with a source of income for every kWh of electricity you produce. This is independent from any excess electricity you sell back to the grid, which you further benefit from in the form of the export tariff. This can really help a wind turbine become an economically viable system to put into your house.
Air source heat pumps convert heat energy from the air to provide heat and hot water for dwellings. They run on electricity, but are incredibly efficient (in some cases 300% or more), which means that for every one unit of electricity used, they produce 3 units of useful heat.
If you compare that to a brand new boiler which is 90% efficient (1 unit of gas produces 0.9 units of useful heat), you can quickly see why these systems are so popular. In fact, if you don’t have access to mains gas, heat pumps are definitely the way to go to fulfil your heating and hot water requirements – provided you have a well insulated home, which is discussed later.
Better still, if you decide to install an air source heat pump in your home, you can also benefit from the Renewable Heat Incentive, which pays you for each unit of hot water water you produce. In some cases, the funding will cover the cost of installing the heat pump, but it gets paid over 7 years on a quarterly basis, so you will still need to find the money upfront!
The air source heat pump needs to be located outside in the open air, and uses a fan to draw air into it. This air then flows over a heat exchanger, which contains a refrigerant liquid. An evaporator uses the latent heat from the air to heat the refrigerant liquid sufficiently until it boils and turns to a gas. This gas is then compressed by a compressor, which causes it to significantly increase in temperature. An additional heat exchanger removes the heat from the refrigerant (turning it back to a liquid), which can then be used as useful heat. There are two types of air source heat pump:
Air-to-water heat pumps
Air to water heat pumps are by far the most popular. These take heat from air outside the property and transfer this to water, which can be used for space heating or as hot water for washing within the house.
Air-to-air heat pumps
These remove latent heat from the air outside the property which is then simply fed into the home through fans. This type of heat pump cannot be used to produce hot water.
Since they include fans and compressors, air source heat pumps require electricity to operate, and bearing in mind the price of electricity is approximately 15p / kWh and gas is just 4p / kWh, on the face of it, you would expect heat pumps to be far more costly to run than gas boilers.
This is not the case though – since for every kW of electricity used to run them, they provide approximately 2.5-3.5kW of equivalent useful energy (depending on the model and the temperature of the external air). This makes running costs comparable to a traditional gas boiler.
The efficiency of air source heat pumps is measured by the Coefficient of Performance, which is simply how many units of useful energy produced from each unit of electricity are consumed to operate the system. For example, if at any moment the heat pump was producing 3kW of useful heat from each unit of electricity, the CoP would be 3.
The CoP varies throughout the year, with lower figures achieved during the colder months (meaning they are running less efficiently), since there is less ambient heat available to remove from the air. This makes comparing the efficiency of different heat pump systems very difficult, so we use what is known as the Seasonal Performance Factor to compare like for like performance of models. This is the annualised CoP, taking into account the different performance throughout the year.
Air source heat pumps don’t produce boiling water
The air source heat pump does not produce the sort of hot water temperature you would associate with a gas, LPG or oil-powered boiler. With a boiler, you would expect the hot water to be heated to about 850c, while a heat pump produces water to about 550c. Trying to increase the water temperature from a heat pump beyond this requires the compressor to work harder, meaning more electricity – this in turn reduces its efficiency or coefficient of performance.
As a result, it is very important to minimise heat loss from the property prior to installing a heat pump. This includes insulating the walls, loft and ideally the floor too. This means that even though the radiators won’t get as hot (using heat pumps), the house is still heated effectively and you are not straining the heat pump – which is expensive.
When installing a heat pump, you may be required to increase the size of some of the radiators in certain rooms too. This is simply because the heat demand will not be met with the existing-sized radiators. If this is the case, you can expect to pay about £200 – £300 for each radiator that needs to be replaced (providing the pipework running to the existing radiator can be reused).
Air source heat pumps and the Renewable Heat Incentive
Heat pumps are part of the Renewable Heat Incentive scheme recently launched by the Government. It means that, if you install a renewable heating technology, you can get paid for each unit of heat you generate. RHI payment rates depend on lots of things, but you can see detailed information here.
Occasionally, but not often, the RHI payments will be enough to cover the cost of the initial outlay of the air source heat pump. Air source heat pumps normally cost between £7,000 – £10,000.In a standard property you can expect to receive a total of about £2-5,000. RHI payments are paid quarterly over 7 years, so you will need to stump up the money up front.
Things to consider before investing in an air source heat pump
Placement of air source heat pump – An air source heat pump requires plenty of space, either to mount on an external wall or to be placed on the ground. The unit needs good air flow, and foreign objects such as boxes, containers etc need to be kept well away.
Cost of air source heat pump system vs system that is being replaced – Purchasing an air source heat pump on top of an existing heating system will prove to be an expensive option; therefore we recommend considering this when replacing an old electric or old oil-fuelled system. However an electric heater will convert 1kW of electrical energy to 1kW of heat energy and an air source heat pump will convert 1kW of electrical energy into 3.5kW (almost 4kW) of heat energy.
Insulation – The air source heat pump emits low temperatures but on a consistent basis. To maximise effectiveness, ensure that your home is suitably energy efficient by installing wall insulation (either cavity or solid wall) and draught proofing. These are low cost measures that will make a big difference to your utility bills, therefore it is worth investing in them prior to replacing your heating system with an air source heat pump.
Noise of air source heat pump – An air source heat pump does make some noise when operating, as both a fan and a compressor will be in motion. The noise is approximately 40-60 decibels (depending on the system) from a distance of one metre away. So please ensure if you invest in an air source heat pump, it is not placed directly outside your bedroom window!
We have filmed an air source heat pump in motion, (don’t say we don’t treat you) so you can see for yourself how they operate.
Efficiency of air source heat pumps – Despite air source heat pumps being able to operate at -250C, the efficiency decreases as the outside temperature drops; therefore if you live in a particularly cold place, you may well need to supplement the heat pump with an additional boiler to get the hot water you require. Try a CHP boiler if you can invest additional resources. The problem may be getting the two systems to work successfully in tandem; therefore a traditional boiler could be your only option.
Local authority regulation for air source heat pump installation
Generally there are fewer restrictions from local authorities in England and Scotland when looking to install an air source heat pump (noise being the main consideration), but please check with your council and installer before proceeding. In Wales and Northern Ireland, an air source heat pump installation requires planning permission.
Benefits
As the heat pump provides the hot water for heating, there are large savings to be made on fuel bills – typically an air source heat pump can deliver up to 3.5kW of useful energy for every 1kW of energy needed to run it.
An air source heat pump can still take heat out of the air in temperatures as low as minus 20 degrees.
By installing an air source heat pump you can reduce your carbon emissions from your homes heating by 50%.
Air source heat pumps are potential income sources, if households qualify for the government Renewable Heat Incentive (RHI) scheme. The RHI is payable on an MCS ASHP installation, carried out by an MCS Accredited Installer and the payment is backdated to include any installation installed after 15th July 2009.
Limitations
Air source heat pumps can be fairly noisy, approximately 40 – 65 decibels at a distance of 1m away (however this varies by manufacturer). Look at our video below for some first hand experience.
The equipment needs to sit outside the house, so may not be suitable if there is not sufficient space.
Air source heat pumps become less efficient at extracting heat from the air when the external temperature is low, so the amount of usable useful heat they produce is less.
Cost
An air source heat pump will cost from about £7,000 to install.
Installing heat pumps
Are you thinking about getting a heat pump? We have scoured the country for the best tradespeople, so that we can make sure we only recommend those we really trust.
If you would like us to find you a local heat pump installer, just fill in the form below and we will be in touch shortly!
This website uses cookies. By continuing to use our website you agree to our Data Protection Policy, which you can view here.OK
Privacy & Cookies Policy
Privacy Overview
This website uses cookies to improve your experience while you navigate through the website. Out of these, the cookies that are categorized as necessary are stored on your browser as they are essential for the working of basic functionalities of the website. We also use third-party cookies that help us analyze and understand how you use this website. These cookies will be stored in your browser only with your consent. You also have the option to opt-out of these cookies. But opting out of some of these cookies may affect your browsing experience.
Necessary cookies are absolutely essential for the website to function properly. This category only includes cookies that ensures basic functionalities and security features of the website. These cookies do not store any personal information.
Any cookies that may not be particularly necessary for the website to function and is used specifically to collect user personal data via analytics, ads, other embedded contents are termed as non-necessary cookies. It is mandatory to procure user consent prior to running these cookies on your website.