Positioning the infrared heating panels is key
If you have purchased – or are about to purchase – infrared heaters, then understanding where to put them is important to get the best results.
Infrared heating panels don’t operate like conventional convection heating, which warms air. Instead the panels emit far-infrared radiation, which travels unimpeded until it hits a solid object, which will in turn absorb the infrared and then heat up. Do not mistake infrared with harmful UV light, which is on the other side of the light spectrum – infrared is 100% safe.
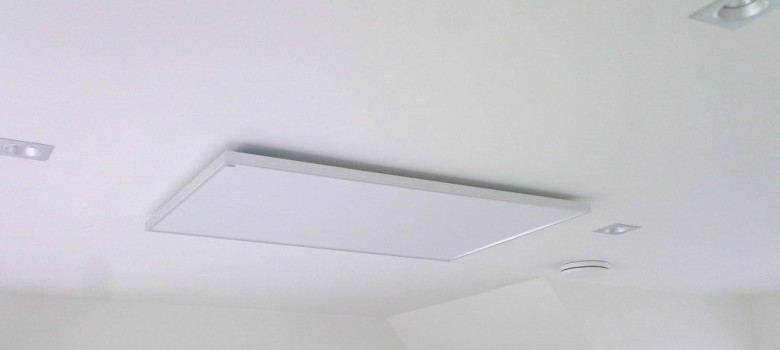
The main thing to remember is that if the infrared radiation is impeded before it reaches its destination, then the object will not warm up. As a result, to get the most out of the heating panel it should ideally be fitted in the centre of the room. Or if you have a larger area and are getting a number of panels, then they should be evenly distributed in that space. The panels should be above seating areas so as not to be shadowed, which is why positioning on the ceilings is by far the most popular.

When the panel is positioned on the wall or ceiling, the infrared radiation will travel at 45o angles in all directions. If they are in a corner and too close to a wall other than the one they are attached to, then you will be warming a small concentrated area; this is not ideal since you will be wasting potentially useful heat. For this reason it is paramount that you don’t position the panels too close to the walls: rather ‘centre’ them as much as possible.
300Watt and 350Watt panels should be at least 0.5m (1.5 feet) or more from the floor – and the larger panels (basically anything over 600Watts) should be at least 1.5m (5 feet) away. When the panels are on they will beam the infrared radiation up to 3m(10 feet). If you have higher ceilings, please give us a ring and we can discuss appropriate models to use in this instance.
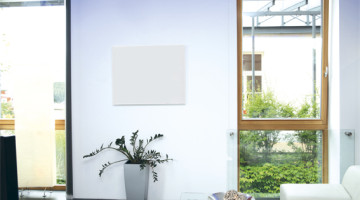
If you install the panels on the walls, then you should try and position them as high as possible. Positioning them too low will almost certainly result in furniture blocking the infrared radiation, which will limit their heating.
For the smaller panels we recommend having them at least 1.0m (over 3 feet) and for the bigger panels this to be positioned 2.0m (6 to 7 feet) high. Like your radiators, the surface temperature of the panels gets to about 80oc, so do not touch or have objects too close to them.
The installation process
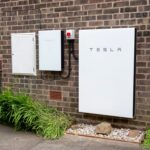
All our panels come with a UK plug, so you can simply plug in and go, but we recommend hardwiring them into an electric circuit where possible. This allows you to use a proper switch (like a light switch) to turn them on. It also means you can install a smart heating system for optimal efficiency. We strongly recommend a professional installation and having the panels ‘hard wired’ into your electrical system by a Part P-qualified electrician.
In terms of the installations themselves we anticipate that most customers will seek the advice and expertise of a Part P qualified electrician who will hardwire the units to a thermostat and the property circuit board. You can find out whether your electrician is Part P qualified by looking up their details on the Competent Person Register.
The infrared panels will invariably come with a frame on the back, which allows you to easily attach them to the wall. This does mean that the panels will sit about 1-2 cm off the wall.
Although the panels radiate heat from their front surface (which will get warm), the reflector technology will ensure that there is no heat being emitted out of the back. The fact they are sitting away from the wall also helps in this respect.
Most of the panels that are sold should be supplied with screws and fixings to get the panels attached to the wall or roof. We do recommend getting an electrician to fix them in position though, and hardwire them into your mains electricity rather than simply run through an existing plug socket.
When the panels are plugged in, they take about 90 seconds to get up to full heat intensity and since you don’t need to wait for the air to get warm, you should feel their effect very quickly. To stop the panels from overheating, they will modulate and come on and off as required; however we recommend having them installed with some form of thermostatic control to ensure the room doesn’t get too warm. The most basic option is a timer plug adapter, however we recommend going for a proper thermostat and programmer unit if you have the funds available.
The installation is carried out as follows:
- Mark and drill the four holes, insert wall plugs and screws with eye bolts supplied, these ensure about 0.5cm spacing from the ceiling;
- Tighten screws and insert the screws into the mounting profile on the reverse of panel.
Then when connecting to the wireless thermostat:
- Connect a permanent 240 volt mains supply to terminals L and N in the receiver,
- Connect the infrared panel neutral (blue) wire to the neutral (N) terminal in the receiver,
- Connect the infrared panel live (brown) wire to the normally open (NO) terminal in the receiver,
- Connect a permanent link wire between live (L) and common (C) terminals in the receiver
This will ensure that when the receiver switches the power on it will reach the panel. Please note – switch contacts alone are volt-free and will not therefore supply power directly to the panel.
Installing infrared panels in the bathroom
Good infrared panels are either IP45 or IP54 rated, which means they can also be used in bathrooms. It is worth bearing in mind that building regulations state that any electrical bathroom installations should be undertaken by a Part P qualified electrician, who in turn will complete a BS7671 installation certificate.
The pull switch or programmer needs to sit outside the bathroom. In terms of placement, the unit needs to be at least 0.6m (2 feet) from a shower or a bath. In addition if you are placing it above a washbasin, please ensure it is at least 13cm away. Again, your electrician should be able to advise and action as appropriate.
Benefits
- Having your panels installed by a Part P qualified electrician will ensure that any potential risks are minimised.
- Infrared rays are safe! Do not confuse them with UV, which are not.
- Fit and forget technology, very little maintenance required.
Limitations
- ‘Shadowing’ – if there are objects inhibiting the movement of infrared rays across the room they may not work as effectively.
- The thermal comfort will also depend on how well insulated your property is. The poorer the insulation, the more the panels have to work and the less comfortable you may feel as the property is naturally draughty.
Installing infrared heating
Are you thinking about installing infrared heating in your home? We have scoured the country for the best tradespeople, so that we can make sure we only recommend those we really trust.
If you would like us to find you a local installer to help install infrared heating in your home, just fill in the form below and we will be in touch shortly!


I need extra heating by my dining room table. I cant get a panel on the ceiling – only on the wall (a shared terraced house wall).
Who will the heating be felt by? Only people with their back to it – or guests in the other side of the kitchen table?
Thanks
RH
I’m very confused by your article. If I’m hanging a panel on the wall, it is recommended that I hang it at least one and a half feet from that wall???
How do I do this? What kind of brackets will let me do this.
Hi Tom,
I think Nick meant from the ceiling. Sorry – he was obviously having an off day! Amended now!
Can you please let me know which side does the cable come out of your infrared panels as we need to know which side to position the power supply. Also how long are the cables?
Many thanks.
Panos
Hi Can I put one of your panels on the wall just a few inches from a wooden floor. I know it will not be as effective but is it safe and would it damage the flooring.
Hi Sue,
Yes you can – it is not ideal, but it is not a problem! If you go to TheEcoStore, you will be able to buy feet for the panels.
Hi Roger.
Panels have insulation inside so that the front operates at a higher temperature than the rear resulting in the majority of the heating being projected forward (into your dining room). One measure of quality and efficiency in a panel is the effectiveness of this insulation and thus the temperature difference between the front and the rear.
Hello,
i am thinking about byuing an infrared panel for my house, A question though do you need or what kind of certificates or licenses these panels needed to be used safely? or it is just a manufacturers guaranty?
Thank you in advance.
Hello,
I would like to know more about your SOlutions for rooms with higher ceilings.
Room size – APrrox 12m2 MAX
ceiling height – 4.5m
What Size panel would be appropriate?
Thanks
Regards,
Krista
Hi Krista,
I will get one of the team to get in touch with you directly to best advise.
Hi, we are working on a large open plan reception with high ceilings we have VRF heat pumps which nicely warm the area in fact we can achieve max 29/30 centigrade, however cashiers and receptionist get cold behind their respective counters , is there an infrared panel solution you can offer.
One company I saw sells these panels in glass to fit in the window. Do you do these ? And do they work?
Can an outside infrared heater be attached to a wooden weather board wall or is there a risk of fire. Further how far below a blind or awning does it have to be, again to avoid risk of fire.
Hi Gordon,
Keep the heater 30cm away from the awning. As long as you have a bracket to allow some ventilation around the heater then mounting on the weather board isn’t a problem.
You would be amazed at the amount of electricity you save when installing infrared heating. Kris.
I want a really simple solution to warm what is a small but cold bathroom. These look great, but it’s not always clear how the control and wiring is done. I want to know if the mirror thermostat receiver can be installed in a “safe” place in the bathroom to limit chasing wires all around the place and ruining walls, i.e could it go above the mirror or on the ceiling? Then could you have a wireless thermostat which doesn’t need to be hardwired to control the mirror off and on? Herschel seem to do a mirror like that.
I am trying to send message through this page but send button is not doing anything.
I live in an apartment without any Gas connection hence using electric heater. We are not happy with current electric heating system since there is no way to control it remotely or on schedule and it takes long time to heat the room.
Hi Vikas,
Sometimes it can be a little tricky to see the confirmation of our forms going through, but don’t worry, I check our system and you’re on there! Someone will be in touch very shortly.
Thanks,
Harriet
Can the small panel be installed on a boat?
Arethe panels any good for a boat.
Has anyone got a few moments to step by step lead me through how to clear the timer/schedule for the Klarstein Wonderwall?
The manual is useless.
I somehow see a clock and sun symbol and can’t get it to delete. I want to use the time but can’t understand the manual so now I just want to clear whatever I’ve mis-programmed and turn it on and off when I want it to work.
If anyone knows of one that is easier to use I am in the market for another for yet another room. So far I have 2 Klarsteins but they are not high end looking and the attached thermostat is clunky looking.
Much appreciate any guidance here. The company just hands me the manual time and time again without any specific help and I’ve looked everywhere for videos but can’t find any that explain how to use the thermostat. Thanks so much!
Hi
Are the panels listed as ceiling mount the the same as wall and its just different fixings,
I’m thinking of putting an infrared heater on the ceiling of our garden office we’re having built which is 3m x 3m. and has a ceiling height of 2.1m. It there any issue with height? I would be sat in the room at a desk and not sure how the heaters work (i.e. silly question but will my head feel hot under it)
Hi
We have a barn type oak framed extension 7m long 5m wide with a gable end extending to 5m at the apex. The side walls are 2.5m high. There is a mezzanine section 1.8m x 2.5m which is enclosed on the ground floor & open above. The building is fully insulated. The gable end is entirely double glazed & is south facing. We are looking for a suitable infra red heating solution & are hoping you can help & advise
Regards
Hi, Can I wire an infrared ceiling heater to the lighting ring?