We are expecting the new GDHIF grant to go live next week and although there has been no official announcement yet, we just want everyone to be prepared for when it does. We are expecting the announcement at ECOBuild so please keep you ear to the ground to ensure you know the day it is going live.
Obviously you can also visit us here at TheGreenAge every day to check – we will release details of the scheme as soon as we have confirmation.
As a reminder, the GDHIF grant is a non-means tested grant that can be used to increase the energy efficiency of homes here in London and across the rest of England and Wales. The scheme has proved to be extremely popular so far in the two short periods it has been live.
Phase 1 of GDHIF lasted 6 weeks when it was launched in the summer of 2014 and then Phase 2 of GDHIF lasted under 2 days when it when live in December!
We want to use this as a simple heads up that you need to be ready the day the scheme goes live otherwise the chances are you will miss out on you voucher (which is then redeemed as a grant)!
So what exactly do you need to apply for the voucher? Well, when phase 2 of GDHIF was released, they made it a requirement that you uploaded a quote for the works as well as the Green Deal / EPC, which caught many people out!
Applying for the Solid Wall Insulation GDHIF Voucher
In order to get your hands on a GDHIF voucher for solid wall insulation, you will need the following.
A Green Deal report or an EPC dated within the last two years – these will need to have on them, solid wall insulation as a recommendation
A quote for the proposed works from a company that is part of the GDHIF scheme.
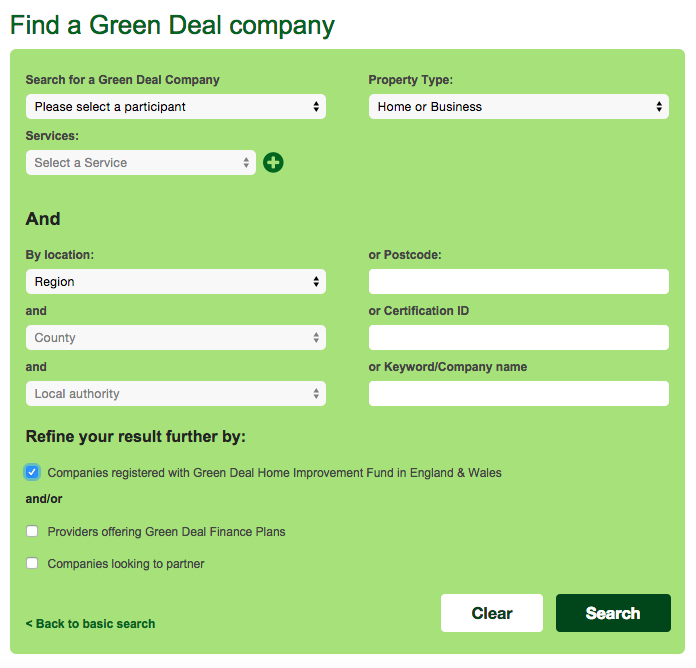
You can find out if the company that you have used to quote for the works is part of the scheme by clicking here and entering the company name.
In the screen shot above, you will be able to see the ‘Companies registered with Green Deal Home Improvement Fund in England and Wales’ box is ticked.
Run the search on the company with this box ticked – if they don’t appear, they are not part of the GDHIF scheme and you will miss out on the voucher!
Applying for the 2 measures
The other side of the GDHIF offer relates to other energy saving measures – it is completely independent from the solid wall offer.
The Government are keen for people to install multiple energy saving improvements (i.e. they don’t simply want to provide a grant to help people cover the cost of their new boiler).
The offer involves taking 2 measures from a list, but the process for getting the voucher is still broadly the same.
Applying for the GDHIF Voucher for other energy saving measures
In order to get your hands on a £1000 GDHIF voucher for the 2 measures, you will need the following.
A Green Deal report or an EPC dated within the last two years – these will need to have on them, the recommended improvements you are looking to install. So if you are looking for a measure like insulating doors, which don’t show up on an EPC, you will need to have a Green Deal Report recommending them instead.
A quote for the proposed works from a company that is part of the GDHIF scheme and therefore will allow you to get the voucher. If you are using two companies to do the works, you will need to upload both quotes in order to get the voucher.
Our advice – be prepared!
As we have mentioned, we are expecting phase 3 of GDHIF to get announced next week. There is a chance they will put in new requirements as part of the scheme, but we are hopeful they won’t!
If you require a Green Deal Report please click here
Think we missed something? Do you have a different opinion?
Comment below to get your voice heard…
Should I install wet or dry underfloor heating?
February 25, 2015
Underfloor heating – the answer for comfort and savings?
Underfloor heating can be a great way to heat your home – it looks good, it saves space, it is usually cheaper to run and it means no ugly radiators! One decision you need to make however is whether to go for a wet or dry system. In other words, do you want an electric underfloor heating system or one with plumbing and pipes?
There isn’t a one-size-fits-all answer. So lets take you through some of the pros and cons of each type of heating:
Wet systems – Pros
Extremely efficient to run and works at low temperatures.
Ideal for use alongside heat pumps to get amazing efficiency.
Wet systems – Cons
Initial costs are very high
The savings in comparison to radiators do not make it cost effective.
Pipes are difficult to reach if there are any issues.
Electric systems – Pros
Relatively inexpensive to install
No pipework – easy installation.
Easily installed on upper floors
Electric Systems – Cons
Very expensive to run
Placement of furniture and heavy items needs to be done carefully.
So as you can see there are pros and cons for each underfloor heating method and it is often not just a simple choice.
This will depend a little on things like the type of floor you have – solid or suspended, but it is safe to say that a wet system is far more expensive. We generally see quotes at or about £100 per square metre to install a wet underfloor system. That can really add up over say a 50 square metre property!
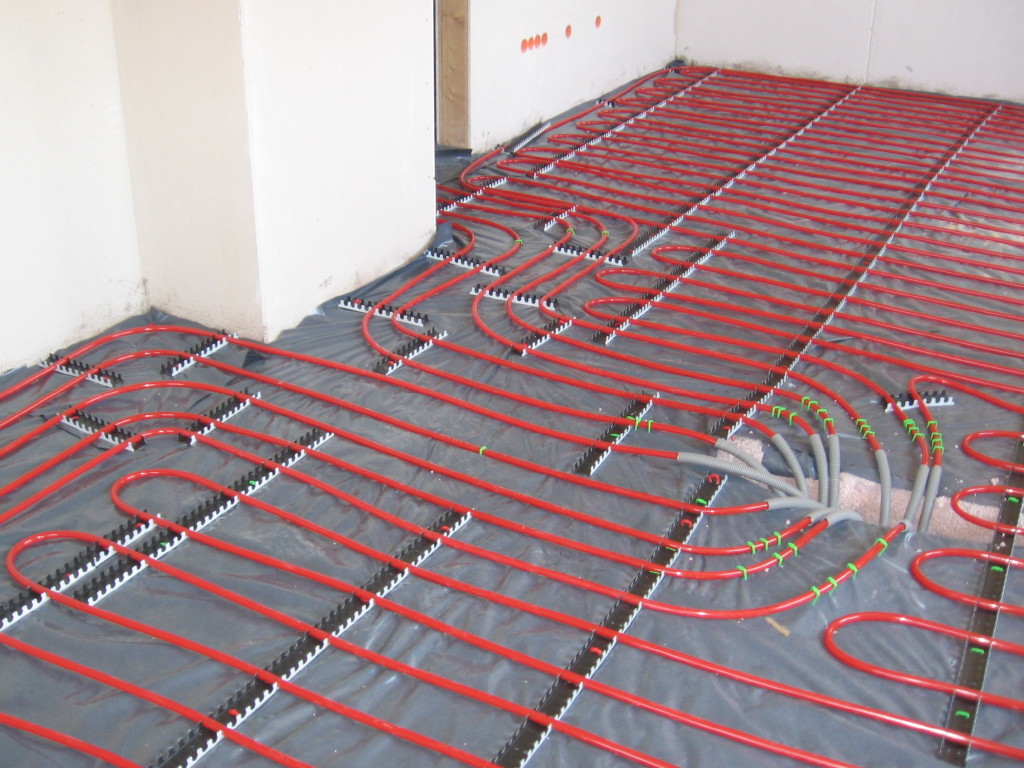
Underfloor heating before screed is applied.
Electric underfloor heating costs much less, with some systems as cheap as £20 per square metre. So for some it is a very attractive option. Running costs are likely to be much higher however, as the cost of electricity per unit is much higher than gas or a heat pump.
Should you get wet or dry underfloor heating?
This really does depend on your circumstances. If you have cheap electricity, with a solar or wind system, then electric underfloor heating may be competitive as an option. It certainly is cheap to install. If you are on the gas grid or able to go for a heat pump, then wet underfloor heating is a clear winner, especially for long term payback.
Electric heating can still be useful as an additional heating system to keep the bathroom floor warm for example, but it really shouldn’t be used as a main heating system unless you fall into a pretty specific category.
How do I get a gas supply in my property?
February 23, 2015
As we have established previously, gas is far cheaper per unit of energy than electricity. For many people without a gas supply, electricity is their only option, but have you tried to see how much a new gas connection would cost? Is it financially viable for your home?
How much does a gas supply cost?
This really does vary depending on your property, but there are a few important things that you need to consider which will contribute significantly towards the cost of the connection:
Has the property had gas in the past and been disconnected? If so, it is often fairly simple to reconnect you and the cost is likely to be a few hundred pounds.
How close is the nearest gas line? If your neighbours or others on the street have gas, then chances are that there is a gas supply right on your doorstep and it just needs a pipe running a few metres to your house. The cost in this instance should be under a thousand pounds.
Are you in a rural part of the country? If you are outside towns or cities it is quite likely that a gas supply quite hard to obtain to your property. In this case costs could spiral into £1000s just to get connected, making it quite an expensive option.
Are you in a flat above the ground floor? Flats tend to have complications as the pipe will need to run through other people’s property. High rise properties also suffer with issues of gas pressure. These types of properties tend to cost thousands of pounds to connect.
The National Grid (one of the Gas Distribution Network companies) give a list of the various prerequisites that need to be met for what they call a ‘standard charge’ installation. You can find them in the connection document here. If your property meets all of those criteria, chances are the cost of your gas line will be in the order of hundreds rather than thousands of pounds.
Who installs your gas supply?
To supply gas to a property it must first be connected to the gas grid. If the property is not connected to a gas grid then a Gas Distribution Network (GDN or GT) company can provide a connection from the nearest supply to the gas meter of your property.
It is the responsibility of GDNs companies such as National Grid, Northern Gas Networks, Southern Gas Networks and Wales & West Utilities to maintain these networks and also offer options for new customers to connect should they wish to. To find out which GT can supply your property with a new connection please visit the following OFGEM document by clicking here.
You can speak to your gas supply company (retailer) such as British Gas, E.ON, SSE, EDF, etc in the first instance on what is the best way to proceed with getting connected to the gas grid. The gas supplier will in most cases advise for you to get a quote from the GDN, an Independent Gas Transporter (IGT) or a Utility Infrastructure Provider (UIP).
To ensure the market is as competitive as possible, OFGEM have designed a framework that also allows other organisations such as IGTs and UIPs to also provide this connection service in certain instances.
Utility Infrastructure providers tend to procure for connections to the gas grid on new housing developments or new commercial premises. However according to the OFGEM guidelines you can ask one of these companies to procure a connection to your property.
For example, if you live in a community where there are a number of existing properties that do not have a connection to a gas supply, then the term ‘infills’ is usually applied to the gas connection project. These are often remote communities situated some distance from a relevant gas main.
If a number of local residents gather together and request that an infill project is undertaken, the GT will determine the connection charge at the beginning of the scheme and apply a similar charge to all requests for a connection to the main for a maximum period of twenty years.
These charging arrangements are provided for under the Gas (Connection Charges) Regulations, see here for more details.
Therefore if you have recently moved into a remote community and the neighbours are connected to the gas network but your property is not, then according to the regulations, as long as you find out what the infill project rates were, then those same rates can be applied to connect your property – even if the original project was nearly 20 years ago. This could therefore save you quite a lot of money.
Is it worth getting a gas supply?
If you have an idea of the cost, you need to decide if it is going to be worth it long term. Obviously in the short term the cost is going to be significant, as not only will you need to pay for a gas connection, you also will need to pay for the installation of a boiler, radiators and pipework. This involves installing pipework from the meter to the boiler and additional pipework to provide the heating via radiators or underfloor heating.
To get an idea of the savings involved, you can take a look at your EPC or Green Deal Report and check the savings that are suggested by switching to gas heating. Depending on the size of the property you could see savings ranging from £200-£800 a year – it really can be that different.
Compare this to the cost of installing a boiler and making a gas connection. This cost can range from a modest heating system in a ground floor flat starting around £4,000, to a 4 bed semi for as much as £8,000.
As you can see, the big up-front cost won’t pay back over night, but a 10-15 year payback is actually pretty good when you compare with other money saving improvements like double glazing. And once you’ve paid back that cost, you are going to be saving a huge amount on your energy bills.
Installing a new boiler
Are you thinking about getting a new boiler? We have scoured the country for the best tradespeople, so that we can make sure we only recommend those we really trust.
If you would like us to find you a local installer to install a new boiler in your home, just fill in the form below and we will be in touch shortly!
What to expect from GDHIF in 2015
February 20, 2015
The Green Deal Home Improvement Fund has been a huge success, with millions being spent on energy saving improvements, particularly solid wall insulation. In the run up to the general election, you can expect some more funding to be released from the GDHIF pot.
What happened to GDHIF Phase 2 in December?
Back in December there was a pot of £30 million released, with 80% allocated for solid wall insulation, and the rest for other measures. The solid wall money went very quickly, and applications were closed after 1 day. The smaller pot of cash for other measures has also been successful, but the applications are still open as of now, so there is still money available.
How has the scheme changed?
The first phase of GDHIF offered up to £6,000 of grant money for solid wall insulation, with a potential contribution of 75% of the total cost of the work. In phase 2 this was reduced to £4,000 and 66%. This is still very generous in the grand scheme of things – and a way to make this affordable for the average person.
What does the scheme look like now?
You can currently get £1,000 for taking out 2 measures from a list of approved installers. This includes: double glazing, secondary glazing, cavity wall insulation, boilers, roof room insulation, floor insulation and waste water heat recovery.
There is a bonus of £500 for applicants who have bought their property in the last 12 months. Plus a £100 refund on the cost of the initial Green Deal Assessment, if you have paid for it.
So you could be looking at £1,600 of grant money towards 2 measures for your home. Not to be sniffed at! The only catch is that many of the measures on the list are pricey.
The solid wall insulation funding is currently not available, but there is more funding becoming available at the end of February / beginning of March. The exact amount of funding and the pot available has not yet been announced, but we expect the funding levels to be similar to the last batch of funding in December.
How to get your GDHIF voucher?
You need a recent EPC or Green Deal Assessment carried out on your property and a suitable quote before you can apply for a voucher, and this can take a week or so to arrange, carry out the survey, and lodge the report and get it back to you. Given the short amount of time the solid wall grant money is likely to be available for, we thoroughly recommend getting your assessment and quote done as soon as possible, prior to the frantic few days the scheme opens for. Remember, many other people have the same idea as you, so assessor companies like ourselves are extremely busy during the GDHIF voucher period. Make sure you don’t lose out and get your assessment and quote ASAP.
Think we missed something? Do you have a different opinion?
Comment below to get your voice heard…
Solar feed in tariff is to decrease in April
February 18, 2015
UPDATE: The Feed-In Tariff is now closed for new applications. To find out about the new scheme designed to replace it, click here.
If you are familiar with some of the content on TheGreenAge, you will know that the feed in tariff is a government backed payment made to properties for producing their own electricity. If you have a renewable electricity generating system installed you get a guaranteed payment for 20 years (provided the install was carried out by a MCS certified installer), fixed from the point you install and apply for it.
This is the time of year when the feed in tariff is reviewed and usually reduced, to keep the rate of return on a solar PV system in line with the falling prices of solar systems available in the market. You can now buy a 4 kW system for around £6,000 if you shop around; this means a typical return on investment of just 8 years or so, whereas when the tariff first started, prices of systems were nigh on double that figure, so the payback took a little longer (although the FIT payments were considerably higher!)
You will not be surprised to hear then that the Government have scheduled a FIT drop for the end of March – so your quarterly payment will drop.
What does the rate cut in the Feed-in tariff actually mean?
The reduction is relatively small, with the current rate of 13.88p/kwh being reduced to 13.39p/kwh. This is fairly similar to the other reductions that the market has seen over the last few years, and it certainly won’t stop people from getting solar installed. What it does do is create a big drive to install systems before the rate cut, and installers will be very busy in the next few months getting systems installed before the rates reduce.
[product_box id=”11392″][/product_box]
Whilst they see it as a good marketing opportunity, the reduction itself is small at around 3 per cent. So while it is better to plan your installation for March rather than April, you shouldn’t be rushed in to something with the thought you might lose out. That small percentage reduction equates to something like £10 a year for a typical system, so it’s not a reason to change your solar plans.
How much can I expect from the feed in tariff?
With the new tariff rates you can expect the following amounts in your first year:
Kwh per year
Annual Feed in Tariff (Up to April 2015)
Annual Feed in Tariff (April 2015)
3,000kW (Large Domestic System)
£416.40
£401.70
2,000kW (Medium Domestic System)
£277.50
£267.80
1,000kW (Small Domestic System)
£138.80
£133.90
What does the tariff change mean for payback?
This small change really means very little for the payback time on a system. You are still looking at a payback period of around 8-10 years, depending on the size and price of your system.
India’s Renewable Boom
February 13, 2015
Like many economically developed countries in the modern world, India is highly dependent on its use of non-renewable energy. The fossil fuel that India consumes the most of is coal. The country possesses a large abundance of coal deposits which are mostly found on the east coast, so they don’t need to import as much. The majority of India’s power stations burn coal to generate electricity – the energy generated in these plants accounts for over half of their current energy demand. Carbon dioxide emissions from coal-firing plants has become a serious problem for the country; coupled with large densities of vehicles in urban areas that also emit their own greenhouse gasses. As a result India’s government has been taking steps to reduce environmental damage and health problems.
Recently India’s power and energy minister Piyush Goyal has highlighted the need to combat air pollution by dedicating funds and research into renewable energy projects. In this blog we will focus on India’s push for sustainability in the area of sustainable power which is improving the quality of life for their country.
Solar energy
With many clear sunny days all year round the potential to generate solar energy is huge. This energy reaches its most intense points in India’s many desert areas in the North West regions of the country. This is where the Gujarat solar park is located. Existing projects similar to this are being funding by foreign investors to increase India’s output of clean energy. Solar panels can be imported at low cost from nearby Chinese traders and are relatively easy to install. Goyal recently put forward his proposal to introduce a ‘Grid Connected Rooftop and Small Solar Power Plants Programme’ to install a large array of solar panels in India’s many domestic and industrial regions. An ambitious target has been set to increase India’s capacity for solar energy by 33 times its current amount. This increase in capacity would require substantial investment.
The funding for India’s energy push must also be sustainable – a model not solely based on grants and subsidiaries. India allows 100% direct access from foreign investors into their renewable energy market, encouraging partnerships into combating the global issue of climate change. Over the last couple of weeks Barack Obama pledged to assist in tackling India’s air pollution problem by agreeing a $1-billion loan to deal into the solar energy market. Certainly a step in the right direction to reduce dependency on fossil fuels – the leading contributor to greenhouse gasses.
Improving quality of life
These announcements triggered a positive reception, especially from poverty stricken families who live near power stations. Lignite or ‘brown coal’, the most abundant type of coal in India produces a very high volume of ash when burnt. The ash is bad news because it contaminates water supplies for poor families who have very little to drink. The ash has also been proven to cause cancer of the skin and damage the nervous system when inhaled.
This is an unfortunate example of life in the modern age, it affects many people living on the breadline around the world. Solar energy and wind power has been improving the quality of life for Indian families who do not have access to electricity. A combined initiative that does not require government grants. Saving on needless electricity costs is crucial for those living on a tiny stream of income, a flat purchase for a solar panel is a massive saving over time on energy bills in homes that only require a small amount of electricity. Wind power has been achieving this goal too, combined with solar power it’s India’s aim to electrify all of the poorer south-western regions of the country.
Karnataka is an example of one of India’s poverty stricken states. The wind blows very strongly here and there are a couple of ways to harness this natural form of energy. Wind generators are a clean method of energy generation but the rotors can be a hazard for wildlife and people living near them. More importantly though it lessens the need for polluting fuels that cloud the atmosphere in these rural areas (diesel for example). As such the quality of life for residents will have increased with this simple change.
If we continue our dependency on fossil fuels without a backup plan, it is bad news for everyone, especially the world’s poor. It is important to follow India’s example by showing the initiative and desire to push into renewable energy markets to create better living and environmental conditions for our future generations.
Think we missed something? Do you have a different opinion?
Comment below to get your voice heard…
The Tado smart thermostat – TheGreenAge Review
February 11, 2015
As more and more aspects of my life are moving onto my phone I was beginning to get very frustrated with my ‘so called’ basic thermostat. Now when I say basic, I don’t mean a 20 year old malfunctioning dial on the wall that only works when you take a sledge hammer to it, but a full on wireless piece of kit that links seamlessly to my boiler. The programmer – while a bit annoying in the fact that the buttons aren’t terribly responsive – worked well and gave me the option to add regular time slots as well as a day by day setting. But still I was getting frustrated. This wasn’t enough for my ‘busy’ mid-twenties London lifestyle, where my plans frequently changed on a day-to-day basis.
Like anyone, I don’t like working late, however this wasn’t because of missing my favourite TV show or my dinner, it was because I knew I was pointlessly heating my house. It got to the stage where I was so paranoid that I once texted someone I knew on my street to go and turn my heating off – they weren’t best pleased! I thought that the time had come to replace this so called, modern wireless thermostat and programmer. So I took the plunge and went for the Tado. It’s been 2 weeks…and this is what I think:
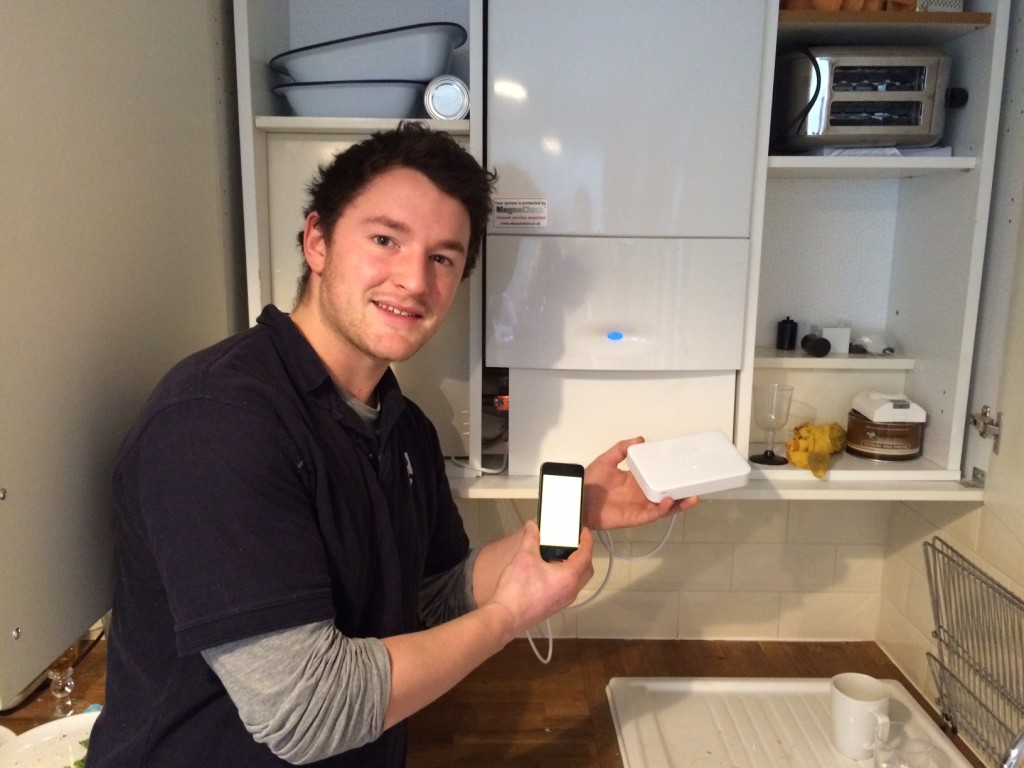
I was debating over paying the £50 or so quid for a professional installer, just to make sure that I didn’t electrocute myself. However, I thought that I couldn’t write a review on all aspects of the Tado unless I went for it myself, and I have to say I made the correct decision and wouldn’t recommend anyone getting a professional; unless you have the DIY skills of a donkey and fingers to match.
Following the step-by-step guide on the website makes it extremely easy, as you seamlessly go through everything from registering the devices (3 in total), to wiring the receiver into the boiler. My only slight problem at this stage was the fact that unlike the Nest, there are 3. There is a separate small box that has to be plugged into your WiFi router, as well as the receiver – which is wired to your boiler, and the thermostat – which is actually very discrete and can actually pass for a coaster (a mistake made by most of my visitors until I installed it on the wall). So with the install relatively stress free and taking around 45 minutes, it was on to testing it.
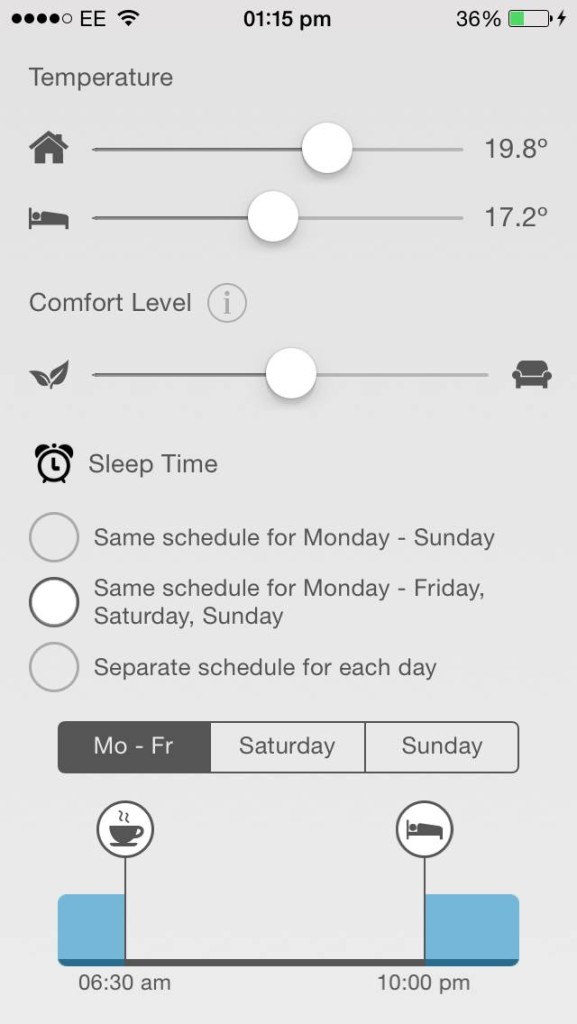
1: Off – or, as I like to call, frost protection mode, as it only turns the heating on when the thermostat reads 5 degrees.
2: Manual – which turns your smart phone (provided you have 3G or WiFi), or any computer linked to WiFi into a thermostatic controller. This means that you can turn your heating up from your bed if you find it gets a bit chilly in the night, or turn it down if you’re on the exercise bike or similar temperature raising activities. The important thing is that you can have 0.1 degree control over your temperature from any area that has 3G or WiFi.
3: Auto – the clever stuff! But basically allows you to set two different temperatures so splits your heating into up-and-about and in-bed mode. Auto mode also uses Geo-fencing so it can see where you are, to make sure that you don’t unnecessarily heat your home when you aren’t there.
So three fairly simple settings that should not only save you money but also increase comfort.
A look at some of the available settings on the Tado
After the couple of weeks, I’ve found myself switching between all three. Over the weekend, I love the auto mode as I have the temperature set to 20 throughout the day and 16 when I’m asleep and in bed. The Geo-fencing also cuts the heating off, if for some bizarre reason I wake up in a different city after a couple too many – hasn’t happened to me I have to say, but for some it may prove useful! Now importantly if your phone ends up in Scotland but you end up at home, all you have to do is logon to the Tado on your computer and set the temperature from there. The one problem I have found, hence why I often switch to the manual mode, is that even when I’m a few miles away it still thinks I’m popping to the shops as opposed to sitting in the office all day. The closer you get, the closer it gets to your set temperature; the further away, the colder it gets. The reason why I often switch from Auto mode to Manual is that Geofencing drains your battery fairly quickly, but the switch only takes a click and from there on in you can just set the temperature manually. Although the nice warm orange of the Auto mode is replaced by a grey…almost like Tado are telling you how boring you are switching away from their most intelligent mode. Turning it to off, or frost mode, gives me a nice picture of grass, trees and a sunset, congratulating me on improving the environment!
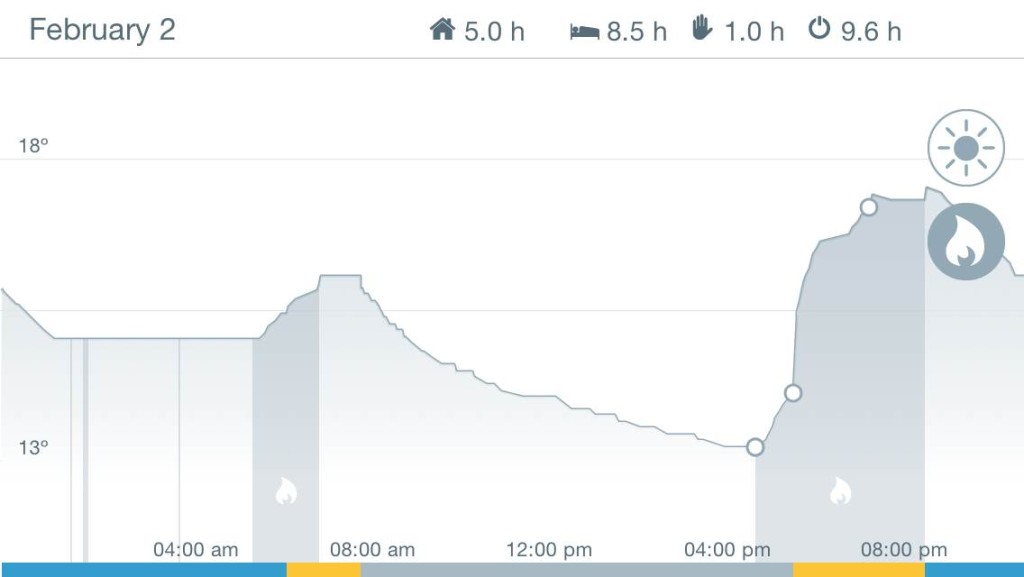
The other smart features are that it logs a continuous graph that shows the history of your room temperature and when the boiler has been on, which I find fascinating as you can see how quickly (or slowly) your house loses heat, and therefore how poorly insulated it is – No marks for me on this one as my cooling down gradient looks like Everest.
The Tado lets you see graphs of your heating over time and how quickly your home is losing heat.
Tado also tries to give you how much it thinks it has saved you since you have had it. For me…in just over 2 weeks it seems to think I have saved £0.77 per day… that is actually a decent chuck out of my heating bill for my 2 bed flat.
So for me, it is a gadget I can’t live without. I wouldn’t even mind if there were no savings, because in all honesty it is fun and my house is cosier and more inviting than ever.
Think we missed something? Do you have a different opinion?
Comment below to get your voice heard…
Do solar panels increase house value?
February 9, 2015
UPDATE: The Feed-In Tariff is now closed for new applications. To find out about the new scheme designed to replace it, click here.
You might be thinking about buying a house with solar PV already installed, or you might have solar PV on your roof and you are looking to sell your property.
In the article below we look at whether solar PV increases the value of the home and some of the factors at play.
Does solar PV really increase the value of my home?
Solar PV is still a very attractive option for many homeowners. Despite the fall in the feed-in tariff, the price of solar panels has dramatically fallen too, so you can now get a large 4kW solar PV system installed for just £6,000 – back in 2010 the same system may well of cost double that.
To be honest, provided you get it installed by a MCS installer and you can claim the FIT payments then the payback is just 8 years and then you will receive a return of £800 (based on a 3.5kW system) for another 12 years after that (so 20 years in total). So from a pure investment point of view – the solar PV is surely a shrewd one.
Effect of the feed-in tariff on value of your home
One thing that people don’t tend to take into account is the effect of solar PV on the value of their property. Now the feed-in tariff payments go to the resident of the home (or the investment company when you consider the solar rent a roof schemes). This means that that you will get a physical financial return for 20 years after installing the payments. If you sell your house 2 years after you have paid for the solar PV installation then the new residents will take over this payments – they will have bought a cash generating asset when they bought the house. This should therefore help increase the value of the house, although the extent to which it does depends on when the new residents moved in. Obviously the sooner you sell the property having invested in the solar panels, the more the install is worth to the new owner.
The distance you are through the Feed-in tariff therefore has a huge impact on the value of your solar PV system and the value of the house as a whole when you come to sell it on. This doesn’t even take into account the savings produced on you energy bills since you can use the electricity you produce meaning you don’t need to buy it from the grid at a cost of 15 per kWh.
When did you get the solar system installed?
Not only does the distance through the feed-in tariff play a large part on the value that the solar system adds to your home – the year the solar system was installed also impacts this.
The reason for this is the feed-in tariff payments have reduced over time, so in October 2011, the amount paid for each unit of electricity produced from the solar system was 43.3p / kWh. Now (January 15) the rates are just 13.88p / kWh. In addition the payment used to be made for a total term of 25 years. Now the feed-in tariff is just paid over 20 years.
This means that if the solar system was installed prior to October 2011, then the value of the system (and therefore the impact it will have on the value of the house as a whole) is much higher.
Was the system installed with one inverter or micro inverters?
When the solar industry took off (about the same time the feed in tariff was introduced coincidentally!), most solar PV systems were installed with one string inverter.
There are several issues with these string inverters – including efficiency of the system; basically each panel would operate at the level of the worst operating panel. The issue here though is that the high voltages going through these inverters mean they don’t last too long – in fact they last about 10 years. Therefore they need to be replaced at a cost of about £1,000.
Solar PV systems with Micro inverters installed not only have higher efficiency (electrical output), they also last for much longer because the voltages going through them is not as a high. The warranties on these tend to be in excess of 20 years – so obviously this means lower maintenance costs for the incoming occupant, therefore the system is worth more to the incumbent!
The cost of electricity
Another point to consider is the cost of electricity over time. Now this is very difficult for us to predict. At the time of writing the cost of oil is falling almost daily and as a result the cost of energy, and electricity is reducing. This is on the back of consistent 10% annual increases in energy bills we have seen over the last 8 years.
Based on historic trends we are pretty confident that the cost of electricity will increase over time, this means that energy savings today cash wise (produced from using the free solar) will be smaller than in the future.
i.e. 2000 units of electricity might cost £300 today, but 2000 units in 5 years time might cost £500.
Obviously this will make solar systems a far more attractive proposition in the future.
Insuring your solar system
The final point to consider is the costs associated with having solar panels on your roof – you may, for piece of mind, decide to insure your solar system. At a yearly cost of £250 to cover damage, theft and loss of revenue (from the feed-in tariff), that will make a sizeable dent in the revenue that you get from the feed-in tariff – obviously not everyone will take up the insurance (some people will just bear the risk), but it might be worth considering!
So there you have it – the value that solar PV adds to your home varies considerably depending on when the system was installed and also the type of system. If you still have a decent amount of time to run on the feed-in tariff though, as a cash-generating asset, it really should add to the property value.
How building regulations have changed over time
February 6, 2015
How building regulations have tightened up over the last 50 years
We often talk about U-values here at TheGreenAge – these have changed considerably over the years as building regulations were bought in to help improve the energy efficiency of properties.
We have previously written about building regulations not going far enough, but over the last 40 years they have actually improved considerably as you will see below!
The first building regulations that had an impact on energy waste in the home came in to play in 1965 and these introduced limits on the amount of energy that could be lost through certain elements of the fabric of new houses.
Although building regulations are regularly updated, the iterations that really impacted the energy efficiency of homes were 1976, 1985, 1990, 1995, 2002, 2006 and the latest in 2013. In the article below we are going to show how building regs have changed for both walls and the roof (i.e. loft space). Together, these make up the majority of the envelope of the property (the envelope is made up of the roof, the walls + windows and the floor) and accounts for the majority of heat loss from the property.
HISTORIC U-VALUES OF WALLS
The efficiency of walls was an obvious area to be targeted since for many properties, the wall area represents the largest volume of the thermal envelope (the outside of the property where heat loss occurs from) therefore if you make that more efficient, it will have the largest impact on reducing energy bills and lowering energy demand.
The only real complication with the U-values of walls was that in 1976 building regulations defined walls as either exposed or semi-exposed. A semi-exposed wall is one that is exposed to the outside air via an unheated space, for example imagine a garage in the home, the wall between the garage and the main house would be a semi-exposed wall.
Anyway, below you can see how the u-value changed over time – remember that a smaller u-value shows a more energy efficient element, i.e. the movement of heat across the element takes longer.
1965 the required u-value for walls was 1.7
In 1976 as a result of the 1973 oil crisis, building regulations reduced the required u-value down to 1 (but it remained 1.7 for semi-exposed walls).
In 1985 the required u-value dropped to 0.6 for walls, hence many properties began to be insulated (this is about the time we begin to see cavity wall insulation installed as standard). The required u-value for semi-exposed walls dropped too – down to 1.0.
In 1990 the u-value for walls dropped down to 0.45; this meant that cavity walls were built with thicker cavities so more insulation could be installed. The required u-value for semi-exposed walls dropped down to 0.6.
In 2002, the u-value for walls was reduced to 0.35 and now building regulations stipulate the u-value for a wall should be just 0.3, quite an improvement from 1.7 in 1965!
Historic U-Values of the roof space
An uninsulated loft space would have a u-value in the region of 2.5 W/m2K, but in 1965 building regulations dictated that the maximum u-value for a loft should be 1.4 W/m2K – which could be achieved with just 2.8 cm of wool insulation!
In 1973, the required u-value dropped to 0.6 – this required a 7cm thick layer of wool insulation – again not much compared to what is needed now!
In 1985, the u-value dropped to 0.35, in 1990 it dropped to 0.25 and in 2002 this dropped down to 0.2. To achieve a u-value of 0.2, you would require 20cm of mineral wool insulation.
Nowadays the u-value required for roofs (and loft insulation) is 0.17 W/m2K – this is 250mm of wool insulation – so in effect you now need 10 times as much insulation as 50 years ago to ensure you conform – that is quite a lot more!
Think we missed something? Do you have a different opinion?
Comment below to get your voice heard…
What insulation materials are used in EWI?
February 4, 2015
What insulation materials are used in external wall insulation?
There are lots of different external wall insulation systems used to insulate solid wall properties – the EWI system includes the type of insulation, the render as well as the fixings that attach the insulation to the wall.
In this article we are simply going to look at the three different types of insulation material that can be used within a system – Expanded Polystyrene (EPS), Mineral Wool and Phenolic Resin.
Using expanded polystyrene (EPS) in external wall insulation
Expanded polystyrene is the most popular product used in external solid wall insulation. It is a relatively inexpensive yet durable product and is lightweight, non-toxic, and is completely recyclable.
The expanded polystyrene (known as EPS) has fantastic thermal properties – for example applying 100mm of the EPS to a solid wall will take the u-value down to 0.3 W/m2k or better, which is an excellent energy efficiency rating. Obviously like all the other insulating materials, the thicker the product you use, the better the level of insulation.
Despite the EPS not having quite the same thermal properties as phenolic resin (looked at below), its price and ease of use make it a favourite with external wall insulation companies up and down the country. It is also the most stable of all the sheet insulation used – so once it is put up on the walls there should be few, if any, issues down the line.
Using mineral or stone wool in external wall insulation
Mineral or stone wool insulation used for external wall insulation is not the same make-up of product that you use up in the loft! The wool used for this application comes in slabs and can the therefore be handled in the same way as the EPS boards. The thermal properties are very similar the EPS, however it is a more expensive material to install.
The one big advantage of mineral wool insulation used in external wall insulation is that it is fire retardant and non-combustible (the material itself is A1 class under the European Classification for fire prevention in building products), so in the event of a fire it will emit negligible amounts of smoke and fumes (more on this below).
The other fantastic advantage of the wool products is that they are also great at reducing the noise pollution. The fibres in the wool are great at absorbing the acoustics, and perform much better in this category versus the other insulation materials.
The wool slabs are normally treated with a water repellent additive to ensure that no liquid water will pass through the insulation so you can be sure that if used on your home – there is going to be no penetrating damp in the home!
Using phenolic resin in external wall insulation
Phenolic resin tends to be a more expensive form of insulation, and for some people is a popular solution. The reason for this is that the thermal properties of phenolic resin are very high – so you can achieve the same thermal insulating properties with a much thinner amount of material.
The issue for us (and the reason many solid wall installers will avoid phenolic resin) is that it can shrink and cause cracking down the line as the material shrinks on the wall. Now the shrinkage is not very big – just 1-2%, but even so, this can be enough to cause the material to fail in the long-run.
As a result we would strongly recommend you to look past phenolic resin if you can, and go with either the expanded polystyrene boards or the mineral wool insulation. The only reason we can see for using this product is if you genuinely need to adhere to some space restrictions!
A quick look at fixings – mechanical versus adhesive EWI fixings
Whatever the type of insulation used, there are three potential ways to attach it to the wall. You can either stick it on with a type of adhesive (basically a form of cement based plaster) with supplementary fixings or you can attach the system with mechanical fixings and supplementary adhesive if required. Or you can attach using a fully bonded system, with both fixings and adhesive.
We recommend that any installer you get to do your solid wall insulation uses both the adhesive and the mechanical fixings. Some companies will just stick the insulation to the wall, which over time can lead to it just falling off. Don’t let your installer cut corners for the sake of that little bit more money. If you are spending that much anyway, get the job done right first time!
Fire classification of external wall insulation systems
The wool products are rated as non-combustible or A1 class as per European classification for building products. When added within an external wall insulation system, the fire classification can range between A2-s1 and A2-s2 (taken from a sample of BBA certificates), which is either non-combustible or very difficult to ignite. Therefore for commercial buildings, high-rise blocks and public buildings, the wool insulation is a good choice as it meets the very high standards for fire prevention.
On the other hand, the EPS and phenolic systems tend to range between B-s1 and B-s2 fire prevention classification (taken from a sample of BBA certificates across the industry), which mean they are still very difficult to ignite. We have seen EPS used as a very popular insulation material in the EWI system, in low-rise and domestic properties, particularly as it is very easy to work with in the installation process.
Permeable or impermeable EWI systems
When people refer to external wall insulation, they talk about insulation systems – including the insulating material, the render and the means of fixing it to the wall. Although there are many different systems for solid wall insulation, one of the key things you need to check with the installer is whether the insulation system being used on your home is permeable or impermeable.
A permeable insulation system will allow the wall to breathe; this means that water vapour (not water liquid!) will be able to cross through the wall and insulation. This is very important since otherwise you can get moisture build up in the home, which can lead to much bigger problems.
Independent insurance for your EWI system
It is really important that your insulation system is covered by a long term and independent guarantee. External insulation is an extensive and expensive addition to the property, and if you have any issues with the insulation in the future, it could prove costly. Industry guarantee schemes like SWIGA or insurance backed schemes like GDGC, Kinnell, mean that even if the company you got to install the insulation is no longer in business, you will still have the consumer protection to take your claim forward and get your wall seen to and fixed.
This website uses cookies. By continuing to use our website you agree to our Data Protection Policy, which you can view here.OK
Privacy & Cookies Policy
Privacy Overview
This website uses cookies to improve your experience while you navigate through the website. Out of these, the cookies that are categorized as necessary are stored on your browser as they are essential for the working of basic functionalities of the website. We also use third-party cookies that help us analyze and understand how you use this website. These cookies will be stored in your browser only with your consent. You also have the option to opt-out of these cookies. But opting out of some of these cookies may affect your browsing experience.
Necessary cookies are absolutely essential for the website to function properly. This category only includes cookies that ensures basic functionalities and security features of the website. These cookies do not store any personal information.
Any cookies that may not be particularly necessary for the website to function and is used specifically to collect user personal data via analytics, ads, other embedded contents are termed as non-necessary cookies. It is mandatory to procure user consent prior to running these cookies on your website.