Infrared Heating Panels

    Heating

What is infrared light?

Infrared light is the reason why we feel warm when the sun is shining in the middle of a wintery day. Conventional wisdom would suggest that if the air temperature were freezing, then you too would feel cold. However the infrared waves emitted by the sun travel unimpeded through space, and warm any object they hit, including your body.

The visible light spectrum - infrared

Infrared is a form of electromagnetic radiation that sits just beyond the red end of the visible light range of the electromagnetic spectrum. We often hear the word radiation and automatically associate it with being harmful, but in fact, radiation is just a process of energy emission. Just like visible light radiation, infrared radiation is 100% safe and even our own bodies emit infrared radiation (which is what allows search and rescue helicopters to find lost travellers at night for example).

Conventional space heating in homes

Conventional heating in the home works by warming up the air around you; for instance a radiator does most of its heating through convection currents (it also gives off small amounts of infrared radiation).

When the radiator warms up, it heats the air directly around it, which then expands and rises. As the hot air rises, it creates a vacuum behind it, which pulls colder air into contact with the radiator, causing it to heat up. As the hot air begins to cool down it drops down back to floor level. This cold air gets heated again and this process keeps repeating itself – this is known as convection heating.

Most conventional heating systems do emit some infrared waves. For example, if you have ever sat near an open fire, you will have felt the heat on your face. Then when you put your hand in front of your face, this stops the infrared hitting your face directly; instead you will feel your hands get warm. This is infrared.

Infrared heaters in the home

Infrared heating is a fairly recent addition to the domestic and commercial heating scene. It is emitted from the heater, which then travels unimpeded through the air until it hits an object. The object absorbs the radiation, causing molecules within it to vibrate, producing heat.

If the waves come into contact with humans, they will travel about an inch into the body providing a feeling of deep heat, but even if you are not directly in the way of the waves, any solid body will vibrate when the waves hit them, causing them to radiate heat back towards you.

Despite being able to purchase gas, oil and solid fuel infrared heaters, we suggest using electric infrared panels in the home, since you do not need to integrate any pipework or fuel storage facilities when you install the panels. There are also no direct emissions associated with using the electrical panels (and if you use them in conjunction with solar panels you get 100% emission-free heating). According to a study made by Jigsaw infrared when adding solar panels to their infrared heating, you could save up to 50% on your energy bills. They also can be placed high up on the walls or the ceiling, so they will be easy to keep away from pets and children (they get about as warm as a standard radiator).

The electric panels come in numerous sizes and certain models can double up as mirrors. Since they have no moving parts, they operate in complete silence, which makes them ideal for any property.

>>> The cost of heating your home with gas vs electricity <<<

Energy savings from infrared heaters

Infrared heating works by heating the surface area of a room, rather than the volume (as is the case the traditional convection heaters), which means they are heating considerably less to provide the same amount of heat.

The following worked example compares a 800 Watt infrared heat panel and a standard 2000 Watt convection heater (like for like providing the same comfort of heat), providing heat up to 4 months of winter (November through to Feb 119 days) for 8 hours a day at a cost of £0.30 per kWh of electricity (As of May 2022 estimated 10 minutes per hour of use for IR panel. 10 minutes per hour for convection heater).

Infrared Heater Convection Heater
 Energy rating 800 Watts 2000 Watts
 Electricity units per hour 0.80 2.00
Total electrical units used 119kWh 238kWh
Total cost £35.70 £71.40

In addition, you are heating solid walls or objects with infrared radiation and these have a thermal mass, which means they retain heat and help keep the home cosy. Conversely, air has no thermal mass, so in the case of traditional convection-warmed rooms, when a door is opened, the hot air will quickly escape; requiring you to reheat the room to feel warm again. One brilliant factor in favour of these panels is the ability to provide the home with a fully-zoned property. Unlike central heating systems, the panels can be switched on in individual rooms using the thermostats. This means that heating is only fully used when required. If you think how much energy is wasted in rooms that do not need to be heated, such as guest bedrooms, this is a real benefit.

A study was placed by Aston University and Jigsaw Infrared which found that Jigsaw’s infrared panels can increase the room temperature to 18 C in 10 mins which is less than a 2000 W storage and convection heater take 15 and 17 min respectively. Moreover, the IR heating system has an efficiency 2 times higher than a 2000 W and storage and convection heating system. Therefore, the IR panel used half the energy (50% less) of the storage heater and reached room temp in almost half the time. Therefore, Infrared heating is much more efficient at heating a space than conventional space heaters. The heat is also contained in the thermal mass of the room surfaces, as opposed to the heat. This means that it stays warmer for longer and draughts do not play as large a part when compared with convection heaters.

Infrared vs. other heating systems

Heating System Annual Cost
Gas central heating with zone controls £608
Jigsaw infrared with zone controls £804
Reversible air con with zone controls £881
Air-water heat pump with zone controls £977
Biomass £1,209
Electric convector heating with zone controls £1,332
Electric underfloor heating with zone controls £1,508
New electric night storage with automatic controls £1,734

Based on a 2-bed property and May 2022 energy prices. Heating only.

Other advantages of infrared heating

Another major advantage of infrared heating is that unlike conventional heaters that just heat the air, infrared heaters heat the walls, which will mean they stay completely dry. It then builds up the thermal mass within the walls and the floors, which maintains the warmth and keeps it dry by reducing condensation. Therefore infrared heating helps prevent the spread of mould in the property.

>>> Get Rid of Black Spot Mould <<<

In addition, conventional heaters warm the room by convection currents that circulate dust particles continuously around the home, however these convection currents do not occur with infrared heating, so for people who suffer from asthma, infrared panels can be the ideal solution.

Benefits

Limitations

Cost

Installing infrared heating

Are you thinking about installing infrared heating in your home? We have scoured the country for the best tradespeople, so that we can make sure we only recommend those we really trust.

If you would like us to find you a local installer to help install infrared heating in your home, just fill in the form below and we will be in touch shortly!


    Looking for an infrared installer, or would like to know more?

    I would like to be contacted by a local installer

    I would like to receive occasional news from TheGreenAge

      Meeting your heating requirements with infrared panels

      Heating

    Meeting your heating requirements with infrared heating panels

    On the whole, an infrared heating panel will heat one square metre of space for every 50 Watts of power supplied to the unit. Take an 800-Watt panel for example this will heat an area of approximately 12m2 in an average property.

    Having said that, other variables also have a part to play in the heating ability of infrared heating panels. These include the quality of existing insulation, the temperature of the outside environment and the temperature the household tends to set its thermostat.

    The Thermal envelope of the property and infrared heating panels

    The level of insulation, the quality of glazing and the airtightness of a building are key factors in determining how much heat is retained. Each building fabric will offer a different thermal insulating performance, and this must be taken into consideration when you are sizing panels.

    If you have good quality insulation, for example, then the heating panels will be at their most effective – warming the room quickly, then modulating on and off to top up the heat as required. The better insulated the walls and the roof space, the more heat will be retained and the less the panels will need to work.

    If, on the other hand, you live in a period property and you have solid walls; or if you live in house with unfilled cavities, then installing insulation prior to putting up the heating panels may be a sensible idea. Loft insulation, for example, is cheap and easy to install. Ideally this should be be done prior to installing the panels, since once in place, the insulation would help limit the heat loss from the home when the panels were switched on.

    How infrared heaters work

    Infrared heating panels work by emitting infrared radiation; this is then absorbed by an object, which in turn will then warm up. The residents should be able to feel a comfortable level of warmth, even though the air temperature may be lower than you would normally experience with a traditional radiator heating system (which relies on convection heating).

    If the heating panel is positioned on the wall, a certain amount of infrared radiation will be aimed at the ceiling and will get absorbed. As a result, this energy will not be felt directly by any people in the room. Therefore, positioning heating panels on the walls may limit the heating area by as much as 20%.

    In an ideal world, the panels would be positioned on the ceiling; however, this is slightly dependent on whether the plasterboard is able to support that weight from the panels. If in doubt, seek advice from a construction expert or an electrician before installation.

    It is important to touch on shading when talking about infrared heating; if the radiation is absorbed by something before it reaches the intended target, then the target won’t get warm. This is very similar to the effect of moving from direct sunlight into the shade – you will suddenly feel colder. This is because the sun does the bulk of its heating via infrared radiation (this is 100% safe and different from UV rays). The same thing happens in the home; if a table absorbs the infrared, the floor underneath it will not warm up.

    To achieve a more all-around warm feeling, similar to what you would experience with a traditional central heating system, the heating panel needs time to warm the walls and furniture. These then give off warmth and effectively act as secondary heaters. Solid stone or brick walls take time to heat up, but then give off warmth nicely.

    According to a study made by Wolverhampton University using Jigsaw infrared heating panels Gas central heating can often take around 30 minutes before occupants can start to feel the warmth as it heats the air within the space. Infrared heating heats objects, not the air, meaning that the warmth can be felt much quicker, normally less than 10 minutes. The Infrared system is so quick at heating that they can be controlled by motion sensors. The panels only come on when there is a person in the room.

    Infrared heaters reduce condensation

    Cold walls tend to cool the warm air created by conventional central heating and can cause condensation, whereas infrared heating is designed to heat the walls and the contents of the room. The fact the walls are heated means they will stay dry, reducing condensation and helping prevent the build-up of mould. Installing infrared heating means the objects are heated in addition to the air around them. Because of this, the panels can be directed towards damp walls to dry the wet areas and reduce the formation of mould.

    How much heating output does my home require?

    The sizing information we give is based upon a fairly well-constructed and relatively well-insulated home. As a result, we assume your home requires 50 watts per m2; however, this can be more like 100 or even 150 watts per m2 for an uninsulated house or commercial premises. The customer should always do some background research and assess how well insulated and thermally efficient their property is.

    The other element to factor in is the temperature the homeowner would like to heat their property to. A recommended ambient temperature is normally between 18 and 22 degrees C; however, if you like to heat your home at 30 degrees then you will require more watts per m2  – and this will obviously cost you more to do.

    A room thermostat and programmer may also help you take control of the heating. By fitting a room programmer, you can judge the warm-up period and cool-down time needed, and also set a lower daytime temperature just to prevent the room from becoming too cold. A thermostat will help prevent electricity from being wasted, by turning the heater on and off to maintain a set temperature. This is especially useful in spring and autumn when the weather is changeable and also in winter to keep a general warmth to the room rather than letting it get very cold and then having to use lots of power to boost the warmth up.

    When installing Jigsaw control systems for the infrared heating panels you will need one Hub at £129 and a room thermostat for each room at £89 and any added extras to make the most of your efficiency. This can be set at several different times and temperatures throughout the day while only directing the heaters to heat a room in use via an app.

    When using the Jigsaw control system IR heating system, it is recommended to heat the room temperature to 22-23 degrees compared to up to 18.5 with gas central heating.

    If you do decide to hang the infrared panels on the wall, you also need to consider where on the wall you are going to hang them. Infrared rays travel about 3 metres out of the panel, so a central position on the longest wall is preferable. Positioning at one end of the room and leaving areas unreachable will, unfortunately, produce cold spots, so you may wish to consider two panels if this is the case.

    For the best results contact your supplier for a quote on where the most efficient place is to install your infrared heating system. Click here to get direct access to book a free quote from Jigsaw infrared.

    Questions to ask yourself before installing an infrared heating panel

    Q: What is the area/room size you are trying to heat?

    A: The bigger the room, the more heating output you will require to get it up to comfortable temperature.

    Q: What is the construction of the room/house – is it an old stone building, a modern building? Assess the level of existing insulation.

    A: Older, solid wall properties will be less insulated, which means the rays are absorbed more by the fabric of the building; which in turn means less useful heat will radiate back into the room. So you may require more watts per m2.

    Q: How many walls are external?

    A: The more external walls that the heated area is exposed to, the more likely that heat will escape and radiate outside the building. Again this is where insulation is important, so determining how well the walls are insulated will have an impact on the heating requirement per m2. The better the insulation (filled cavity or solid wall insulation), the more likely the heat will remain in the room/s and keep that useful warmth, so the panels need to work less hard.

    Q: What type of glazing do you have? Is it single or double and what is the size that occupies the walls?

    A: If the answer is single glazing and the amount of area is large, then you will require higher output wattage than the 50 watts per m2 that we recommend.

    Q: What height is the ceiling?

    A: Domestic panels work optimally up to 3m in room height. If you have higher ceilings you can contact us and we will give you further guidance.

    Q: Where do you think you will be placing the panels – ceiling or walls?

    A: If you place the panels on the walls, ensure they are at least 1 metre from the ground. Some of the bigger panels will require a bigger gap of at least 2metres. On the other hand, if the panels are installed on the ceiling, make sure the plasterboard can support the weight.

    Q: Will you be installing infrared heaters with thermostat and/or programmer?

    A: When you have control over the temperature and running times of your panels you can ensure that energy coming in is optimised to the energy being released. The more sophisticated the setup, the more it will work around your lifestyle and operate efficiently to minimise wastage.

    Benefits

    Limitations

    Cost

    Installing infrared heating

    Are you thinking about installing infrared heating in your home? We have scoured the country for the best tradespeople, so that we can make sure we only recommend those we really trust.

    If you would like us to find you a local installer to help install infrared heating in your home, just fill in the form below and we will be in touch shortly!


      Looking for an infrared installer, or would like to know more?

      I would like to be contacted by a local installer

      I would like to receive occasional news from TheGreenAge

        How to install your infrared heating panels

        Heating

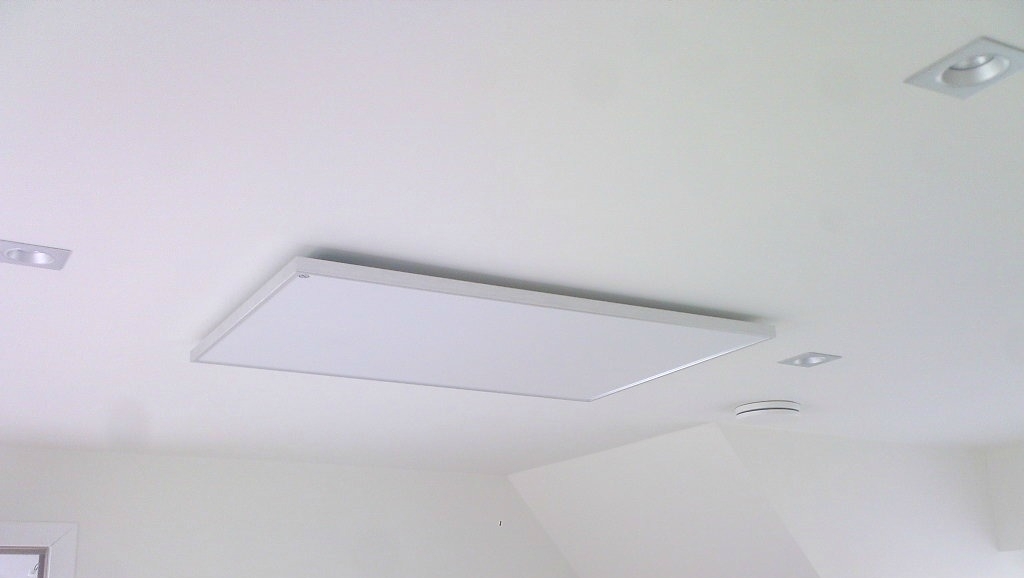
      Positioning the infrared heating panels is key

      If you have purchased – or are about to purchase – infrared heaters, then understanding where to put them is important to get the best results.

      Infrared heating panels don’t operate like conventional convection heating, which warms air. Instead the panels emit far-infrared radiation, which travels unimpeded until it hits a solid object, which will in turn absorb the infrared and then heat up. Do not mistake infrared with harmful UV light, which is on the other side of the light spectrum – infrared is 100% safe.

      The main thing to remember is that if the infrared radiation is impeded before it reaches its destination, then the object will not warm up. As a result, to get the most out of the heating panel it should ideally be fitted in the centre of the room. Or if you have a larger area and are getting a number of panels, then they should be evenly distributed in that space. The panels should be above seating areas so as not to be shadowed, which is why positioning on the ceilings is by far the most popular.

      The distribution of infrared heater rays

      When the panel is positioned on the wall or ceiling, the infrared radiation will travel at 45o angles in all directions. If they are in a corner and too close to a wall other than the one they are attached to, then you will be warming a small concentrated area; this is not ideal since you will be wasting potentially useful heat. For this reason it is paramount that you don’t position the panels too close to the walls: rather ‘centre’ them as much as possible.

      300Watt and 350Watt panels should be at least 0.5m (1.5 feet) or more from the floor – and the larger panels (basically anything over 600Watts) should be at least 1.5m (5 feet) away. When the panels are on they will beam the infrared radiation up to 3m(10 feet). If you have higher ceilings, please give us a ring and we can discuss appropriate models to use in this instance.

      If you install the panels on the walls, then you should try and position them as high as possible. Positioning them too low will almost certainly result in furniture blocking the infrared radiation, which will limit their heating.

      For the smaller panels we recommend having them at least 1.0m (over 3 feet) and for the bigger panels this to be positioned 2.0m (6 to 7 feet) high. Like your radiators, the surface temperature of the panels gets to about 80oc, so do not touch or have objects too close to them.

      The installation process

      All our panels come with a UK plug, so you can simply plug in and go, but we recommend hardwiring them into an electric circuit where possible. This allows you to use a proper switch (like a light switch) to turn them on. It also means you can install a smart heating system for optimal efficiency. We strongly recommend a professional installation and having the panels ‘hard wired’ into your electrical system by a Part P-qualified electrician.

      In terms of the installations themselves we anticipate that most customers will seek the advice and expertise of a Part P qualified electrician who will hardwire the units to a thermostat and the property circuit board. You can find out whether your electrician is Part P qualified by looking up their details on the Competent Person Register.

      The infrared panels will invariably come with a frame on the back, which allows you to easily attach them to the wall. This does mean that the panels will sit about 1-2 cm off the wall.

      Although the panels radiate heat from their front surface (which will get warm), the reflector technology will ensure that there is no heat being emitted out of the back. The fact they are sitting away from the wall also helps in this respect.

      Most of the panels that are sold should be supplied with screws and fixings to get the panels attached to the wall or roof. We do recommend getting an electrician to fix them in position though, and hardwire them into your mains electricity rather than simply run through an existing plug socket.

      When the panels are plugged in, they take about 90 seconds to get up to full heat intensity and since you don’t need to wait for the air to get warm, you should feel their effect very quickly. To stop the panels from overheating, they will modulate and come on and off as required; however we recommend having them installed with some form of thermostatic control to ensure the room doesn’t get too warm.  The most basic option is a timer plug adapter, however we recommend going for a proper thermostat and programmer unit if you have the funds available.

      The installation is carried out as follows:

      Then when connecting to the wireless thermostat:

      This will ensure that when the receiver switches the power on it will reach the panel. Please note – switch contacts alone are volt-free and will not therefore supply power directly to the panel.

      Installing infrared panels in the bathroom

      Good infrared panels are either IP45 or IP54 rated, which means they can also be used in bathrooms. It is worth bearing in mind that building regulations state that any electrical bathroom installations should be undertaken by a Part P qualified electrician, who in turn will complete a BS7671 installation certificate.

      The pull switch or programmer needs to sit outside the bathroom. In terms of placement, the unit needs to be at least 0.6m (2 feet) from a shower or a bath. In addition if you are placing it above a washbasin, please ensure it is at least 13cm away. Again, your electrician should be able to advise and action as appropriate.

      Benefits

      Limitations

      Installing infrared heating

      Are you thinking about installing infrared heating in your home? We have scoured the country for the best tradespeople, so that we can make sure we only recommend those we really trust.

      If you would like us to find you a local installer to help install infrared heating in your home, just fill in the form below and we will be in touch shortly!


        Looking for an infrared installer, or would like to know more?

        I would like to be contacted by a local installer

        I would like to receive occasional news from TheGreenAge

        Pin It on Pinterest