Not all windows need to be draught-proofed. Double or triple glazed windows installed since 2002 should be sufficiently well-built and installed so as not to require any. Older double glazing and single glazed windows can be draught-proofed, however. If you are unsure on the age of your double glazing, you should check for either a FENSA certificate, which you will have received with any windows installed since 2002, or a stamp in the metal seal of the window.
Where to look for draughts
The gaps between the window and the frame
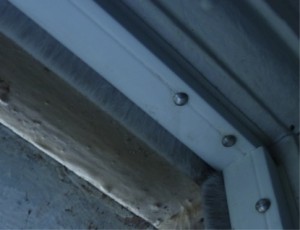
Caulk on the outside of the window frame
The area around any locks or catches
Although the potential for draughts to occur around the edge of one window is not equal to that of an external door, the accumulated draught from every window in your house can account for huge amounts of energy loss. Therefore it is crucial to draught-proof these areas. In order to complete a successful draught-proofing of a window, you must firstly pinpoint the gaps that require work. After locating the area that requires draught-proofing, there are a few methods to consider.
How can I draught-proof my windows?
How should I draught-proof a window that opens?
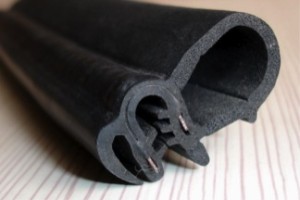
Firstly, compression seals provide a professional finish and prevent draughts, as well as dust and moisture entering the home. The seals are sometimes held by metal, plastic or wooden carriers, which are fixed onto the frames through pre-drilled fixing holes. This maintains the ‘memory’ or ‘bounce-back-ability’ of the seal, enabling it to return to its original shape even after periods of crushing, due to normal everyday use of the window. The carrier is cut to length and must be less than 25mm from the cut end to avoid any snagging on unwanted items such as clothing. However they may also be glued to the frame. While these compression seals, as well as the similar tubular seals, provide excellent performance on narrow window gaps, they are not the best option when draught-proofing sash windows on larger properties.
How should I draught-proof a window that doesn’t open?
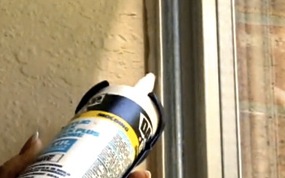
The best method for draught-proofing a window that does not open is a silicone-based sealant. After the gaps in the framework have been located and cleaned to remove any dust that may reduce the longevity of the draught-proofing method, a gunned silicone sealant can be easily applied. This is a cheap and easy way to DIY draught proof.
How should I draught-proof a sash window?
If you are looking to draught-proof a sash window or if the gaps between the window and its frame are not consistent due to seasonal changes, brush strips may provide the best solution. While mainly used in the draught-proofing of doors, it is not rare to see this method around larger windows. This solution involves brushes or blades fixed into a carrier, which is pinned onto the frame. While they may be painted to reduce their visibility, this does decrease their efficiency. However the brushes or blades may be contained using wooden carriers, which may provide a more aesthetically-pleasing solution to window draughts.
Another method of draught-proofing your window, and common when taking the DIY approach, is low-friction seals in loose strips or carriers. This solution involves the rubbing of wipers or blades, which are fixed onto the frame, against the closing window. While they may also be fixed using an adhesive-based foam strip, this method (although cheap) does not comply with British standards and is therefore not recommended.
Using gunned silicone as a sealant
A DIY-friendly and relatively cheap solution to your window draught-proofing needs is gap-filling seals with gunned silicone sealant. In order to ensure that maximum draught-proofing is achieved, you must cover the part of the window that comes into contact with the frame in a release agent. This prevents the sealant from sticking to the window as opposed to the frame. The window is then shut to provide a temporary mould for the sealant before it sets. While it provides an efficient solution to the draught-proofing issue, if it isn’t carried out correctly, the result may look untidy.
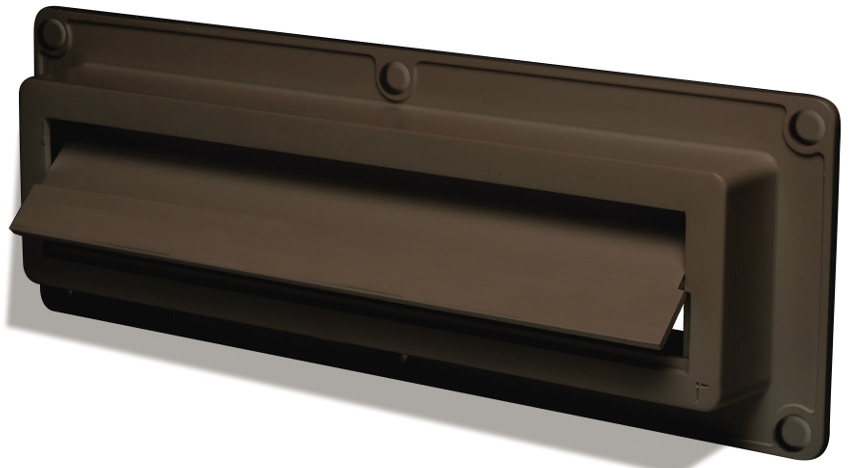
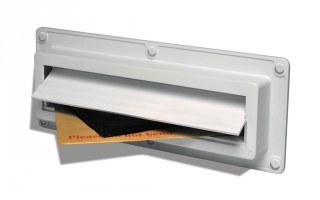
Installing Ecoflap to my Letterbox
The Ecoflap is a patented product that sits on the inside of your letter box hole. With its innovative design it can prevent draughts that are caused by howling winds. Draughts cause discomfort when you are trying to heat your home on cold winters day and your boiler works that extra bit harder to keep a comfortable room temperature.
Ecoflap Innovation
Ecoflap is unique as it has a weight distribution system and a series of lever and pulleys that stops it opening when wind is blowing, but it allows letters and post to come through as normal. You can have it installed with a widget lifter so the flap can open up without strain when you are trying to post through large items and parcels.
The Installation of the Ecoflap
Installing Ecoflap is incredibly easy – just follow the steps below:
Take the Ecoflap, check whether the door is flat next to the letter box hole, by turning the edge and resting against the frame. If it is flat then the installation should snuggly fit; however if there is a slight space between the straight edge and the door, it may not fit properly.
Identify the locating lip of the product, which will then fit on the bottom edge of the letterbox hole. For a wooden frame door you may wish to use screws. If this is the case you need to use 3.5mm screw and no more than 15mm, so the cap can fit on top of it.
For PVC doors or if you don’t want to screw fix, then you can use a silicon sealant. In this case turn the Ecoflap around and liberally apply the silicon to the rim. Then place the Ecoflap onto the edge of the letterbox hole, ensuring the locating lip is fitted in the right place.
For any sealant that spills on the edges, take a wet cloth and wipe it down.
That’s it, simple as that!
To find out more about the installation process please refer to the ‘how to’ video below:
Most floors in the UK are either solid (concrete) or suspended (usually timber floorboards). Solid floors don’t really tend to have draught issues associated with them, but suspended timber floors are definitely worth tackling.
The first step is to identify which type of floor you have. You can find out by pulling up the corner of your carpet, or looking for air bricks on the outside of the property at the bottom of the walls – these will signify a suspended timber floor.
Where to look for draughts:
In between floorboards
Around skirting boards
How do I draught-proof floorboards?
The gaps in between stripped floorboards may add up to the size of a small window; therefore draught-proofing your floor is essential and can shed pounds from your energy bill, paying for itself in less than 12 months. With so many products on the market, it is important to select one that will provide you with the best outcome for your specific requirements.
The first thing to assess when considering whether to draught-proof your floorboards is what the required finish is. For example the methods used to draught-proof floorboards under a carpet are different to those used to draught-proof stripped floorboards. It should be noted that even though carpet will help with draught-proofing, it is not 100% effective, and additional measures can still help.
How do I draught-proof stripped floorboards?
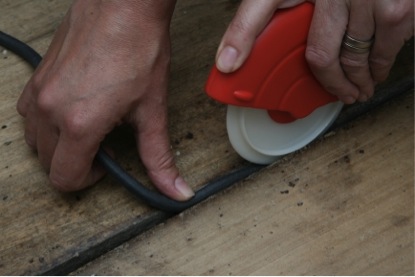
There are many products that fill the gaps between the floorboards, helping to prevent draughts. These come in the form of tube-like rolls (such as DraughtEx) that are easily pushed into the spaces between floorboards, assuming that the correct and accurate diameters have previously been taken into account. This is a quick, easy and relatively cheap way of draught-proofing your floorboards effectively. However, difficulties may arise if you have an older floor with uneven gaps between the floorboards that may require you to buy additional rolls of different sizes.
Alternatives to the tube-like rolls, which are pushed into floorboard gaps, are thin V-shaped, one-size-fits-all, plastic lengths that spring apart when pushed into place using a credit card. When in position, this innovative method is invisible and effectively stops draughts. The issue here is that if they pop out they could then potentially trip you up; make sure they are fitted as per the instructions to prevent this from happening.
How do I draught-proof floorboards under a carpet?
A carpet fitted over your floorboards helps reduce draughts; however there are further steps you can take if you are searching for optimal draught-proofing. If you are on a small budget, then the traditional technique of papier-mâché may be the best option. However, while this provides a cheap and effective solution and covers the potentially draughty gaps in between the floorboards, it does take a lot more time than shop-bought fixes. For a more efficient, but costlier method of draught proofing underneath your carpet, you can apply a gunned silicone sealant to the gaps between the floorboards provided the gaps aren’t enormous!
Using thicker underlay below the carpet is also an effective way to stop the draughts and insulate the floorboards.
The most effective way to stop draughts coming up through the floorboards is unfortunately also the most costly and time consuming. This involves lifting up the floorboards and applying insulation between the joists – details of how to do this can be found on our ffloor insulation pages.
How do I draught-proof the skirting board?
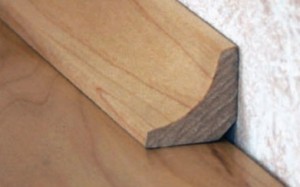
Even with successfully draught-proofed floorboards, you may still lose heat through the skirting board area. In order to maximise efficiency you can draught-proof this area using wooden beadings, which can be applied to skirting boards where they meet the floor. The wooden beadings come in a variety of shapes and they help bridge the gap that allows draughts.
Draught-proofing this area may also be achieved through silicone-based gunned sealants that can equally block the gap between the floor and the wall; again you may need to use a combination of both the wooden beadings and the sealant if the gaps between the floor and the skirting board are particularly large.
Obviously draught proofing external doors should be the priority, since this will stop cold outside air entering the property; but doors that separate cold rooms from warm rooms should also be draught-proofed to prevent the unwanted circulation of air between the two. This maybe the case if you have a spare room that you do not heat during the winter to help save on your energy bills.
How can I draught-proof around the door frame?
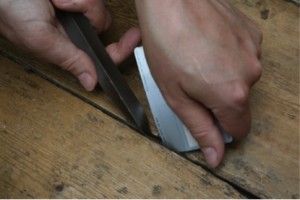
The first step is to fit a brush strip to the bottom of the door frame, as this is where the largest gap tends to be between the door and the frame. Most draught excluders are screwed in place, so first you need to measure the length of the bottom of the door. It is important to measure the door when it is closed, as the fixed brush strip may otherwise stop the door shutting. The brush strip then needs to be cut to length using a hacksaw. Once it has been cut to length, screw the brush strip in place, ensuring that the bristles of the brush reach the floor as this is what is going to stop the draughts.
A hinged flap draught excluder may also be used as it works on a similar principle; however instead of brushes this method relies on a flexible strip to prevent draughts.
Around the sides and the top of the door you can use a foam strip or brush strips to minimise draughts. The foam strips tend to come attached with a self-adhesive surface, so prior to fitting them to the door, you need to clean the door surface with soapy water (and let it dry) to ensure the foam strip sticks properly.
The brush strips tend to be a lot smaller than those used at the bottom of the door, so again they tend to come with a self-adhesive surface to stick them to the door, but in some cases you will be required to screw them in place. The pre-drilled holes that attach the brush strips to the door do not hinder the ‘memory’ or ‘bounce-back-ability’ of the seal. This enables it to return to its original shape, even after periods of heavy door usage.
Gunned silicone sealant may also be used in the draught proofing of doors. This is the cheapest solution to draught proofing around the edges and at the top of the door It is absolutely key that a release agent is first applied to areas of the door that you don’t want the sealant to attach too. By applying the releasing agent in the correct places, the closed door can actually be used as a temporary mould for the sealant before it sets.
Installing Cavity Wall Insulation
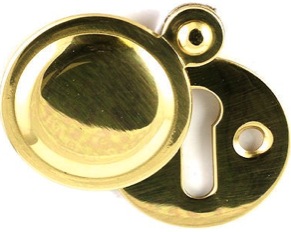
How can I draught-proof a keyhole?
Draughts may also enter the property via keyholes within doors. These draughts are easily prevented by installing an escutcheon plate (essentially a metal disc that is attached at the top of the key hole). This will swing open allowing you to insert the key and swing shut again to stop draughts.
How can I draught proof letterboxes?
Standard letterboxes produce a surprisingly large draught. We recommend installing something like the Ecoflap letterbox as it is 100% effective, easy to install and is low cost. It is a simple method of draught proofing and completely stops any potential heat loss through the letterbox. You attach the bracket to the inside of the door so it also works as an anti break-in feature.
Installing new doors
Need your doors replaced? We have scoured the country for the best tradespeople, so that we can make sure we only recommend those we really trust.
If you would like us to find you a local installer, just fill in the form below and we will be in touch shortly!
Draught Proofing Materials
Draught Proofing Materials
In our main draught proofing technology page we describe many of the areas where draughts can occur and we give an overview of how to stop the draughts. Here, we want to describe some of the different materials that can be used to draught proof the home.
Flexible silicon sealant
Flexible silicon sealant is a viscous gel that can be squeezed into gaps using a sealant gun to help stop draughts. The sealant will set in the gap forming a draught barrier, but will still be flexible so will accommodate some movement if used between floorboards for example.
Silicon sealant takes about 24 hours to cure (set) at which point it will be a waterproof barrier. It is ideally used around window frames (between the wall and the window frame), between skirting boards or floorboards. Obviously don’t use this type of draught proofing on windows, since once it sets you won’t be able to open the windows!
Typical price: Silicon sealant – £5 / 300ml + £5 for the reusable silicon skeleton gun (required to apply the silicon sealant).
Brush Strips
Brush strips are either plastic or metal strips with brushes attached. These come in lots of different forms, for example they may have different length bristles or the bristles themselves may be made out of a variety of different materials.
These are again relatively easy to install, and are ideal for installing on the bottom of doors thereby preventing potential draughts entering the home from between the door and the floor. It is imperative you don’t have bristles that are too long as this may restrict the ability to open doors or windows.
To attach these to the door, the metal strip tends to be screwed into door to hold them in position using screws, but some use an easily removable plastic bracket, so they can easily be replaced.
Typical price: £10 per door.
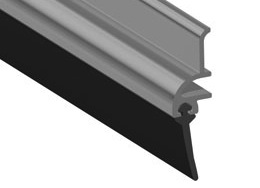
Rubber Blades / Fine Nylon Brush Pile
Both rubber blades and fine nylon brush pile are used to prevent draughts entering the home around ill-fitting windows with gaps in excess of 5mm. Installing both of these materials is a simple DIY job, since they can be attached in position using adhesive strips, or small screws.
If professionally installed, the rubber blades or nylon will most likely be embedded into the window frame giving an even more subtle end result. If the draught is between the top and bottom sashes, fix the fine nylon brush pile strip to the bottom sash at the meeting point.
These are used in a very similar way to rubber blades / nylon brush pile, but are used when the gap you are trying to draught proof is from 1mm – 5mm.
Typical price: Rubber seal / Polymer foam seal – £5 per 5m
Expandable Polyurethane Foam
For large gaps, polyurethane expanding foam can be used. This foam is ideal for filling and sealing awkward gaps, since it can be squirted into place using a straw like applicator, where it expands to fill the space. Many of the companies producing this have a built in applicator, but you can also buy cheaper cans of foam and buy a separate reusable applicator.
Once it has expanded and set solid, it can then be cut or sanded down ready for painting or plastering. This expandable foam also offers some acoustic insulation in addition to stopping the draughts.
Typical price: Expandable foam with built in applicator – £8, can of foam & the reusable applicator – £4 + £20 for applicator
Chimney Balloons
We have written a detailed section on chimney balloons, these can obviously only by used in chimneys but can be easily deflated or re-inflated as required, so they are a very flexible means of draught proofing. They are inserted into the chimney space and then inflated to ensure an air tight fit.
Typical Price: A medium sized chimney balloon – £20–23 (including inflation tube)
Ed’s Blog: Home Improvements – Small Things Do Add Up!
February 4, 2013
With all the windy weather recently, I’ve noticed how my house is a bit draughty – it actually sings to me as the air rushes in and out of the small gaps in the windows and doors! To stop this singing, I seriously looked into draught exclusion to try and keep as much of that precious warm air from escaping. I was quite surprised at how much energy I could save (and money!), therefore this blog details not only how I found ways to draught-proof a house, but also suggest some other cheap methods to help your house become more energy efficient.
While it’s good to have effective ventilation throughout the house to ensure good air flow through the house to help reduce any condensation or damp, (I’m not looking for a completely airtight building), but draughts are actually pretty costly from an energy point-of-view.
Here is how I tackled my doors
I have two entrances to my house, a front and a back door, both of which have fairly old doors on them. As the house is a little bit exposed to the elements (it sits on a slight hill so we get the full force of the wind and rain), I think the old wooden doors have warped a little bit and don’t sit flush with the frame. I noticed the previous owners had put in some foam strips to try and stop the air flowing through, however it didn’t appear that it helped that much. So, this is what I decided to do to improve the situation:
Replaced the foam strip with a thicker foam strip to get a more snug fit around the edges of the door,
Put a letterbox brush on the facing the inside,
Put a little plate over the keyhole to stop the air getting through.
All these measures cost under £25 per door and a quick look online shows that I would save at least that amount over a year. With the payback of 12 months, it is a no-brainer!
Windows in good shape
The windows are actually in pretty good shape (the FENSA certificates when I bought the house said they were installed between 2006 and 2007) so no work is needed there. But you can do similar things with the self-adhesive foam strips on the windows or even more permanent metal strips (though these tend to be more expensive). You can even put silicon sealant on windows that don’t open to get a really snug fit.
Loft – quick and easy seal
I also noticed when I was up in the loft (looking at the water system – will have a separate blog on this at some stage), I noticed that there is a bit of air rushing in and out of the hatch, so I sealed that with some foam strips on all four sides, much like you can do with a normal door (cost less than a fiver). Quick and easy and probably making a marginal benefit that will help in the long-run.
Shutting out that chimney noise
When the air Source heat pump engineer came round a couple of weeks ago to look at the possibility of installing a pump, he commented on the fact that I have two disused chimneys in the house. This is a problem as they also appear to be letting a lot of the heat out. One option is to install a cap on the chimney, but I’m quite keen to get the fireplaces up and running over time, so I’ve invested in a genius device called a “chimsoc”, which is a plastic, inflatable, reusable balloon.
Basically, you place it halfway up the chimney, inflate it and it sits there keeping most of the warm air from escaping! It’s got a slight gap at one side to allow for a little bit of airflow and a handy dangling device which can be seen in the fireplace and will stop me inadvertently lighting a fire while it still up there! They are also good for reducing any noise, especially if like me you live in a busy area – near a main road or railway line.
A bit of expanding foam on external pipework
My house has quite a few pipes running in and out it. In pipes for gas and water from the well, and out for waste water (sinks, showers, toilets etc). I invested in a can of expanding foam (£8 from B&Q) and filled the gaps around these pipes. It’s amazing stuff (be careful and use gloves though as it’s quite sticky!) and has reduced the draughts considerably. You can spray it in and then saw off / sand down any excess.
All in all then, I have spent under £90 on a number of measure I have installed above (you might need to spend a little more if your windows need a bit of draught proofing), but improved my house extensively. I can already notice the difference in the reduced draughts and hopefully soon I’ll start noticing the savings in my heating bills.
Hope to this was useful.
This website uses cookies. By continuing to use our website you agree to our Data Protection Policy, which you can view here.OK
Privacy & Cookies Policy
Privacy Overview
This website uses cookies to improve your experience while you navigate through the website. Out of these, the cookies that are categorized as necessary are stored on your browser as they are essential for the working of basic functionalities of the website. We also use third-party cookies that help us analyze and understand how you use this website. These cookies will be stored in your browser only with your consent. You also have the option to opt-out of these cookies. But opting out of some of these cookies may affect your browsing experience.
Necessary cookies are absolutely essential for the website to function properly. This category only includes cookies that ensures basic functionalities and security features of the website. These cookies do not store any personal information.
Any cookies that may not be particularly necessary for the website to function and is used specifically to collect user personal data via analytics, ads, other embedded contents are termed as non-necessary cookies. It is mandatory to procure user consent prior to running these cookies on your website.