As we mentioned in our Introduction, there are two main ways to insulate your loft: one is via the rafters and the other is by insulating your joists. Insulating the joists is often the easier of the options and especially makes sense if you have no real plans to use the loft space.
Key points before you start
If your loft is easy to access, the insulating process should be pretty straightforward and can be undertaken as a DIY job. However, if you have any doubt in your own ability to carry out the work, we recommend getting a professional to do it.
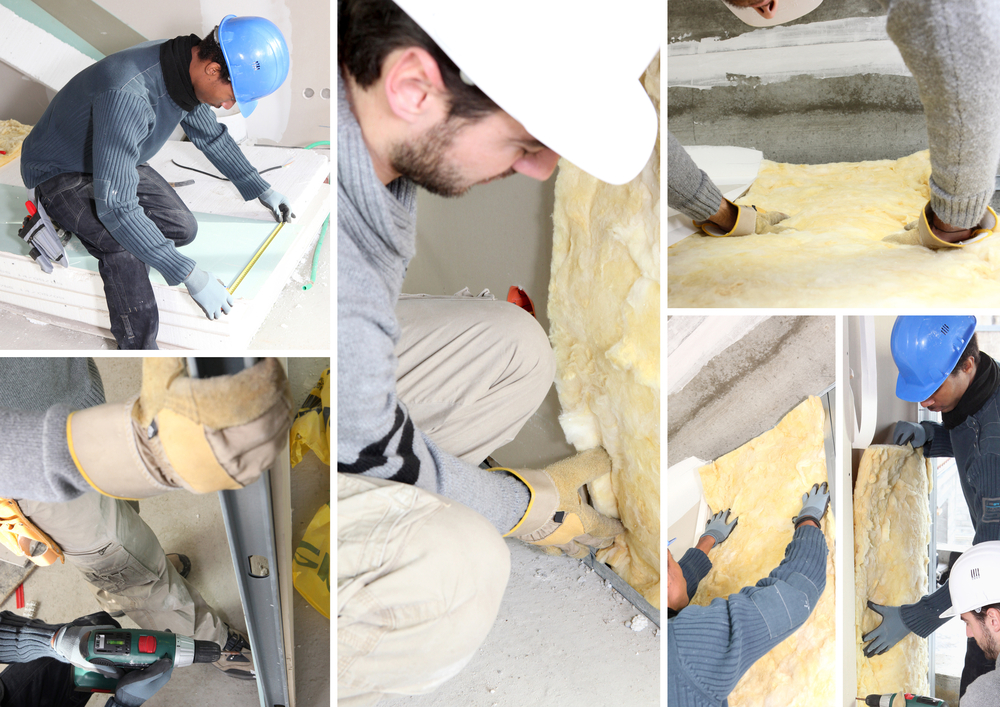
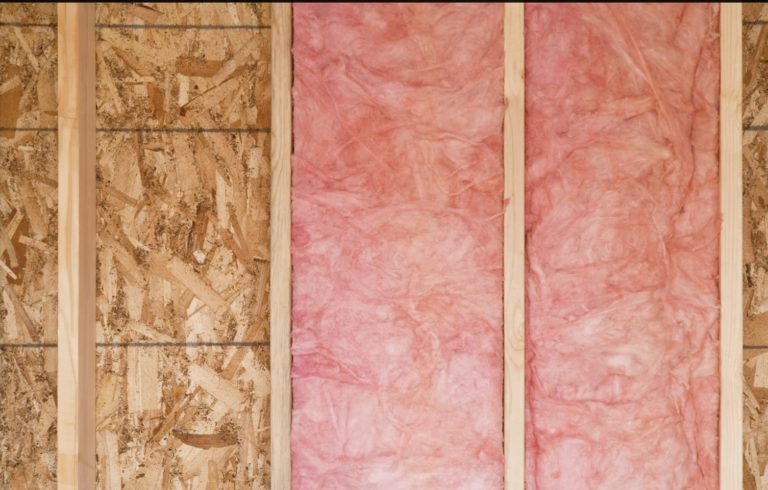
Normally, people use mineral wool (either glass fibre or Rockwool) to do the job and if you intend to do the same it is imperative you wear protective clothing, goggles and a face mask, since the wool is an irritant.
You can use sheep wool insulation, which is much nicer to handle, 100% sustainable and actually is more breathable than the other types of wool insulation. If you are happy to pay a little extra we really recommend using this.
As a final warning, never stand between joists otherwise you will more than likely come through the ceiling which is never ideal. Using a board supported by several joists is the best way of working in the loft area regardless of whether you are insulating the joists or the rafters.
Preparing the loft space ready to insulate
Before you get to the business end of installing loft insulation up in your roof, you need to make sure you have prepared the loft space and also bought the right quantity of materials to do the job. Below is a quick step-by-step guide on what you should do before you begin any work – but before this a quick word of warning!
Please remember not to step in between the joists – otherwise you will end up falling through the loft! Make sure you only stand of the joists themselves, ideally using a plank as a kneeling board.
A kneeling board should straddle several joists, thereby spreading the weight more evenly and reducing the load on the joist structure. The board should go across at least 3 joists to ensure it spreads the weight sufficiently. We also recommend covering your skin with suitable clothing and using a face mask, as stray fibreglass can act as an irritant if it comes into contact with skin.
Before installing the loft insulation:
- Clean the space between the joists by vacuuming between them, removing any dust that may have settled there over time.
- Make sure you pay attention to any cracks, dry rot or damage to the joists. If the are looks unsafe to work in, stop what you are doing and immediately seek professional help to repair these areas.
- Ensure good lighting in the loft to provide decent visibility to help you do the work.
- If you have boards fixed to your joists you need to remove these before you begin insulating the loft space.
Once you have the loft space ready to insulation we recommend doing a quick equipment check – below is a list of all the equipment you will need:
- Tough pair of scissors to cut the loft insulation
- Measuring tape
- Protective overalls and gloves when handling mineral wool (otherwise it is itchy!)
- Safety goggles
- A disposable mask
The protective overalls, gloves, goggles and mask are really worth using – the mineral wool insulation most people tend to use to insulate the loft is incredibly itchy, so making sure your skin is covered is a good way of avoiding this.
Using sheep wool insulation is another way to get around the itch issue.
Measuring the size of your loft
After you have cleared bulky objects you can see the area more clearly on what you can insulate. When measuring your loft space you need to start with the following:
- Take a measuring device and measure the whole area of your loft (this is simply the width multiplied by the length).
- Take into consideration the thickness you want to insulate to and if there is any pre-existing insulation in place, we recommend using 300mm if using wool insulation and 150mm if using the rigid insulating boards like Celotex or Kingspan.
- Measure the width of your joists – for example our wool insulation comes in two widths 380mm and 570mm – the idea is you go for the one that is closest to width of your joists so it minimises cutting.
- Measure the height of your joists – normally this is about 100mm. This means that if you are looking to insulate to a depth of 300mm in total, you will first lay down a layer of 100mm thick wool between the joists, then use 200mm thick wool laid across the joists at a 90 degree angle.
Write down these measurements on a piece of paper and then take them with you to a DIY shop to buy the insulation or visit an online retailer. Just a word of warning: insulating wool is really bulky and so unless you have a huge car, you might be better off having it delivered directly to your home.
Installing loft insulation between the joists
Insulating the loft at joist level is actually pretty easy to do as a DIY job, but if you feel uncomfortable doing the work then please call in a professional. Since different insulation products have slightly different insulating properties, building regulations use a U-value that needs to be attained to conform. This allows you to calculate the thickness of your chosen insulation product required to conform with building regulations, for example if you opt to use mineral wool, you will need to use 270mm-thick insulation to reach the 0.16 U-value specified in building regs.
To insulate your loft at joist level, please follow the steps below:
STEP 1: The first thing to do is to check whether there are light fittings that protrude between the joists (e.g. a GU10 spotlight will always have the fitting protruding into the loft), if there are, these will require capping prior to laying any insulation. These caps, sometimes referred to as downlight fire hoods or insulation guards, allow sufficient space around the light fitting for the heat to dissipate to stop the light getting too warm. Each light fitting will require a cap to prevent this overheating – they are simply placed over the light fitting and then you are good to go with the insulation.
STEP 2: The first layer of wool insulation needs to be laid between the joists, so you need to measure the distance between the joists to ensure you can get the right width of product. Typically the gap between the joists is either 380mm or 570mm so you will need a width of insulation similar to this, so it can fit snugly between the joists. Most insulation you buy will be partially perforated, allowing you to cut the roll of insulation easily to produce either 2 rolls that are 570mm wide or 3 rolls that our 380mm wide. If the insulation isn’t partially perforated, you will need to use scissors to cut it to the necessary thickness.
STEP 3: Once the insulation is the correct width, you need to roll it out between the joists; lightly press the insulation material to fit between the joists, but be careful not to overdo it and compress the material. Joists tend to be only about 100mm high (although this can vary), so match the insulation thickness you buy with the joist height – once installed, the insulation should come up to the top of the joists. You will need to work the insulation around and over any downlight caps that may now be present.
STEP 4: You now need to spread an additional 170mm – 200mm thick insulation at 90 degrees to the joists. Starting at the furthest point from the loft hatch slowly unroll the insulation over the top of the joists – make sure you use kneeling boards to spread the weight load and reduce the risk of ceiling collapsing as you move around in the loft space. This second thicker layer of insulation should have no gaps between the strips that you lay out – it should produce a continuous layer of insulation – you will no longer be able to see the joists. This will take the total thickness of the insulation in the loft to 270mm – 300mm as specified by building regulations. You may like to install even thicker than this, but the energy savings of doing so will be negligible.
STEP 5: As a final step you will need to insulate the loft hatch, by strapping on some material to the top of the hatch. This can be stapled to the top of the loft hatch, helping to preserve a consistent thermal barrier. You can also fit draught proof strips on the outside of the hatch to stop gusts of cold air in the winter. A really easy way to do this is to fill a black bag with insulation and then tape this down to the top of the hatch using thick tape.
Although 270mm – 300mm is the optimum depth recommended for mineral wool, but if you are planning on using one of the other insulating materials such as loose fill, it is worth reading the guidelines provided by the manufacturer to ensure you use a sufficient volume to give the required depth. Putting more than 270mm on insulation within your loft (e.g. 350mm) will help you heat your house for less, but the savings equal the cost of laying the additional insulation so you may deem this unnecessary.
Storing items in the loft but still insulating to building regulations
As we have said, the more insulation the better and to adhere to building regs you need 270mm of wool insulation as a minimum. One of the issues with putting this much insulation in the loft space is that you lose sight of the joists. Many people like to use the loft space as storage, however, so will insulate only to the top of the joists and then attach chipboard directly to the joists making a solid, walkable surface. Obviously if you install 300mm this is not possible, so prior to STEP 4 above, you will need to install loft stilts (or loft lifters).
These are relatively simple to install, and are essentially strong plastic stilts that raise the height of the joists, allowing you to install the extra insulation and then attach chipboard on top of the them. This allows you to still produce a useable surface while also maximising the thickness of insulation you install.
Using rigid insulation board as loft insulation
Some people may prefer to use rigid insulation board to insulate the loft space – for example Celotex or Kingspan – the process is pretty similar to above, although you will need less depth to achieve the same insulation levels (than mineral wool). You will also need a hacksaw to cut the insulation to size. If you do decide to use rigid insulation board, then you will still need to use chipboard if you want to walk on it.
Insulating water tanks in the loft
One issue that arises from insulating the loft space just above the ceiling (i.e. in the joists) is that the loft space itself will become incredibly cold. During very cold weather the temperature could even become sub-zero, which if you have water tanks in the loft, could be a big issue!
If you do have cold water tanks in the loft, first of all, never insulate underneath them; always allow heat to travel up through the roof into the bottom of the cold water tank. Also, it is worth insulating the cold water tanks themselves and lagging any pipework you can see in the loft that sits above the insulation you have installed in the joists. The kit required to insulate the cold water tanks is known as the Byelaw 30 and can be purchased from any good DIY store.


Been thinking of using Kingspan panels in my loft between the ceiling joists, not roof joist, rather than the current standard of 270mm quilt type insulation.The ceiling joists are 70mm deep so thinking Kingspan panels of around 50-60mm after which i can put a chipboard floor down for storage.Do i have to do anything special where there are wiring penetrations for lights and will the Kingspan likely match the ‘U’ value of quilt insulation? The light fittings do not extend into the loft space.
I have 300m2 of loft space.
We are thinking 100mm of loft wool as suggested And then 50 or 100mm Celotex and then board ontop,
Is 150 total or 200 total enough? Or do we still need to get to the recommendation of 270mm?
Many thanks
Hi, we have a breeze block chimney in the centre of our loft for a log burner that we don’t use. The burner was put in by the previous owners, so I assume the chimney has a flue inside. My question is, is it safe to use sheep’s wool or Kingspan insulation tight up to the blockwork or should I leave a gap?
Regards Keith
I like how you discussed the ideas you mentioned above. It is worth sharing to everyone.
I would use an open cell spray foam fitted by a specialist installer on the pitch of the roof. Saves all that bother plus wool type insulation such as Glass fibre has the ‘U’ value seriously affected by moisture which all cold roofed lofts have. Spray foam will last as long as the building is standing and is not affected by building regulations increasing GF depth all the time. Floor insulation isn’t needed when you spray foam the pitch so the whole loft floor without legs becomes available for boarding ….
I have 100mm deep joists spanning 6metres wide without any support in-between (no internal wall below in this area) roof is 6 metres wide by 15 metres long. will the joists spanning 6 metres across be strong enough?
If I want to use rigid insulation board and wool insulation, what way round does it go? Can I put the insulation board down first then the wool?
Want o renew insulation in roof space of one-storey extension with limited access. Could I use Celotex board & lay it on top of joists (already “old-type fibre glass” insulation there at the moment)? There will be no need for access after renewing insulation.
I am thinking of insulating our loft with Celotex between the joists,then laying the existing insulation on top and then over boarding so I can use the loft for storage. I am quite confused because there seems to be so many options, Would Celotex GA3000 be a product I could use in this situation?
Trying to figure out, can i compress 200mm insulation(eartwool) down to 170mm? will this be ok?
I plan to board loft using loft legs and they are only 17.5cms and i already have blown fibreglass up there, the only insulation sizes i can find are either 100mm or 200mm thickness and some articles are saying do not compress your insulation, i’m also reading other contradicting stuff which says to fill void between boards with as much insulation as you can but at the same time they say that you must allow an airlflow gap to avoid condensation, could you shed anymore light on this? thnx
Hi,
If using Celotex or Kingspan will it still be necessary to fit Loft Lifters – Loft storage stilts if boarding out the loft?
Hi John, not really as the boards will spread the weight. We would never recommend walking on just Celotex or Kingspan though. Make sure you use chipboard / ply to deck it out.
Hi
Was just wondering do you have any advice when using the celotex/kingspan method ,you mention in the wool method about the insulation guards/downlighter caps .
1, would you have to cut holes in the celotex/kingspan,, and also mark the the chipboard flooring where they are situated ,just incase you need access in the future,
2,If your joists are 100 mm ,can you put a 100 mm rigid board or do you need a gap between ceiling and insulation ie 75 mm board and 25 mm gap or does this not matter with the cold roof method .
3 , And if i use rigid board what side should i put towards ceiling the foiled side or buy board with two sides foiled
Thank you kindly for any help
Robbie
Hi Robbie, thanks for getting in touch.
In terms of the fittings it depends a little bit on the total thickness of loft insulation. Obviously if you are just going with 100mm (situated between the joists) then there are going to be quite significant cold spots across the area in question. How far do the downlights protrude into the roof space? Otherwise I would be tempted to say to cut holes around the fittings in the first 100mm of board. The next boards should then be laid at 90 degrees to these taking the total depth to 200mm (you can get away with anything above 170mm for celotex / kingspan loft insulation). So the top insulation boards won’t have holes in – just the boards between the joists. Then you will minimise the thermal bridging.
In terms of the gap – it is not necessary here to be honest – try and push down the celotex as far as you can – but in our experience it is almost impossible to get the celotex perfectly flush with the ceiling plasterboard, so some air flow occurs anyway. If you are trying to complete a warm loft (i.e. you put the insulation between the rafters) then you do 100% need a gap for air flow if using this type of board.
Finally – use the board with both sides foiled!
Hi I have insulation in my roof but I want to put insulation in my ceiling / attic my joists are 11cms and I want to use celotex?. What size do I need and air gap?. Thanks
This was the first thing we did when we bought our new house. insulating the loft was actually free, british gas came and did it becuase they did a survey and there was not enough existing loft insulation so it didn’t cost us a penny. Our house is really nice and warm and I am sure that is in some part down to this insulation. I think it is one of the things this government seem to have got right. From my experience on the day, I don’t think it is very hard to do yourself as a DIY job, the guys wore boiler suits masks and gloves I guess to protect against the itchy wool, but it took them 20 minutes and I went up and checked the whole area was covered with the loft insulation. The only problem with insulating the floor of the loft is that I can’t now see see the joists.
This is a great little guide. I insulated my loft with 300mm of wool, but then quickly reaslised you can’t store anything on top of that since it compresses the insulation so it is less effective. The insulation also comes away when you move anything (like our christmas tree this year which was a pig to remove). Those loft extender things seem like a really sensible idea to be honest. I think the challenge is now going to be finding the joists to attach them too!