Key points before you start
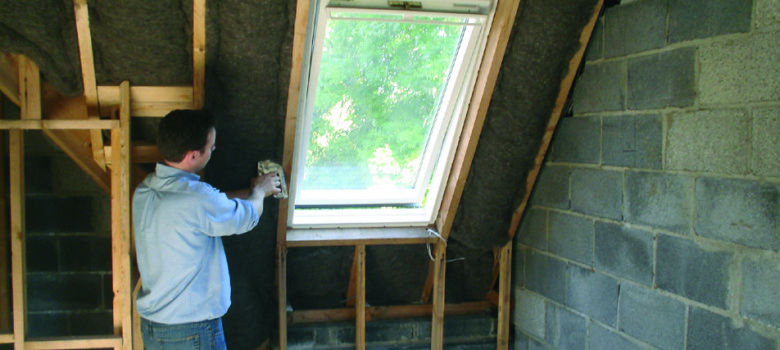
Insulating the rafter space will give you a warm loft. This means insulating between or below the sloping beams that form the construction and support a sloping roof. The rafters are joined together by a horizontal ridge board at the top and tied together by ceiling joists at the bottom.
Having chosen to insulate your rafters and potentially use the loft space as an extension of your living area, you need to be aware of some safety features before you read on:
- Ensure if you are placing heavy objects or walking in the loft space you have fix boards to your joists, otherwise there is a danger you may fall through the ceiling.
- Be aware of pipes and electrical cables.
- Making the loft warm is not a substitute for a full professional conversion.
Insulating your rafters as a DIY job
If your loft is easy to access, the insulating process should be pretty straightforward and can be undertaken as a DIY job. However, if you have any doubt in your own ability to carry out the work, we recommend getting a professional to do it.
There are two ways you can do this as a DIY job:
- Insulating between the rafters
- Insulating below the rafters
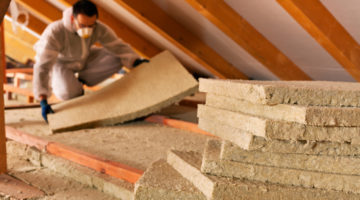
Normally, people use mineral wool or insulation boards to insulate the rafter space. We prefer recycled insulation for obvious reasons.
If you are planning to use wool then it is imperative you wear protective clothing, goggles and a face mask, since the wool is an irritant.

Preparing the loft space ready to insulate
Before you get to the business-end of installing the product you need to make sure you have prepared the workspace in the loft and have also bought the right quantity of materials. There is a quick step-by-step guide below on what you should do before you begin any work:
- Clean the rafter space by vacuuming between them, removing any dust that may have settled there over time.
- Make sure you pay attention to any cracks, dry rot or damage to the rafters and the roof membrane. If it looks unsafe to work, stop what you are doing and immediately seek professional help to repair these areas.
- Check the wiring is ok.
- Ensure a good level of lighting in the loft to provide decent visibility to help you do the work.
- Ensure you have boards laid out on the joists, as you will be moving around the loft and transferring your body weight onto the ceiling below.
Once you have all the space figured out you will need to do an equipment check. Here is what we recommend you find before starting:
- Tough pair of scissors
- Measuring tape
- Protective overalls and gloves when handling rock or glass wool
- Safety goggles
- A disposable mask
- Safety helmet
If you are handling insulation boards then you may also require the following:
- A saw
- Drill
- Nail gun
- Wooden battens
Another option are loft lifters, which are easy-to-install joist extenders that raise your loft boarding in order to allow extra insulation between your joists.
Remember: safety should always be paramount. Stop working if you start to feel unwell and consult a professional. Do not look to undertake any work under the influence of alcohol!
Measuring the size of your rafter coverage
After you have cleared bulky objects, you will be able to see the area more clearly. When measuring your loft space here is a simple guide:
- Take a measuring device (tape measure or a laser measure) and measure the rafter area – this can be done by measuring from the apex of the roof down to where the sloping roof meets the horizontal joists and multiplying by the breadth of the roof.
- Take into consideration the thickness you want to insulate – it is recommended you insulate to at least 100mm to get the optimal performance
- Measure the width of your rafters – this is important if you are thinking of insulating below the rafters
- Write down these measurements on a piece of paper and then take them with you to a DIY shop to buy the insulation or order the materials online.
DIY rafter insulation
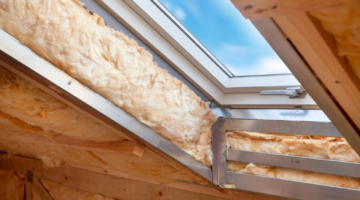
Before you apply the insulating material you will need to measure and leave a space of about 50mm between the roof (breathable membrane or tiled) and your insulating material so air can travel freely through, otherwise you could have issues with condensation and damp.
The depth of rafter will obviously influence the thickness of insulation you can fit between them, but you can always extend the rafter by attaching a wooden extension to it, since the more insulation you can fit in place, the warmer the loft space will be.
- When handling wool, ensure you take enough rolls with you into your loft space. Use scissors to cut through the packaging and lay out the material. You will need to start at the top, stapling the wool material to the sides of rafters on each side. Carry on fixing the material until you have the whole space covered. You will need to have your dimensions correctly mapped out as you need to have material that covers the width of the rafter space.
- Make sure the insulation is 50mm below the actual roof, which can be done using the battens as your measuring gauge for the breathable area between the roof and the insulating material.
- Depending how deep your rafter is you may be able to fit two layers of 100mm thick wool insulation. To ensure bits don’t fall off you can then attach a layer of netting that will ensure the material is further supported from the forces of gravity.
- At this point, if you are bothered about aesthetics you can fix a thin layer of plasterboard to the bottom of the rafters (with the material already snuggly fitted between them), and paint over it. Although you will lose you some headroom, it does improve the visuals of the place.
Installing rigid boards
- Your rigid boards will need to be cut to fit the gaps between the rafters. When they are cut ensure there is a relatively tight fit between the edges so that it could be stapled to the rafters. The wooden battens that sit further in the rafter will act as an automatic stabiliser, so the boards could easily sit on top of them.
- Again make sure you select the right thickness of the material so you fill as much of the rafter gap as possible. To ensure you don’t have bits flying off you can get sheets of see-through film and staple it to the underside of the rafters.
- Using rigid boards as opposed to wool is a much more precise process, as the cuttings need to be almost perfect to snugly fit rather than the wool, where your material can be folded and moulded to fit into the rafter space. If you are in doubt please consult a professional.
- When you use solid insulation board to create a warm loft the key thing to remember is ventilation – you must keep a 50mm gap between the roof and the rigid insulation board. We would always recommend having a breathable membrane in place between the tiles and the rafters too to allow the roof to breathe. If there is no vapour layer it might result in damp issues, since the warm air may condense in the loft space on cold surfaces. Water and timber don’t work too well together and it could result in the timbers rotting.
- The best way to achieve the gap is to attach some dowel batons on the inside of the rafters so you can then butt the insulation board up to them ensuring the 50mm gap is still in place. If you measure the thickness of the rafter, then less the 50mm gap – this is the thickness of the rigid board you want to put between the rafters. By doing this the insulation board will then not protrude out past the outside edge of the rafters, which means that you can then very simply attach more insulation boards, fixing them directly to the rafters to achieve the required depth of insulation.
What materials can you use to insulate below the rafters?
If you have shallow rafters or just don’t care about losing the headroom, then fixing material on the underside of the rafters is the much easier way to insulate at rafter level. Here you don’t have issues with condensation or worrying about leaving a gap in the roof membrane.
Installing rigid boards
- Your rigid boards will need to be cut with some logic so that you can move from one side of the roof to the other. Insulation boards come in different sizes, and as long as you figure out a plan as to how you will cover the rafter space then you should be fine.
- You need to nail them to the underside of the rafters to ensure they can be fixed. You can use a nail gun or a conventional hammer and nails to do this. If you are using a nail gun, ensure that you handle it with care.
- At this point you may also decide that it is sensible to do this as a lone ranger. Having someone there holding the material in place while you fix the edges will ensure the process is more efficient. In addition having a fresh pair of eyes and hands means you always have a second opinion during this process.
- At the end you may want to put a decorative finish by covering with a thin layer of plasterboard and painting a finish.
Installing reflective foil
The reflective foil installation is the easiest of the processes, however the thermal insulation result is the poorest.
- Unroll the material and start on one side of the loft. Staple the foil to the underside of the rafter, ensuring as you roll-out the material you staple to all the rafters. You will eventually get to the other side of the room having covered a level with this insulating material.
- You either now move onto the other direction of the loft or you position the foil below or above the level you have just insulated. The idea is that by the end of the process you would have covered the whole loft space.


When you insulate the rafters, is it worth doubling up with some foil insulation over the top of the celotex or rockwool? I want to make sure I have done enough but there isn’t any more room or depth to the rafters.
Thanks,
Roger
It is stated that a 50mm gap must be left between insulation board (I am using Wickes Easy Fit insulation panels) and the roof, membrane or tiles. Loft Conversion UK states that no gap is necessary in older houses where there is no underfelt as the tiles themselves will expel the air. Which is correct?
Why no mention of multilayer insulation blanket as an alternative to simple breather membrane (between rafters & slates? Obviously only appropriate when re-slating but surely worth a mention?
Oh dear! So I’ve just booked to have roof insulation done in my loft by professionals using spray foam with two-thirds paid with the voucher from the Government’s Green Homes Grant (I have not got it yet as I’m trying to get double-glazed windows done as well) and I’ve paid a deposit of £1,120. But now, in view of your assessment of spray foam insulation in the rafters, I’m wondering whether I’ve done the right thing? So what problems can it lead to? The whole reason I’ve gone for this is to make the house warmer and have lower energy bills but you say they will be higher. I only use the loft for a bit of storage and very rarely go up there, so I don’t want to pay higher bills just to keep the loft warm. I thought the point of the insulation is that it would do that. I think I’ll ring the company and put this to them but they’re not likely to admit it, are they? They’re inundated with applicants under the Green Homes Grant scheme, so I think this will affect a lot of other people too. By the way, I can’t put more insulation on the floor because it’s boarded up and I’m not up to taking the boards out and putting them back again.
It looks fantastic, and you did an excellent job
Can you squash rock wall to level of original joist depth so that you can board over, and then in addition insulate roof rafters to achieve a U value standard for Builders regs?