What does External Solid Wall Insulation look like?
Solid wall insulation can be a big investment – it is not something that should be rushed in to. You want to know as a customer that a job which will cost thousands of pounds is going to not just keep you warm, but also make the property look in keeping with the rest of the neighbourhood – you want it to be finished well and look good!
[amazon_link asins=’B071NGHJWB’ template=’ProductAd’ store=’the0c3-21′ marketplace=’UK’ link_id=’7b20402e-3dd6-4dfe-b2f1-b4123b5b3c4b’]Our partners at Be Constructive apply a layer of 10cm thick expanded polystyrene to the outside of the exposed walls of your home. The insulation boards are stuck to the walls initially with concrete adhesive and then reinforced by mechanical fixings and plastic caps. The system is further reinforced by a layer of adhesive and reinforcement mesh, finally finished by silicate render, which is waterproof and can be coloured depending on the customer’s choice. That’s a fairly big job, but the results are amazing, as we shall see!
>>>Click here to find out more about external wall insulation<<<
In this blog I am going to take you through how a good external wall insulation job should look – from the finish around the windows, to the render finish.
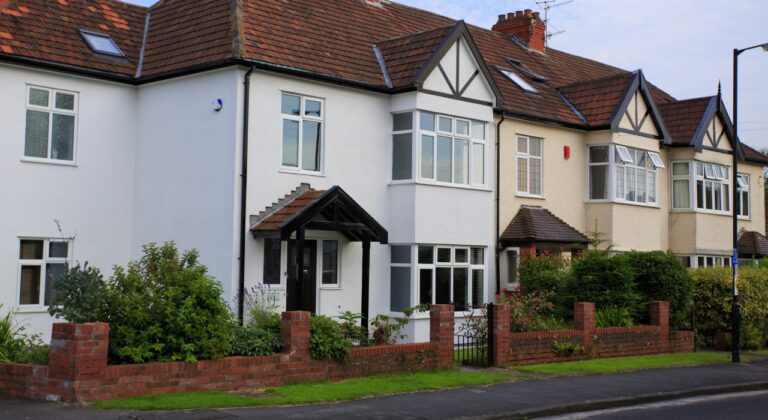
What should the render look like?
Our partners Be Constructive can create pretty much any finish you like. They have a full palette of render colours to choose from, with the option of pebble dash and brick effect finish if you prefer that, at an additional cost.
As you can see above, a simple white render can look attractive, but should you wish to go for a different colour or effect, that should not be a problem – although it may add a little to the cost.
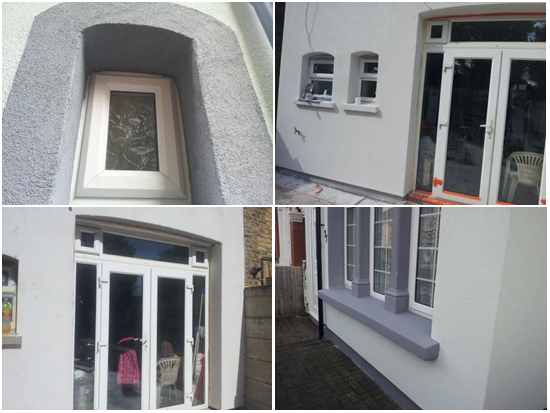
How does the solid wall insulation look around windows and doors?
The Kreisel insulation system, used by Be Constructive, like most EWI systems will thicken the external walls by 120-130mm. Where your existing windows are in line with the walls, the insulation will take the finished surface beyond the existing window line and they will install a profile, which will extend the window sills to provide an aesthetically pleasing and blended finish.
Prior to the insulation, the windowsills are extended so that it can take the extra thickness of the walls.
Where you have concrete sills the installers will replicate the existing sill lines so that the finish is aesthetically pleasing – using suitable and complementary materials determined by site installation conditions.
As you can see from these examples below, even though the insulation insets the windows somewhat, the effect remains attractive and does not adversely impact the use of the windows.
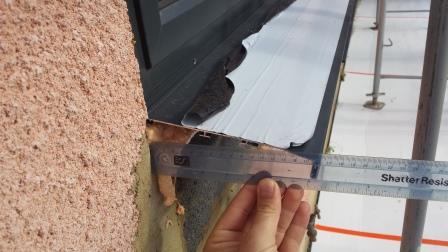
How will the external solid wall insulation work with my existing roof line and guttering?
If your existing roof line finishes 150mm or more beyond the walls, then you shouldn’t have any need to modify the existing roof profile. Where your existing roof line finishes very close to the wall, the insulation will take the finished surface beyond the existing roof line (known as the soffit) . In order to achieve a smooth and aesthetically pleasing finish we will install a profile, which will blend the new rendered elevation with the existing roof detail to meet the existing solid wall insulation standards.
Alternatively the installers can extend the roof rafters, but this is subject to a separate survey and the price will vary on the type of roof that you have. You can see here the way the roof line and insulation are reconciled.
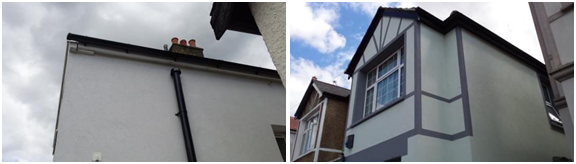
The guttering and downpipe will be carefully worked around, and moved as necessary.
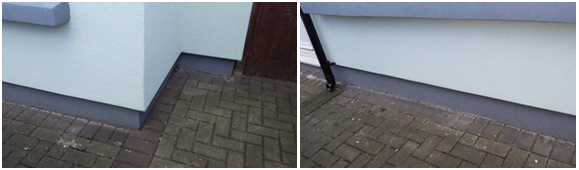
What about the Damp Course Layer?
The standard solution will finish the line of the insulation at the height of the damp proof course (the DPC layer), which is from the ground up at a range of 100mm to 300mm above ground level. The reason for this is to ensure that moisture cannot be drawn into to the fabric of the insulation and to ensure you do not compromise the existing damp proof course layer.
If requested, you can add a layer of coloured silicate render coat to be applied from the bottom edge of the insulation to ground level.
Photos showing how the DPC layer can be finished to the rest of the property:
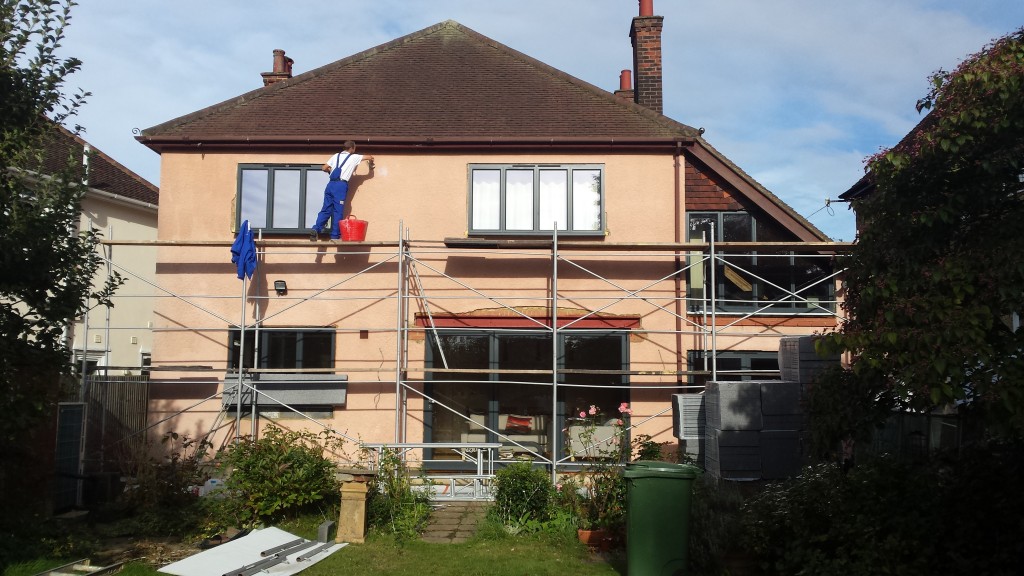
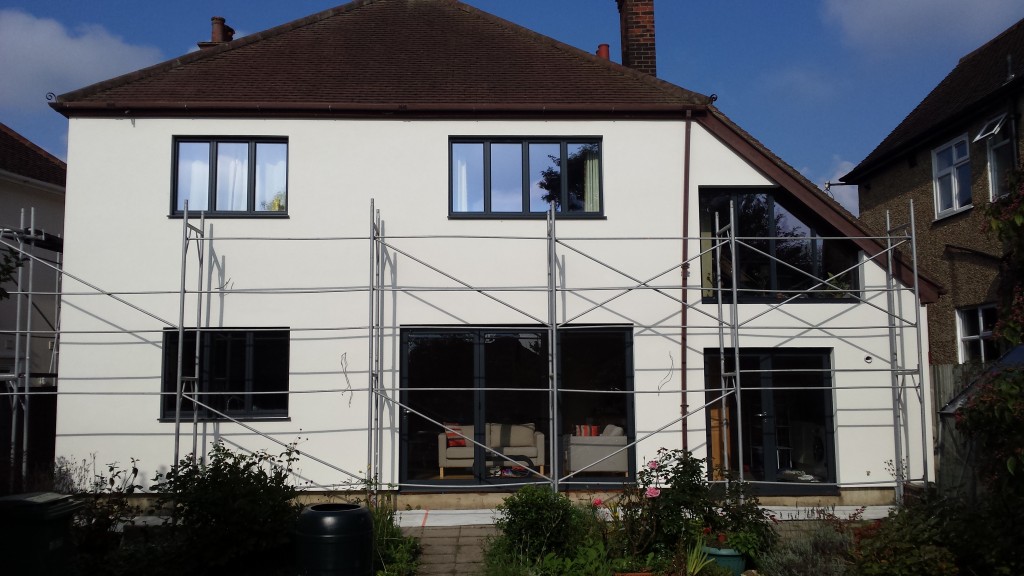
The Before and After
So how does the final job look, and how does it compare to the original look of the property. Here are some full before and after shots of a house, at the back and front of the property.
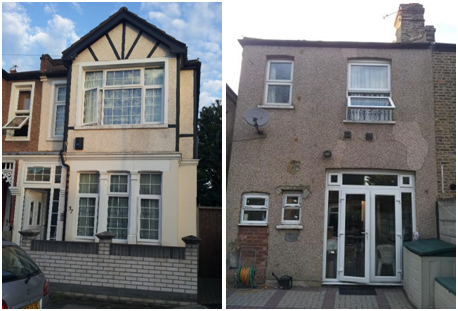
Here you can see the property prior to the installation of external wall insulation. Note the poor condition of the render at the rear of the property as well as some staining on the front.
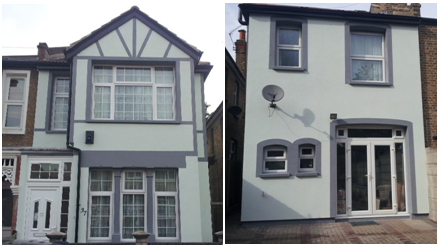
Post installation and the transformation is remarkable. A fresh render finish gives the property a revitalised look and feel, while the 100mm of EPS insulation should save the homeowner around £400/year.
Throughout this article we have used an extreme example of the transformation a property can go through. So if you aren’t so sure about the colours used, don’t worry as there are hundreds of colours to choose from as well as wether or not to have the different coloured surrounds around the windows and doors.


Am buying a wimpey concrete house and planning external wall insulation, new windows (including changing some openings) and to rebuild the side addition. What order would you do things in? Seems most contractors are specialists so it’s a matter of scheduling.
interested in only getting one external wall done (I can explain the logic). might thermal bridging be a problem? can I get a quote based on a picture and measurements that I can send in by email
looks surprisingly good
Hi Joshua, the EPS achieved 0.27W/m2K. Hope this helps.
What U-Value did the 100mm of EPS achieve in this case?