
Want to use your loft for storage, but still want it insulated?
Many of us store old bits and pieces in the loft like luggage and Christmas decorations, but one of the biggest problems is storing these on wool insulation in the loft. For one, boxes will compress the insulation, making it less effective in terms of energy savings. In addition, the wool is pretty horrible to touch (although not our 100% sheep wool!) so actually venturing into the loft to get anything you have stored up there is also a pretty traumatic experience!
Obviously one way of getting around this issue is simply boarding the loft and we come across lots of homes that do just that, resting the chipboard across the joists. The issue with this is that the recommended insulation depth is now 270mm (according to UK building regulations) and joists tend to be only 100mm tall, so it means that if the loft is insulated under the boarding – it will be at a maximum depth of 100mm which is not really sufficient.
So how then do you create a solid storage platform in the loft will still managing to insulate to the required 270mm?
Method 1: Creating a warm loft
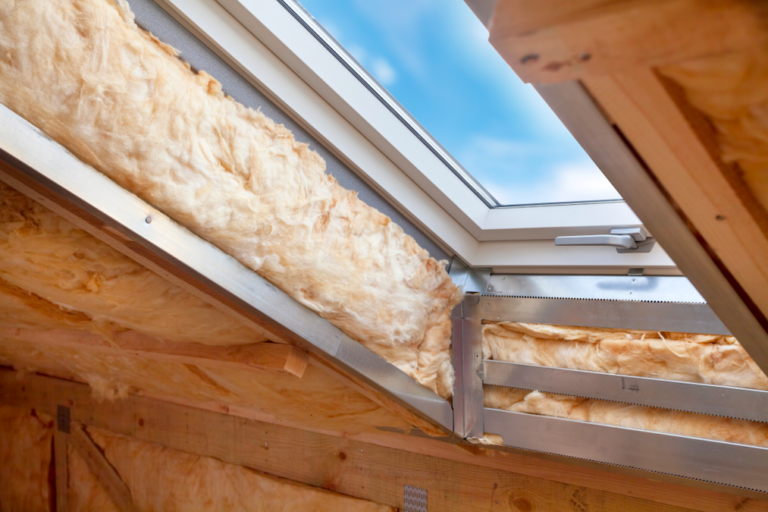
To be honest, this is our least favourite option, but only because insulating your loft should be really quick and easy. Creating a warm loft is more difficult, because you need to attach the insulation to the rafters – which is great once it is done, but having to fight gravity while installing it can be rather painful.
Essentially, a loft can be insulated either at joist level (just above the ceiling of room directly below the loft space) or at rafter level, which is between the rafters that support the roof of the loft.
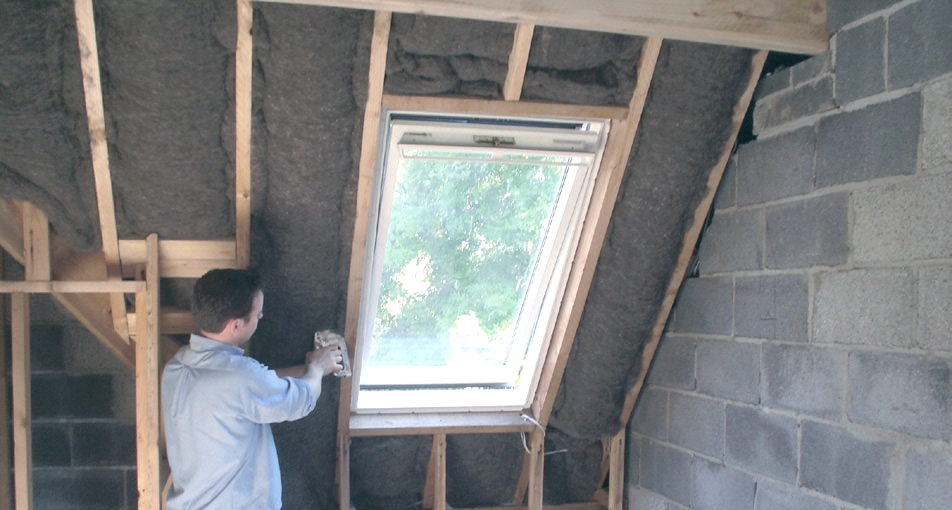
We have written a far more detailed methodology of how to do this here, but by doing this, you can simply board up the joists (or leave them boarded if they are already) and it will mean that the loft is warm – since insulation at the rafter level means that heat can travel freely through the ceiling of your home into the loft space.
So the two drawbacks are the installation process itself, and the fact you are heating your loft, which in all likeliness is not used very often. The benefit is that since the loft is warm, it will protect anything you store up there. Obviously books and the like will fare better in a more consistent temperature rather than suddenly going from very cold to very warm.
Method 2: Raising the height of your joists
This is our preferred method to be honest, and involves raising the level of the joists, on to which you can then attach the chipboard panels to create a solid storage surface.
The first way is to lay new joists at 90 degrees to the existing joists. This is relatively easy, but will mean purchasing new timber and also adding much more load (essentially weight!) to the existing joists.
In order to do this, you will first need to lay the insulation between the existing joists. Once this has been done, you will need to run joists along the length of the roof space at 90 degrees to the existing joists. You can then insulate between these and then board over.
The second method is to artificially raise the height of the joists – to do this you will need loft stilts which you can buy from us by clicking on the link below.
To install the loft storage stilts, you first need to run the 100mm thick insulation between the joists as normal. If you have spotlights coming in to the roof, we suggest getting caps that sit on top of the fitting to help prevent them from overheating.
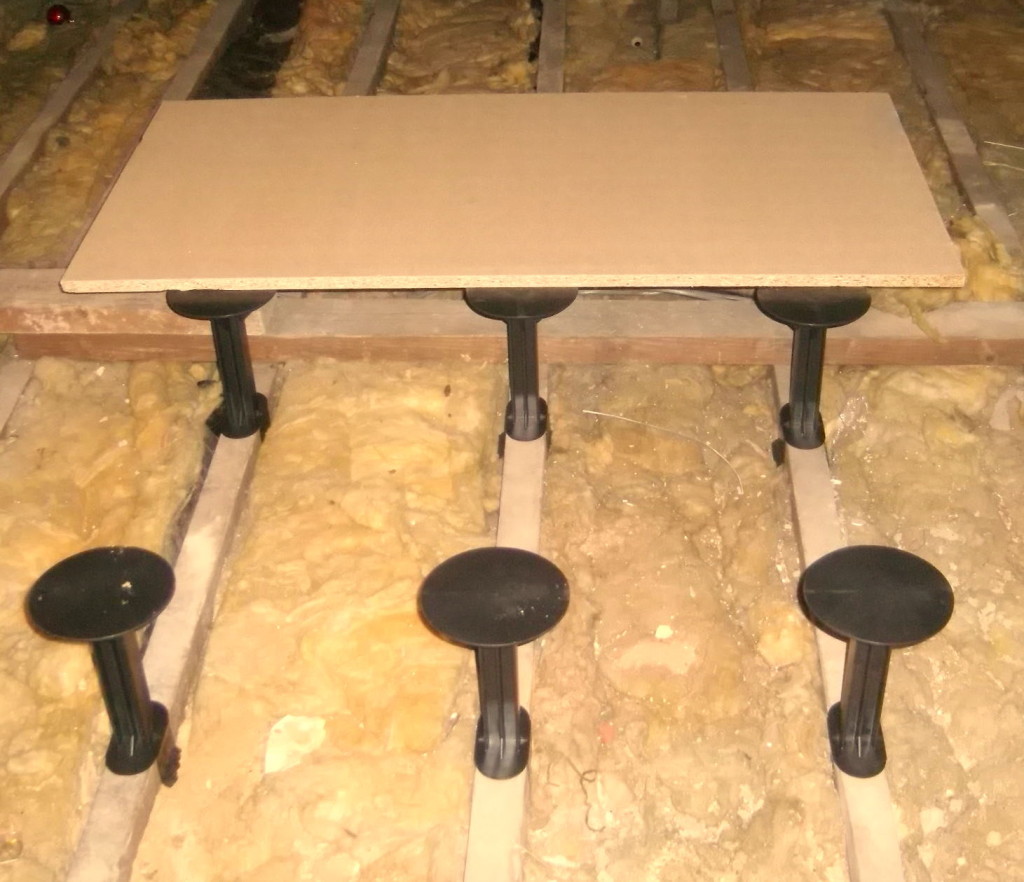
Once the initial layer of insulation has been laid between the joists, you then need to attach the loft storage stilts to the joists. They need to be spaced no more than 600mm apart to ensure that there is enough of them to support the weight of the chipboard and the items that are being stored. Once these are all in screwed into place, you can then lay the next 200mm thick layer of insulation at 90 degrees to the existing joists and then screw down the chipboard into the stilts.
The top platform of each of the stilts is 150mm wide, allowing you to support either 2 chipboard edges on the stilt or 4 corners.
You can see in the photo below what the finished installation should look like.

Method 3: Using chipboard with 100mm compressed insulation backing
The final method for insulating the loft is to use a chipboard product with a non compressing insulated backing.
These again are available from B&Q – click here to go to their site (although I am sure you can by similar products from other DIY stores).

With these, we recommend still filling between the joists will 100mm insulating wool as normal (and remembering to cap any light fittings that protrude into the roof space). Once that has been done, you then simply lay these boards ensuring that each individual board is supported by 3 or more joists. They fit together very much like a puzzle (with the tongue and groove) and can then be screwed in to place to give you a really firm supporting surface.
A final thought!
Finally we want to ensure that you only undertake this type of work if you are DIY competent. If you have any doubts, we strongly recommend getting in touch with a professional to help. Not only is falling through the ceiling between the joists embarrassing – it is also rather dangerous and expensive!


This is immensely valuable material I’ve been looking for this sort of information in one location on the internet for several hours.
How about laying additional insulation over existing chipboard loft boards? Mine have 100mm beneath the chipboard, and cover the entire loft.
Some very good info here but also some duff/incorrect advice, which could cause condensation problems if you follow it 🙁
Specifically – Method 1 is correct, Method 2 can work (and is what most people do) but you need to do it differently to what’s written here. Method 3 has a very high risk of causing condensation.
The errors on both Methods 2 and 3 relate to interstitial condensation. That is to say, moisture will rise into your loft from the rooms below. It comes through holes for lights, wiring or other services, and will also just migrate through the plasterboard ceiling even if there are no holes there. And as it rises, it will cool, owing to all the insulation. And if it’s cooler, and hits a cold surface, such as the underside of the chipboard, then there is a very high chance that it will condense. That’s what interstitial condensation means. And you don’t want that, not only will the insulation get wet and stop working properly, but the moisture can cause damp that will affect your ceiling.
The way to avoid this is simply to have a well-ventilated air-gap between the top of the insulation and the underside of the boards. The ventilation normally comes simply from the air-flow from the eaves on one side to the eaves on the other. The photos in Method 2 don’t show this, so that’s wrong. If you’re using Loft Lifters, you need to raise them up at least 50mm above the insulation, to leave a 50mm air gap. Or use another, taller, product, like LoftZone. In Method 3, the board is fixed to the insulation, which means there is zero air-gap. Other manufacturers with these products withdrew them from the market after all the condensation/damp problems they caused, the fact that B&Q still sells them says a lot about B&Q! But this blog shouldn’t be promoting this flawed concept.
Very useful, been wondering how to store stuff without putting it straight on the insulation, more becuase that insulation stuff is itchy as hell!
Hi Binky, you should try alternatives such as hemp or sheep wool. We used sheep wool when we rennovated our home and it is a pleasure to work with, not itchy at all! I wish we had used the stilts when we put chipboard down though, we added extra timber to make the joists higher and so there must be a hell of a lot of weight up there now. Just hoping the ceiling doesn’t collapse on us all!!
This is really useful. I was wondering whether you can retrospectively add boarding / storage to the loft once 300m of insulation is down?
Hi Ben,
The answer is definitely yes, so don’t feel like you cant take that free insulation offer because you might want to board it later on – it shouldn’t change the quote for the boarding work.
Regards,
Alan
Really useful information – I’ve been searching the internet for several years looking for this type of information all in one place – should have known I’d find it on twitter!
Thanks!
Haha – thanks Kathryn! Let us know if you need any more help.
Is it necessary to leave a gap between the top of the insulation and the underside of the boards? The legs I have installed come up to the height of the insullation but no higher, so the boards will be sitting right over the wool (although not compressing it). Will this be ok?
No not really! Should have a 50mm air gap between the underside of the decking and the insulation. What happens is that the warm moist air passes through the plasterboard as its supposed to do (MVP moisture vapour permeable). And then hits the underside of the board (its at the temperature of the roof space) and just sweats on the underside. Think of it like the moisture / condensation on your windows You will find it gets all damp black and mouldy under there. Its the whole reason why roof spaces have to be ventilated in the first place.