Cost Comparison: LED spotlight versus Halogen spotlight

Update: Please scroll to the bottom of the article to find out more about the new legislation affecting halogen bulbs in 2018

Comparing LEDs with Traditional Halogen Lighting

LED bulbs are the (relative) new kids on the block when it comes to home lighting and if you go in to a shop today to buy one you will see that they are considerably more expensive to purchase than traditional halogen bulbs. Is the extra upfront expense worth it?

The answer, as our numbers suggest below, is a resounding yes!

The table below shows the lifetime costs associated with running a 5w LED spotlight versus a 50w halogen spotlight.

Type of lightbulb 5 Watt LED Spotlight 50 Watt Halogen
Cost per bulb £5.00 £1.50
Cost of electricity (@ £0.15 / kWh) £18.00 £180.00
Light bulb projected Lifespan (Hrs) 24,000 2,000
Bulbs needed to last 24,000 hours 1 12
Bulb price £5.00 £18.00
Total cost of buying and running the bulb £23.00 £198.00

So this shows that for each halogen bulb you replace with an LED equivalent, you are potentially going to save £175 over its lifetime.

The table below shows you typical savings per year – based on 5 hours usage per day (typical for a kitchen or lounge).

Type of lightbulb 5 Watt LED Spotlight 50 Watt Halogen
kWh used per year 9.13 91.25
Cost of electricity per year (@ £0.15 / kWh) £1.37 £13.69

So based on the fact that you are saving about £12 per year on each bulb, the payback is a little over a year if you were to use them for 5 hours per day!

The final table looks at the savings you can make from swapping out 6 halogen spotlights in your kitchen with 6 5W LED bulbs, and it assumes that you only buy new halogen bulbs every two years – so every 3650 hours (instead of the 2000 hours which is their expected lifeline, we need to give them a chance!).

>>> Click here to see our comparison between MR16 LED bulbs with GU10 LED <<<

The yearly energy costs are as follows:

For LED bulbs – 6 x £1.37 = £8.22

For Halogen bulbs – 6 x £13.69 = £82.13

 5w LED Yearly Costs   50w Halogen Yearly Costs 
Electricity Cost Cost of Bulb Cumulative Cost Electricity Cost Cost of Bulb Cumulative Cost
Year 0 £0.00 £25.00 £25.00 £0.00 £7.00 £7.00
Year 1* £8.22 £0.00 £33.22 £82.13 £0.00 £89.13
Year 2 £8.22 £0.00 £41.44 £82.13 £9.00 £180.26
Year 3 £8.22 £0.00 £49.66 £82.13 £0.00 £262.39
Year 4 £8.22 £0.00 £57.88 £82.13 £9.00 £353.52
Year 5 £8.22 £0.00 £66.10 £82.13 £0.00 £435.65
Year 6 £8.22 £0.00 £74.32 £82.13 £9.00 £526.78
Year 7 £8.22 £0.00 £82.54 £82.13 £0.00 £608.91
Year 8 £8.22 £0.00 £90.76 £82.13 £9.00 £700.04
Year 9 £8.22 £0.00 £98.98 £82.13 £0.00 £782.17
Year 10 £8.22 £0.00 £107.20 £82.13 £9.00 £873.30
Year 11 £8.22 £0.00 £115.42 £82.13 £0.00 £955.43
Year 12 £8.22 £0.00 £123.64 £82.13 £9.00 £1,046.56
Year 13 £8.22 £0.00 £131.86 £82.13 £0.00 £1,128.69
Year 14 £8.22 £0.00 £140.08 £82.13 £9.00 £1,219.82
Year 15 £8.22 £0.00 £148.30 £82.13 £0.00 £1,301.95
Year 16 £8.22 £0.00 £156.52 £82.13 £9.00 £1,393.08
Year 17 £8.22 £0.00 £164.74 £82.13 £0.00 £1,475.21
Year 18 £8.22 £0.00 £172.96 £82.13 £9.00 £1,566.34
Year 19 £8.22 £0.00 £181.18 £82.13 £0.00 £1,648.47
Year 20 £8.22 £0.00 £189.40 £82.13 £9.00 £1,739.60
TOTAL £164.40 £25.00 £189.40 £1,642.60 £7.00 £1,739.60
Type of lightbulb 5 Watt LED Spotlight 50 Watt Halogen
Light bulb projected Lifespan (Hrs) 24,000 2,000
Cost per bulb £5.00 £1.50
kWh of electricity used over 24,000 hours 120 1,200
Cost of electricity (@ £0.15 / kWh) £18.00 £180.00
Bulbs needed to last 24,000 hours 1 12
Bulb expense £5.00 £18.00
Total cost of buying and running the bulb £23.00 £198.00

LEDs last 12-15 times longer, they use 90% less energy and so overall contribute to enormous savings on your electricity bills – so what are you waiting for? The reason for these savings is because halogen bulbs, much like traditional incandescent bulbs produce light as a by product when they get hot. LED bulbs however work differently – providing light as electrons pass through a semi conductive material, so first and foremost they produce light far more efficiently.

Year 1* – This is the time it takes to pay for the additional cost of the LED bulb, and remember after that you are saving about £12 per year on electricity per bulb you replace.

Please remember not all LED bulbs are built the same though, if you want to see why our LEDs are the best, be sure to check out our LED buyers guide!

Update (September 2018): EU Legislation to Ban Halogen

Halogen lightbulbs are soon to become obsolete in the UK following a ban made by the European Union. Retailers will have to replace their stocks of halogen lightbulbs with more energy-efficient alternatives, such as LEDs or compact fluorescent bulbs. If you’ve read the above then you’ll see why we think this is a great thing!


    Have a question or would like to find out more?

    What are you enquiring about?

    I would like to be contacted by a local installer/supplier

    I would like to receive occasional news from TheGreenAge

      Is concrete bad for the environment?

    First off, I would like to apologise – this subject really is very dry! I have tried to make the blog below as interesting as possible, but it was a bit of a struggle… You might want to grab a strong coffee before you get started!

    So here goes…..

    Concrete is the most widely used building material today as a result of its strength and its durability. It is used in homes, airports, skyscrapers, tunnels and pretty much every other type of construction you can think of.

    Concrete and cement are terms that are often used interchangeably; however cement is actually an ingredient that makes up concrete, along with water, sand and gravel. Cement acts as a hydraulic binding material, hardening with water and tying together all the aggregate materials.

    Why is Concrete a Problem?

    After coal-powered electricity, cement manufacture is the next biggest emitter of greenhouse gases, accounting for approximately 5% of annual anthropogenic global CO2 production. In 2011, we used approximately 3.6 million tonnes of the stuff within the construction industry – the problem being that for every tonne of cement produced, one tonne of CO2 is also produced.

    I am not going to try to use this blog as a platform to preach that we should stop building – that would be ridiculous. People need a place to live and businesses need to grow. Instead, I am going to look at the current manufacturing processes and identify a few technologies and areas of investigation that are being toyed with; can these reduce the impact of the cement/concrete industry and the impact it has on anthropogenic CO2 emissions?

    How is Cement Made?

    First, a bit of science! To make cement, limestone (calcium carbonate – CaCO3) is heated to temperatures approaching 10000C, along with other feedstock materials such as clay (which contains silicates). At this temperature, the limestone (and other feedstock) breaks down into Calcium Oxide (known as Lime – CaO), Silicon Oxides and Carbon dioxide. The two oxides then combine to produce di & tri-calcium Silicate, which is then ground to a fine powder producing a product known as ‘clinker’.

    Finally, gypsum is added to the clinker (to prevent flash setting of the cement), and this is ground to produce the cement, which can then be used as the main ingredient to make concrete.

    There are two ways that making cement releases CO2:

    1. Burning fossil fuels to heat the kilns to achieve the reaction temperatures
    2. Breaking down calcium carbonate into calcium oxide and CO2

    The burning of the fossil fuels accounts for about 30% of the total CO2, while breaking down the calcium carbonate accounts for 70%.

    Processes to Make Cement Manufacture ‘Greener’

    So how can you make ‘greener’ cement, thereby helping to reduce the total volume of carbon dioxide into the atmosphere?

    Carbon Sequestration

    Well strictly, the first couple of processes I touch upon are not related to changing the manufacturing process, but instead installing carbon sequestration techniques, thereby using the CO2-rich flue gasses to produce new materials.

    As covered across TheGreenAge, there are numerous techniques of using carbon dioxide to produce useful products. Artificial photosynthesis would use this gas to produce sugars that are essentially a store of energy, replicating the natural process that plants use for growth everyday. The benefit of this technique would be not only limiting CO2 emissions, but also producing a valuable by-product.

    Bio-algal synthesis is another technique for using the CO2; in this process the gas is pumped through a waste water growth medium infused with microalgae. These algae use sunlight and the CO2 for growth, doubling their mass every 24 hours, which can eventually be crushed for algae oil and algae meal for cattle. The advantage of the algae meal is that there is little cellulose within it (unlike regular crop-derived meal), so when digested by cattle, very little methane is produced (another greenhouse gas), helping to solve another greenhouse gas emitting problem.

    In terms of changes to the process itself, there are numerous different ways that it could be carried out to produce lower carbon dioxide emissions.

    Using Electrolysis to produce concrete

    If electrolysis is used to react the limestone, replacing the initial kiln part of the reaction, different resulting molecules would be produced.

    If carried out over 8000C, electrolysis would produce lime in addition to carbon and an oxygen molecule. If it is carried out under 8000C, the Lime is produced along with carbon monoxide and an oxygen atom. Carbon monoxide can be used to produce fuel and form plastics, and has a value of approximately $600 / tonne, allowing one to actually make money from the process (based on the lower cost to produce the lime).

    Make Extra Strong Concrete, so you Need to Use Less!

    This is a fairly simple idea, but by changing the feedstock entering the initial furnace, you can change the chemical composition of the clinker.  So why not make ‘extra strong’ concrete, so you don’t need to use as much to perform the same job? Placticisers are additives that are added to the concrete that increase its strength. They are relatively complex but essentially to get strong concrete you need a low amount of water within it when it dries. These placticisers act as spacers between the cement molecules, ensuring that there is less water in contact with these molecules; hence stronger concrete.

    Use Solar Power

    The kilns used in the current process (to heat the clay and limestone) need to reach incredibly high temperatures. Historically, these temperatures have been reached by using the heat from burning fossil fuels (accounting for 30% of the carbon dioxide emissions from the cement manufacturing process). If the kilns were instead heated using a green electricity source, for example a concentrated solar power plant, this would obviously instantly remove much of the CO2 produced in the process.

    Use Consistent mixes to make the concrete

    Currently under EU standards there are 170 different types of concrete mix used in the construction industry. This poses a problem for builders, who simply do not know the strength of the different types, so in order to ‘make sure’ the construction is strong enough, excess concrete is used.  If there were only say 10 types of concrete, then builders could better get to know the characteristics of each one, and they would be able to predict accurately how much of that particular type to use, thereby using less in the overall construction process.


    The Future of Concrete

    China currently use about half of the world’s supply of cement, and this demand is expected to rise. If current production techniques are used, an equivalent 700,000 tonnes of CO2 will enter the atmosphere.

    This is just China though; hopefully in the next couple of years the worlds economies will be able to put the current financial situation behind them, and begin a new phase of growth. As a result, global demand for concrete is only going to rise, therefore we really need to come up with a way to lessen the impact of the concrete industry on the environment, potentially using one of the methods detailed above.

      The Green Deal Frequently Asked Questions

    Do you need an assessment to get Green Deal Finance & Cashback

    Yes – in order to access any Green Deal finance or Cashback you will need a Green Deal Report produced by a certified Green Deal Assessor.

    Can I take my Green Deal report to any provider?

    Yes – the Green Deal Report is portable, so regardless of who carries out the assessment, you can get quotes from any Green Deal Provider.

    Can I use my current builder to install the work?

    Yes – provided the builder is a Green Deal Approved installer (PAS2030 certified). If they aren’t, you can still use them, but you won’t be able to access the Green Deal finance or Green Deal cashback.

    Can a landlord benefit from the Green Deal?

    Recent changes to the Green Deal Legislation means that landlords can now get Green Deal finance, so they can get measures installed in their properties and the bill payer will make the Green Deal finance payments on the measures (which is obviously advantageous in the case of tenants paying their utility bills).

    Do I have to pay interest on Green Deal Finance?

    Yes – The interest rate for Green Deal finance is set at 6.96%. On the face of it, this is quite a high interest rate, however the loan is fixed – taking into account solid wall insulation is paid back over 25 years, they have had to opt for a rate that is high enough to cover any future interest price rises by the bank of England.

    What is ECO?

    ECO or the Energy Company Obligation is the grant part of the Green Deal scheme. You can find out more about ECO here – but in some cases you can use this Grant in conjunction with Green Deal finance to ensure that there is no upfront payment.

    What types of charges are associated with Green Deal finance?

    Aside from the 6.96% interest rate, there is a Green Deal Finance Company charge and an Energy Company charge that go towards cover the compliance and administration costs to set up and administer the Green Deal Plan.

    Aside from Green Deal finance and cash back – why would I get a Green Deal Assessment?

    We find that many of our customers are simply getting the Green Deal Advice Report (GDAR) since they are not sure where to start on their own properties in terms of improving the energy efficiency of their homes.

    When the assessor visits your home (provided they are good!), they will provide you with numerous tips and tricks on how to lower your bills, as well as letting you know what other schemes feed into the Green Deal, like the Renewable Heat incentive and the Feed-in Tariff

    The Green Deal is now also a legal requirement to be able to get the Renewable Heat Incentive (RHI) – excluding self-build properties.

    Is the Green Deal a Grant?

    The Green Deal is not a grant – you borrow money against the energy savings that the measure installed creates. For example, replacing an old boiler with a new energy efficient model will allow you to heat the home using less gas – which will produce a saving on your gas bill.

    How long is my Green Deal Report Valid For?

    The Green Deal Report is valid for 10 years (*source Energy Saving Advice Service helpline 0300 123 1234) provided the property doesn’t undergo major changes during that time that would impact its energy efficiency.

    Can I use my existing EPC to get a Green Deal Report?

    If there has been an EPC carried out on your property after April 2012, then the assessor may choose to use the information provided. However, in our experience very few assessors will be happy to accept existing EPCs since the accuracy of them tends to be rather variable depending on the quality of the assessor!

    If, since getting the EPC, major works have taken place to the property that will have significantly altered its energy efficiency, you will need to get a new EPC completed regardless.

    What Will my Green Deal Report Look like?

    The Green Deal Report is a 5-page document – you can click here to see an example of what the report looks like, and you can click here to learn exactly what each of the different sections on the report looks like.

    How do I go about claiming Green Deal Cashback?

    A full, step-by-step guide to applying for cashback can be found here  

    What if I don’t have 12 months of energy bills

    If you do not have any information regarding energy bills, or have lived in the property fewer than 12 months then the Green Deal Report will not be able to provide you with accurate savings tailored to you. However, this does not affect the amount of funding you may receive as this is taken from a typical household living in your property.

    Why is there a fee for the assessment?

    The fee is based on the work required to produce the report, including the site survey, travel time and lodgement fees. In some cases councils may fully subsidise the cost of a Green Deal Assessment, or energy companies might try and offer free assessments in return for taking out other services they offer. On the whole though, all independent assessors will charge for the assessment as one might expect for a professional service.

    The fees for the assessment vary between suppliers, we for example charge £110 + VAT for our Green Deal surveys.

    Can I repay the Green Deal Early?

    You can absolutely pay back the Green Deal early if you want to, although in some cases there might be an early repayment charge.

    Typically if the original length of the Green Deal plan was under 15 years, then the repayment charge is likely to be very small (under £8,000 left and it will actually be zero)

    If you originally took out a Green Deal plan over 15 years, the early repayment charge is a little more difficult to calculate – and involves comparing the fixed interest charge on your individual Green Deal plan (i.e. at December 2013 – 6.96%), with the current interest being charged on Green Deal plans – but even so the repayment charge is capped at a low level.

    For more details on the Green Deal early repayment please click here.

    Is the work done under Green Deal guaranteed?

    Yes – all work carried out under the Green Deal scheme (including installations done under the Green Deal) is provided with a Green Deal Guarantee. This guarantees that if the measure goes wrong within 5 years (or 25 years in the case of cavity walls and solid walls), the Green Deal provider will rectify the problem free of charge. If the Green Deal Provider goes bust in that time frame, the liability should be covered by the insurer who has underwritten the policy.

    In the case of damage to the property resulting from a Green Deal installation, you can get the Green Deal provider to come and sort the issue within 10 years of the original measure being installed.

    Can I still switch my energy provider?

    There are various different energy companies signed up to the Green Deal including the Big six – British Gas, EDF, E.On, nPower & SSE. In addition, there are some small suppliers also signed up including Flow, Green Energy and Opus.

    Provided you are swapping between these energy suppliers then there is absolutely no problem since the Green Deal finance amount is set. If you have a Green Deal plan in place, you will be unable to move from the supplier offering Green Deal finance to another provider who doesn’t offer the finance.

    What if you can’t afford the Green Deal finance charge anymore?

    Much like when you default on energy bills, if you suddenly find yourself in a position where you can’t pay the Green Deal portion of the bill you would eventually be disconnected.

    There are obviously a few steps they will take before they disconnect you for instance they may agree to defer payments or connect you up to a prepayment meter – in addition in some cases they will not disconnect the home during the winter.

    What happens if I move house?

    The Green Deal is tied to your electricity meter (i.e. your home), not to you, so if you sell your property, the debt will pass on to the next assessor.

    If you do decide to sell or let out the property, you will need to disclose the details of the Green Deal payments to the incoming bill payer.

      Evacuated Tube Solar Thermal Hot Water Systems

    While Solar PV system turn the sun’s energy directly into electricity, solar thermal panels harness the sun’s energy by turning the solar radiation into heat. This heat is normally then used to heat water for use in the home.

    At the heart of every solar thermal system is the collector and broadly speaking there are three types of collector to choose from – flat panelled collectors, plastic collectors and evacuated tube solar collectors.

    The evacuated tube solar collectors are the most expensive, but importantly they are also the most efficient with a conversion efficiency of over 90%. This means that they can produce more heat, so while a simple plastic collector might be fine to help keep a swimming pool warm – if you want to produce hot water to use in your radiators then ideally you are going to need to go with one of these.

    The glass / glass evacuated tube solar collector

    solar thermal, evacuated tube thermal collector

    The evacuated tube comprises of a smaller glass tube suspended within a larger glass tube. The air is then pumped out of the space between the small inner tube and the larger outer tube creating a vacuum thermal insulation layer. This vacuum layer is absolutely key since it reduces heat loss from the solar collector.

    The inside of the inner glass tube is coated with a selective light absorber such as aluminium nitrate or titanium nitride oxide, which helps maximise the absorption of solar radiation over a large range of wavelengths.

    An absorber plate (normally made from copper) then runs the length of the inner glass tube, which absorbs the heat and transfers it to a heat transfer fluid. In passive systems, convection drives the movement of the heating fluid around the solar collector, when the transfer liquid gets heated it evaporates and turns to steam. This rises to the top of the evacuated tube solar collector the heat is transferred via a heat exchanger to another liquid – typically the potable water that is then stored in the hot water storage tank. The transfer liquid, having given up its heat to the heat exchanger then condenses and falls back down the evacuated tube where the process can start again.

     The Cost and Potential Returns for an evacuated Tube solar system

    A typical evacuated tube solar collector system will cost about £3,000 – £5,000 to get installed on your property, and will typically produce about 1,000 – 2,500 kWh of useful heat – or about 50% of your hot water requirements.

    As long as you get it installed by a MCS approved installer you will then be entitled to the renewable heat premium payment grant which for solar thermal installations is about £600. In addition, in March 2013 the Renewable heat incentive is launching which will pay you 17.3p / kWh of heat produced.

    Therefore you should be looking at an annual return of between £170 and £430 depending on the exact output you evacuated tube solar collector and payment is guaranteed for 7 years, but obviously the key thing is that you are producing free hot water for use in your home.

    It is worth remembering that temperature of the water produced by your system is dependant on the weather – you obviously produce more hot water in hot sunny weather – and also the season, with the majority of the hot water produced during the summer months.

    As a result we would not suggest solely relying on a evacuated tube solar collector for all your hot water. Instead it should work in conjunction with your existing hot water system (normally gas boiler or immersion heater). In addition it is recommended that water is heated to 650C to ensure that the temperature of the water is sufficient to kill Legionella bacteria (that cause Legionnaires disease), therefore if your solar thermal system only heated it up to 600C for example, then the boiler can just provide the ‘top-up’.

    Finally, if you have a combi boiler installed in your home – to take advantage of the hot water you produce you will need to install a hot water storage tank.

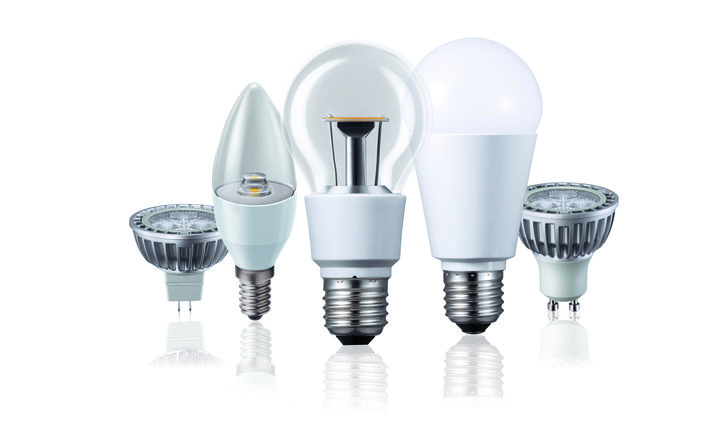
      Light bulb Colours and Brightness

    The local DIY store has plenty of different shades of white paint, and just as you can paint your walls different types of white, so you can have different types of colour in light bulbs.

    Colour Temperature

    Different types of light bulbs emit their light in different ‘colours’, so that those over 5,000K are called cool colours (bluish white), while those around 2,700K are considered warm colours (yellowish white).

    Lightbulb

    What About LED’s?

    So there is a wide variety of colours, with different bulbs emitting different ranges of colours. Some people prefer the warmer colours, others the cooler ones, and of course different rooms and areas of the home might be better suited to certain colours. You can get many of these colours in LED bulbs now.

    What are Lumens?

    You often see lumens quoted on various light bulbs. A lumen is simply a measure of how much light is being emitted that can be detected by the human eye. This is used because power (i.e. Wattage) can refer to invisible ranges of the spectrum of light, as well as the visible. So if your light bulb is giving off infra red, you won’t be able to see it, even though a form of light is being emitted.

    How many Lumens do I need?

    So the important thing to remember is that Wattage and Lumens are very different. Even between the same style of LED bulbs there can be differences in the ratio of Watts to Lumens – this is simply because one bulb is more efficient at turning that power into visible light, with less power being used to create invisible parts of the spectrum. Also remember that LED bulbs last much longer, and dim more slowly over their lifetime compared to older bulb types, so bear this in mind when buying!

    To give you an idea of how lumens compare between older light bulbs and LED, we have made a comparison table for you below:

    Wattage (Halogen / Incandescent) Approximate LED Lumens Approximate Wattage for LED’s
    40 W 200-300 3-4
    60 W 450-500 5-6
    100 W 800 10-12

      Applying Wallrock Thermal Liner

    Preparing to Apply the Wallrock

    You will need: Your Wallrock Thermal Liner, Liner Adhesive, scissors or heavy duty snap knife, roller and/or brush, hanging brush or wallpaper smoother, and a plumb line and pencil.

    Firstly, make sure your walls are clean and free of any loose wallpaper or flaking paint. It is recommended that all surfaces are sanded down and ‘sized’ with adhesive before you start.

    Applying the Wallrock

    1. Mark out straight lines on the wall using the plumb line to make sure your Wallrock is applied vertically.
    2. Apply Liner adhesive to the wall or ceiling generously. You can use a roller or brush for this. Make sure you apply more over textured or damaged surfaces. It is worth applying enough adhesive to complete one length each time, ensuring the entire surface to be papered is covered with the adhesive.
    3. Apply the thermal liner with fluffy side down. You can cut a length each time or hang directly from the roll.
    4. Cut excess paper with scissors or knife. Be careful not to trim too much!
    5. Do not overlap the paper, as you add new lengths, ensure they are tight to the length next to it. Remove excess adhesive as required using a sponge and clean water.
    6. Let the walls dry for a day naturally. That means no heating systems, except if the room is especially cold.
    7. Now you can paint over the top or hang standard wallpaper to cover the Wallrock*. Ensure any small gaps are filled with flexible, non-shrinking filler.

    *Note that wallpaper used should be ‘paste-to-wall’ or ‘non-woven paper’. Otherwise thermal expansion may cause buckling or folding of the paper.

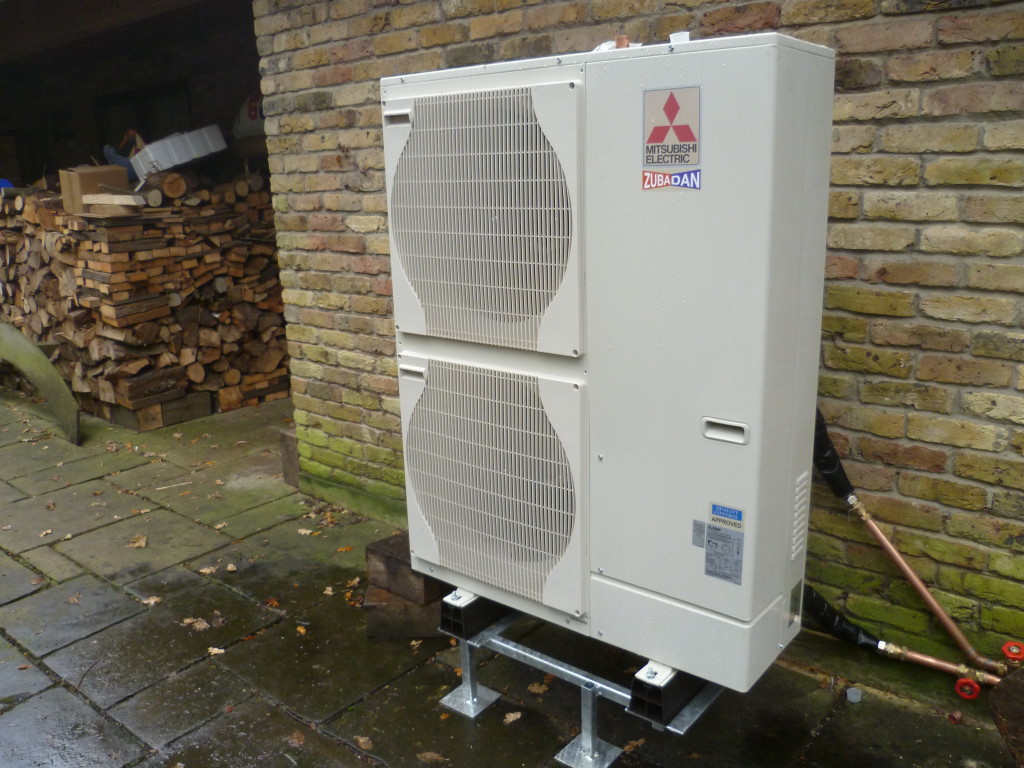
      Installing Underfloor Heating with Suspended Timber Floors

    Underfloor heating on timber floors

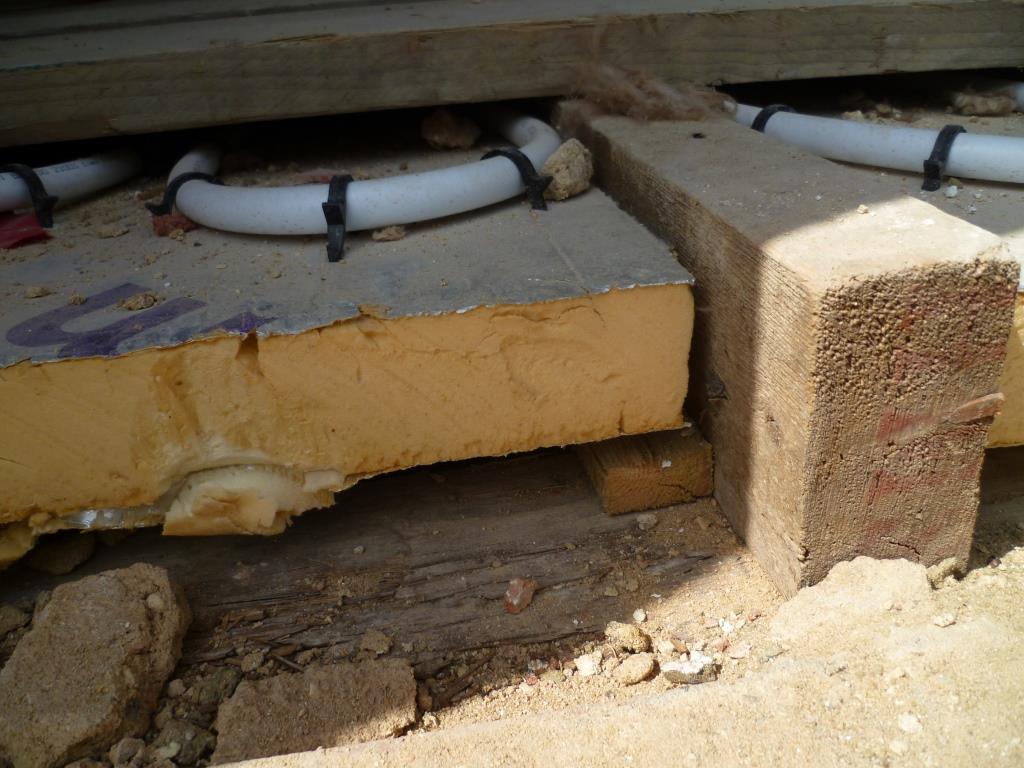
    In our home energy surveys, we encounter some interesting properties on our travels. One property we recently Green Deal assessed, located in North London, was going through a major retrofit, including the installation of an air source heat pump with underfloor heating.

    Underfloor heating we would say is a nice to have as the ability to walk on a nice warm floor even in the midst of winter is definitely a really pleasurable experience. In addition, provided you have a well-insulated property; it can be a much more efficient way of heating your property compared to using radiators. This is because the temperature the floor is heated to is much lower than trying to heat with radiators, hence less energy is required; and since heat rises a more even distribution of heat can be provided.

    Now, the property in question was a Victorian semi in Primrose Hill, with solid walls and suspended timber floors throughout. Retrofitting underfloor heating and insulation on suspended floors involves a different process than if you are looking to do the same with a solid concrete floor so please bear that in mind as you read this article. The process for installing underfloor heating and insulation on a solid concrete floor can be found here.

    Process of installing underfloor heating on a suspended timber floor

    In this section we look the installation process for a wet underfloor heating system, although in practice you could also install an electric ‘dry’ system. We recommend going for a wet system as this is better suited to heating larger surface areas like your living room and kitchen.

    Installing the insulation

    1. Prior to thinking about expensive measures like renewables, you first need to insulate the envelope of the house (loft, walls and floors). In this instance it is an absolute must before starting the installing of the underfloor heating system. As mentioned the heating works at lower temperatures than conventional systems so it is imperative the heat they produce doesn’t escape, which will be the case if you get insulation. Insulating a timber floor

    As the photo  shows, the first thing you do is fix some battens to the sides of the joists, whilst leaving enough headroom for the heating pipes and screed that will go above that.

    2. Having put this in place you then install polystyrene boards like Celotex or Kingspan of variable thickness. The precise thickness of boards installed can vary from 25mm of insulation to 150mm of insulation as long as you leave a decent air gap between the boards and the ground to allow for ventilation and the prevention of damp

    In the photo I made out the thickness to be 75mm, which was fixed between the joists of the whole floor area.

    Adding the cabling

    3. The next step is to install the heating pipes, which are then fixed to the top of the insulation boards as shown on the photo below. These underfloor coils need to be aligned close enough together to ensure there are no cold spots under the floor.

    Applying a level of screed

    4. This is then followed by a layer of screed (made of a combination of cement and sand), which is placed over the pipework to protect the pipes from collapsing when people stand or furniture is laid on the floor. To provide adequate protection and to ensure the floor isn’t too hot, the coils have to be buried with a decent level of screed material.  Screed covering

    Floor Finish

    5. A range of floor finishes can be applied to the screed layer including tiles, veneer or wooden boards. This entirely depends on your taste and preference. In my property example the home owner went for a veneer oak finish.


    Underfloor heating with Renewables

    It is also worth mentioning that underfloor heating works especially well with renewable heating solutions like air source heat pumps since they produce hot water at lower temperatures than traditional gas fired central heating systems. In addition since they are producing hot water at minimum cost once they have been installed they really do make the running of the underfloor heating system very economical.

    If you have had a heat pump or solar thermal installed in the last couple of years give us a ring to see if you could benefit from the Renewable Heat Incentive which is a subsidy payment designed to help fund the installation of renewable heating solutions. Call us on 0208 144 0897 for more details.


      Installing Underfloor Heating with Solid Floors

    When we go out to do our Green Deal Assessments, we encounter some interesting properties on our travels. One property we recently Green Deal assessed, located in London, was going through a major refurbishment, including the installation of underfloor heating.

    Underfloor heating if you have never tried it, is a real luxury; the ability to walk on a nice warm floor even in the midst of winter is definitely a most pleasurable experience! In addition, provided you have a well-insulated property; it can be a much more efficient way of heating your property compared to using radiators. This is because the temperature the floor is heated to is much lower than trying to heat with radiators, hence less energy is required and when heat rises a more even distribution of heat is achieved.

    Now, the property in question was a 1975 town house in West Kensington, with cavity walls and solid floors throughout. Retrofitting underfloor heating and insulation on solid floors involves a different process than if you are looking to do the same with a suspended timber floor so please bear that in mind as you read this guide. The process for installing underfloor heating and insulation on a suspended timber floor can be found here.

    Process of installing underfloor heating on a Solid Floor

    In the following guide we look at installing a wet underfloor heating system, although you can install electric ‘dry’ systems.

    Installing the insulation

    1. Prior to laying the anything on the solid floor, you first need to insulate the envelope of the house (loft, walls and floors). This is an absolute must before starting the installing of the underfloor heating system. As mentioned they work at lower temperatures than conventional heating systems so it is imperative the heat the produce doesn’t escape, so we strongly recommend doing the insulation first, otherwise your new heating solution could essentially not work.

    Roll of Water Proof Membrane

    The first photos shows a roll of water proof membrane, which is laid out on the concrete floor. This acts as a vapour barrier that will also prevent damp from rising in the floor.

    2. Having put this in place you can then install polystyrene boards like Celotex or Kingspan of variable thickness. The precise thickness of boards installed can vary from 25mm of insulation to 150mm of insulation. However on concrete floors the more insulation you put in, the more room height you sacrifice, although obviously the less heat will escape into the ground. It is vital that you don’t run the underfloor heating coils directly onto the concrete floor without first laying insulation otherwise the majority of the heat will be lost into the ground.


    In the photo below I made out the thickness to be 75mm, which was added throughout the ground floor area.

    Laying the underfloor heating

    3. The next step is to install the heating pipes, which are then fixed to the top of the insulation boards as shown on the photo below. These underfloor coils need to be aligned close enough together to ensure there are no cold spots under the floor.

    4. This is then followed by a layer of screed (made of a combination of cement and sand), which is placed over the pipework to protect the pipes from collapsing when people stand or furniture is laid on the floor. To provide adequate protection and to ensure the floor isn’t too hot, the coils have to be buried within 65mm of screed.

    Underlay plus carpet5. A range of floor finishes can be applied to the screed layer including tiles, veneer or wooden boards. This entirely depends on your taste and preference. In my property example the home owner went for a carpeted finish, which meant carpet underlay went in before the carpet was rolled out.

    Underfloor heating with Renewables

    It is also worth mentioning that underfloor heating works especially well with renewable heating solutions like air source heat pumps or solar thermal since they produce hot water at lower temperatures than traditional gas fired central heating systems. In addition since they are producing hot water at minimum cost once they have been installed they really do make the running of the underfloor heating system very economical.

    If you have had a heat pump or solar thermal installed in the last couple of years give us a ring to see if you could benefit from the Renewable Heat Premium Payment which is a cashback incentive to help fund the installation of renewable heating solutions. Call us on 0208 144 0897 or send us an email to Mailbox@TheGreenAge.co.uk

      ECO Funding with Green Deal Finance – Worked Example

    The following scenario shows how you can utilise ECO funding (a grant) to help pay for solid wall insulation, which otherwise wouldn’t meet the “golden rule” if paid for outside the Green Deal mechanism.

    Note: the numbers have been adopted from an example provided on the Department of Energy and Climate Change website. The ECO assumption is based on £77 per tonne of carbon saving, which is consistent with the Green Deal Final Impact Assessment.

    Internal Wall Insulation with ECO funding

    This example is based on the assumption that figures were based on a small semi-detached house or an end of terrace property.

    Insulating internal solid wall estimated to save each year £273
    Golden Rule says max repayment on electricity bill in year 1 should be £273
    Assume cost of work unsubsidised (needs Green Deal Finance) £5,300
    Assume support from “ECO” £2,724
    Cost that householder pays (i.e. cost quoted) £2,576
    Assume 25 year Green Deal finance loan @interest rate 8.3%
    After taking interest plus cost of job over 25 years:
    Annual repayment added to electricity bill £249
    Customer better off with the savings £24
    Customer also receives cashback for the measure installed £650
    Total customer benefits in year 1 (bill saving + cashback) £674

    The customer here has received £2,724 or 51% of grant money, that they won’t have to pay back. The balance is paid for by Green Deal Finance, which means there is no upfront cost borne by the customer.


    Total 25 Year Benefit to Customer

    £3,974 – £2,724 ECO grant, £24 per annum net bill saving plus £650 cashback

    From Year 26, the customer will make the full £273 estimated bill saving (today’s prices), once the Green Deal has been paid off.


      Green Deal Finance – Partially Financed Worked Example

    The following scenario shows how you can take Green Deal Finance and pay-off the balance with your own personal contribution where the “golden rule” isn’t met. Note: the numbers have been adopted from an example provided on the Department of Energy and Climate Change website.

    Replacing an Inefficient Boiler with an A-Rated Boiler

    The example below assumes the installation takes place in a typical 3 bedroom semi-detached property:

    Replacing G-rated boiler with A-rated boiler estimated to save each year £197
    Golden Rule says max repayment on electricity bill in year 1 should be £197
    Assume typical cost of the work £2,500
    Illustrative cost covered by Green Deal finance for this customer £1,300
    Assume 12 year Green Deal finance loan @interest rate 10.1%
    Personal Contribution (cash or other means of financing) £1,200
    After taking interest plus cost of job over 12 years:
    Annual repayment added to electricity bill £192
    Customer better off with the savings £5
    Customer also receives cashback for the measure installed £270
    Total customer benefits in year 1 (bill saving + cashback) £275


    Total 12 Year Net Benefit to customer

    £340 – £5 per annum net bill saving plus £270 cashback

    From Year 13 the customer will make the full £197 per annum saving (today’s prices) on the boiler when the finance is paid off.


    Pin It on Pinterest