An introduction to loft insulation
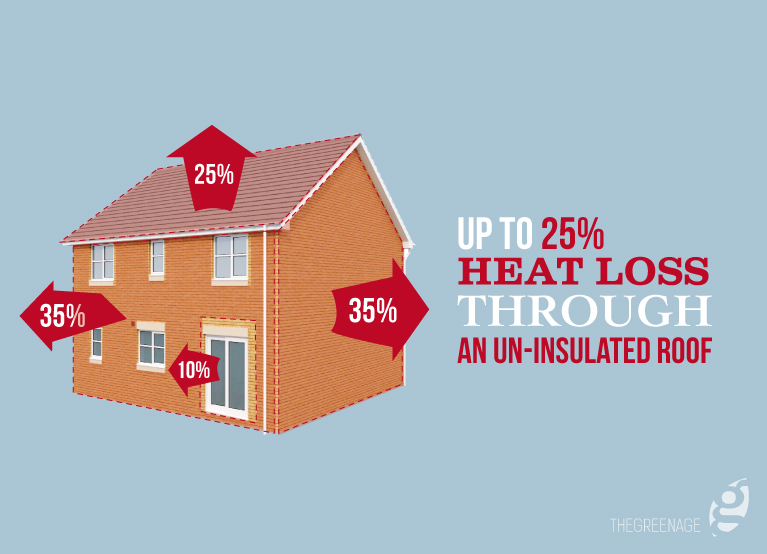
    Insulation

Why should I install loft insulation?

Insulating your loft is one of the best ways to improve the EPC rating of your home. If you have a virgin loft (i.e. 25mm or less of insulation) then insulating it will produce massive savings on your energy bill and the great thing is that for many of us, the energy companies offer this insulation free.

Without proper loft insulation, a lot of the warmth produced by your heating system escapes through the roof of your property; in fact, as much as 25% of the heat in an uninsulated house is lost in this way. Loft insulation acts as a barrier, slowing the movement of heat out of the property during the winter and into the property during the summer.

Even if you can’t get it installed for free, it is an incredibly easy DIY job. In the tabs above, you can find out exactly how to do it.

The first decision to make is whether you are looking to create a warm loft or cold loft. The majority of us just use the loft space for storage so normally a cold loft will more than suffice, but for some we use the loft space for a games room or a study. To be honest, insulating your loft as a cold loft is far easier than trying to produce a warm loft – mainly because you don’t need to fight gravity. The method of insulating your loft varies considerably whether you have decide to push forward for a warm loft or a cold loft, but since the vast majority go for a cold loft lets start there – at the joists.

Insulating your loft at the joists

The purpose of insulation is to produce a barrier that slows the movement of heat either in or out of the property. When you produce a cold loft, you need to lay insulation directly above the ceiling to produce this barrier to slow the movement of heat out of the home during the winter and visa versa in the summer to prevent the home overheating.

The latest building regulations stipulate you need to reach a U-value of 0.16 to conform – now for most of us who don’t talk ‘U-values’, this simply means you need a 300mm blanket of wool insulation (if you decide to use rigid insulation board like celotex or Kingspan then you can achieve this u-value with less thickness).

What materials can you use to insulate joists?

Mineral wool

We describe the main types of wool insulation in detail here. Each have their own advantages and disadvantages, but all of them work in a similar way. The wool traps air, which provides an insulating barrier. They are all fairly easy to work with, in that they can be cut to measure, shaped to fit around immovable objects and also rolls of wool insulation are cheap.

The main issue with wool insulation is that it compresses if you put any weight on it, which lowers its insulating efficiency. If you lay wool insulation to a depth of 270mm, it is also difficult to locate the joists, which you should use as support if you are in the loft space. Never stand between the joists, otherwise you will more than likely come through the ceiling!

Wooden boards can then be laid over all the insulation if you need to make the loft usable for things like storage. The insulating mineral wool used normally comes in rolls of blanket, which is a consistent thickness and width.


Sheep wool insulation

If you are using sheep wool insulation you will get the added benefits of the material being able to absorb moisture as well. Warm air rises from the heated rooms below and condenses when it comes into contact with cold insulation materials. Unlike other wool products, sheep wool can absorb some of this moisture and protect the joist timbers from rotting, without affecting its own insulating properties.

Loose-fill loft insulation

Insulating your loft floor using loose-fill is great as a top-up process for a pre-insulated space. It tends to be light material such as recycled newspapers and mineral wool, which can be spread to cover any gaps between the joists. You simply open the bags of insulating material and pour into any spaces that were previously lacking an adequate level of insulation. This process is a fairly simple do-it-yourself job.

Rigid insulation boards

These boards, produced by companies like Celotex, are ideal for insulating loft spaces. They are more expensive than the wool, however they offer double the insulating capacity (therefore where you would normally use 270mm of wool, you would only require 135mm of the insulating board). In addition, since they are rigid it is easy to store items directly on top of them without laying board on top of them first. They can be cut to size using a saw to fit between the joists and also drilled to allow room for light fittings.

Blown fibre insulation

Another type of loft insulation is blown fibre insulation, which must be installed by a professional. An installer will use specialist equipment to blow insulation material into the gaps that require it.

Having a carpet of insulation in your roof will significantly reduce heat loss out of your home. The reason why we are such advocates of loft insulation and consider it the no.1 method of saving energy in the home is basically because the insulation is incredibly cheap to buy and the process of producing a cold loft is so easy.

Now a couple of important things to mention; while this is certainly the cheapest way to go, the loft space itself will be very cold in the winter. This means that anything you really value should be kept in the home itself, not in the loft. In addition you need to insulate any pipework and cold water tanks up in the loft as these may now be liable to freezing and the cost of repairing bursting pipes will far outweigh the energy savings produced!

For detailed instructions on how to insulate your loft to produce a cold loft please click the tab here.

Insulating your loft at the rafters

Gravity is a pain – it makes producing a warm loft that much harder. Unfortunately if one tries to insulate between the rafters by squishing in lots of wool insulation then 9 times out of 10 it will just fall out.

However if your heart is set on creating a warm loft space then it is definitely possible. There are four main ways to insulate your rafters; the first is to use netting and wool insulation. Using solid insulation board is again a really good way to minimise heat loss out of your home. The third way is simply to use reflective foil stapled to the rafters – this doesn’t produce significant energy savings but is by far the simplest way to go, requiring just reflective foil and a staple gun. You might want to use reflective foil anyway even if you do opt for a cold loft.

What materials can you use to insulate between rafters?

The materials you should use to insulate the rafter space will depend on the way you have chosen to insulate, however the products used will tend to be denser and more rigid than those used for joists.

Normally the process you decide on depends how deep the actual rafters are. If the depth is rather shallow the best option will be to insulate below the rafters. You can in theory increase the depth yourself by attaching planks of wood top of the rafter, but then you are giving yourself more work and adding complexity to the process.

Mineral wool for insulating between the rafters

This can be glass wool, rock or mineral wool and it comes in rolls. You will need to wear protective material, a mask and have the adequate tools to fix this to the space between the rafters. The material is then fixed to the space between the rafters, whilst ensuring there is gap to the roof membrane to avoid condensation.

The difficulty in creating a warm loft with mineral wool insulation is basically due to the thickness of wool insulation needed to hit the necessary U-value as specified by building regulations (300mm) although to be honest, if you are doing this yourself, you are not required by law to conform. The way to keep the insulation in place is to use a net that you can then staple to the rafters which acts as a hammock for the insulation.

Sheep wool for insulating between the rafters

If you are using sheep’s wool, which is not an irritant, then you can handle the material without wearing protective clothing. If you are using sheep wool insulation you will also get the added benefits of the material being able to absorb moisture. Warm air rises from the heated rooms below and condenses when it comes into contact with cold insulation materials. Sheep wool, unlike other wool products, can absorb some of this moisture and protect the rafter timbers from rot, without it affecting its own insulating properties. When insulating rafters, a more rigid form of sheep’s wool insulation can be used, which is more suited to rafter insulation.

Insulation boards for insulating between or below the rafters

Insulating board can be fitted between the rafters or below the rafters. Note: Because the material is thick, if you are going below the rafter space you will certainly lose headroom in the loft space. If your rafters are shallow then you have no choice and have to insulate below.

These boards, produced by companies like Celotex or Kingspan, are ideal for insulating loft spaces. They are more expensive than the basic mineral wool, however they offer double the insulating properties (therefore where you would normally use 200mm of wool, you would only require 100mm of the insulating board). They can be cut to size using a saw to fit between the spaces and drilled through for cabling.

Reflective foil for insulating below the rafters

A thin layer of reflective material is placed below the rafters to prevent heat escaping from the property. This is the most simple way to insulate your loft via the rafters, but obviously the insulating properties on this type of insulation are very limited compared to either mineral wool or insulating board.

As mentioned, the foil is by far the easiest way to insulate your loft; you simply staple it to the rafters. It is worth starting at the apex of the ceiling and then working down the rafters, overlapping the foil to achieve a continuous reflect surface. You can then tape over the joins.

Spray foam

A layer of foam is sprayed into the rafters and sets hard. This can only be installed professionally.

When professionals come in and install spray foams, they can achieve high thermal efficiency with very little depth. The two downsides of this firstly that it is very expensive compared to the other methods and also it doesn’t allow the roof to breath, locking in the water next to the timber – which as we have mentioned previously can lead to problems.

While having a warm loft space is great because you can then use the space – you are now heating an extra ‘room’ that you wouldn’t normally heat if you insulated just above the ceiling (i.e. a cold loft) – which means your heating bill will be higher.

Benefits

Limitations

Installing loft insulation

Interested in installing loft installation? The Green Homes Grant is a Government run scheme, offering grants of up to £10,000.

If you are interested in this scheme, we advise you look in to this on the Government website.


    Interested in loft insulation?

    I would like to be contacted by local installers

    I am a recipient of state benefits (this helps us figure out what funding you're eligible for)

      Insulating Your Loft Joists: a Step-by-Step Guide

      Insulation

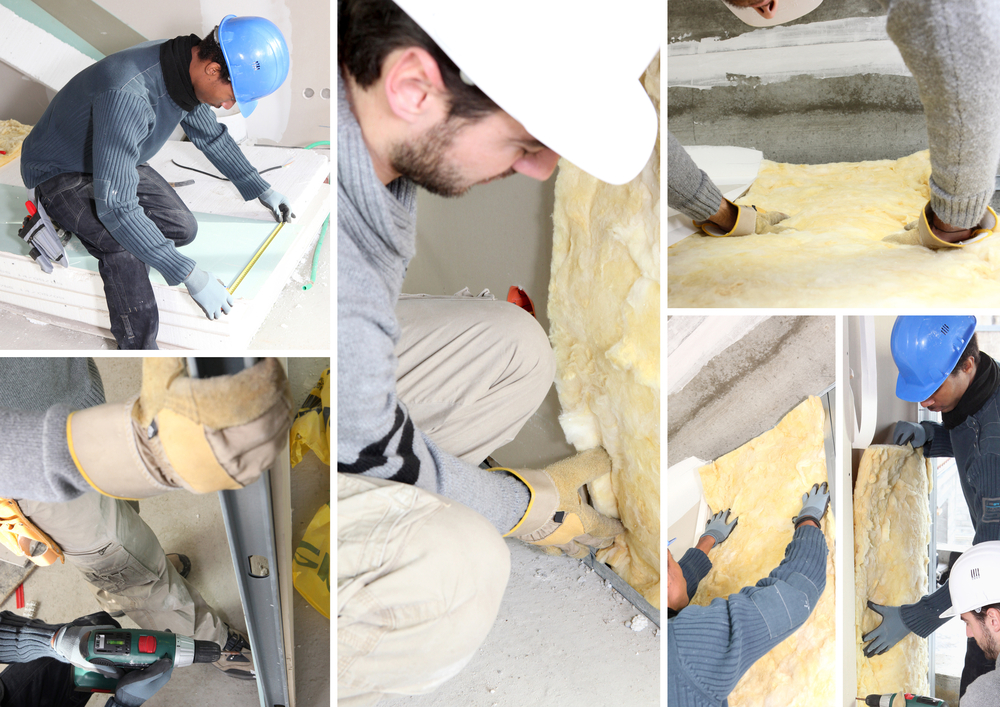
    As we mentioned in our Introduction, there are two main ways to insulate your loft: one is via the rafters and the other is by insulating your joists. Insulating the joists is often the easier of the options and especially makes sense if you have no real plans to use the loft space.

    Key points before you start

    If your loft is easy to access, the insulating process should be pretty straightforward and can be undertaken as a DIY job. However, if you have any doubt in your own ability to carry out the work, we recommend getting a professional to do it.

    Normally, people use mineral wool (either glass fibre or Rockwool) to do the job and if you intend to do the same it is imperative you wear protective clothing, goggles and a face mask, since the wool is an irritant.

    You can use sheep wool insulation, which is much nicer to handle, 100% sustainable and actually is more breathable than the other types of wool insulation. If you are happy to pay a little extra we really recommend using this.

    As a final warning, never stand between joists otherwise you will more than likely come through the ceiling which is never ideal. Using a board supported by several joists is the best way of working in the loft area regardless of whether you are insulating the joists or the rafters.

    Preparing the loft space ready to insulate

    Before you get to the business end of installing loft insulation up in your roof, you need to make sure you have prepared the loft space and also bought the right quantity of materials to do the job. Below is a quick step-by-step guide on what you should do before you begin any work – but before this a quick word of warning!

    Please remember not to step in between the joists – otherwise you will end up falling through the loft! Make sure you only stand of the joists themselves, ideally using a plank as a kneeling board.

    A kneeling board should straddle several joists, thereby spreading the weight more evenly and reducing the load on the joist structure. The board should go across at least 3 joists to ensure it spreads the weight sufficiently. We also recommend covering your skin with suitable clothing and using a face mask, as stray fibreglass can act as an irritant if it comes into contact with skin.

    Before installing the loft insulation:

    Once you have the loft space ready to insulation we recommend doing a quick equipment check – below is a list of all the equipment you will need:

    • Tough pair of scissors to cut the loft insulation
    • Measuring tape
    • Protective overalls and gloves when handling mineral wool (otherwise it is itchy!)
    • Safety goggles
    • A disposable mask

    The protective overalls, gloves, goggles and mask are really worth using – the mineral wool insulation most people tend to use to insulate the loft is incredibly itchy, so making sure your skin is covered is a good way of avoiding this.

    Using sheep wool insulation is another way to get around the itch issue.

    Measuring the size of your loft

    After you have cleared bulky objects you can see the area more clearly on what you can insulate. When measuring your loft space you need to start with the following:

    Write down these measurements on a piece of paper and then take them with you to a DIY shop to buy the insulation or visit an online retailer. Just a word of warning: insulating wool is really bulky and so unless you have a huge car, you might be better off having it delivered directly to your home.

    Installing loft insulation between the joists

    Insulating the loft at joist level is actually pretty easy to do as a DIY job, but if you feel uncomfortable doing the work then please call in a professional. Since different insulation products have slightly different insulating properties, building regulations use a U-value that needs to be attained to conform. This allows you to calculate the thickness of your chosen insulation product required to conform with building regulations, for example if you opt to use mineral wool, you will need to use 270mm-thick insulation to reach the 0.16 U-value specified in building regs.

    To insulate your loft at joist level, please follow the steps below:

    STEP 1: The first thing to do is to check whether there are light fittings that protrude between the joists (e.g. a GU10 spotlight will always have the fitting protruding into the loft), if there are, these will require capping prior to laying any insulation. These caps, sometimes referred to as downlight fire hoods or insulation guards, allow sufficient space around the light fitting for the heat to dissipate to stop the light getting too warm. Each light fitting will require a cap to prevent this overheating – they are simply placed over the light fitting and then you are good to go with the insulation.

    STEP 2: The first layer of wool insulation needs to be laid between the joists, so you need to measure the distance between the joists to ensure you can get the right width of product. Typically the gap between the joists is either 380mm or 570mm so you will need a width of insulation similar to this, so it can fit snugly between the joists. Most insulation you buy will be partially perforated, allowing you to cut the roll of insulation easily to produce either 2 rolls that are 570mm wide or 3 rolls that our 380mm wide. If the insulation isn’t partially perforated, you will need to use scissors to cut it to the necessary thickness.

    STEP 3: Once the insulation is the correct width, you need to roll it out between the joists; lightly press the insulation material to fit between the joists, but be careful not to overdo it and compress the material. Joists tend to be only about 100mm high (although this can vary), so match the insulation thickness you buy with the joist height – once installed, the insulation should come up to the top of the joists. You will need to work the insulation around and over any downlight caps that may now be present.

    STEP 4: You now need to spread an additional 170mm – 200mm thick insulation at 90 degrees to the joists. Starting at the furthest point from the loft hatch slowly unroll the insulation over the top of the joists – make sure you use kneeling boards to spread the weight load and reduce the risk of ceiling collapsing as you move around in the loft space. This second thicker layer of insulation should have no gaps between the strips that you lay out – it should produce a continuous layer of insulation – you will no longer be able to see the joists. This will take the total thickness of the insulation in the loft to 270mm – 300mm as specified by building regulations. You may like to install even thicker than this, but the energy savings of doing so will be negligible.

    STEP 5: As a final step you will need to insulate the loft hatch, by strapping on some material to the top of the hatch. This can be stapled to the top of the loft hatch, helping to preserve a consistent thermal barrier. You can also fit draught proof strips on the outside of the hatch to stop gusts of cold air in the winter. A really easy way to do this is to fill a black bag with insulation and then tape this down to the top of the hatch using thick tape.

    Although 270mm – 300mm is the optimum depth recommended for mineral wool, but if you are planning on using one of the other insulating materials such as loose fill, it is worth reading the guidelines provided by the manufacturer to ensure you use a sufficient volume to give the required depth. Putting more than 270mm on insulation within your loft (e.g. 350mm) will help you heat your house for less, but the savings equal the cost of laying the additional insulation so you may deem this unnecessary.

    Storing items in the loft but still insulating to building regulations

    As we have said, the more insulation the better and to adhere to building regs you need 270mm of wool insulation as a minimum. One of the issues with putting this much insulation in the loft space is that you lose sight of the joists. Many people like to use the loft space as storage, however, so will insulate only to the top of the joists and then attach chipboard directly to the joists making a solid, walkable surface. Obviously if you install 300mm this is not possible, so prior to STEP 4 above, you will need to install loft stilts (or loft lifters).

    These are relatively simple to install, and are essentially strong plastic stilts that raise the height of the joists, allowing you to install the extra insulation and then attach chipboard on top of the them. This allows you to still produce a useable surface while also maximising the thickness of insulation you install.

    Using rigid insulation board as loft insulation

    Some people may prefer to use rigid insulation board to insulate the loft space – for example Celotex or Kingspan – the process is pretty similar to above, although you will need less depth to achieve the same insulation levels (than mineral wool). You will also need a hacksaw to cut the insulation to size. If you do decide to use rigid insulation board, then you will still need to use chipboard if you want to walk on it.

    Insulating water tanks in the loft

    One issue that arises from insulating the loft space just above the ceiling (i.e. in the joists) is that the loft space itself will become incredibly cold. During very cold weather the temperature could even become sub-zero, which if you have water tanks in the loft, could be a big issue!

    If you do have cold water tanks in the loft, first of all, never insulate underneath them; always allow heat to travel up through the roof into the bottom of the cold water tank. Also, it is worth insulating the cold water tanks themselves and lagging any pipework you can see in the loft that sits above the insulation you have installed in the joists. The kit required to insulate the cold water tanks is known as the Byelaw 30 and can be purchased from any good DIY store.

      Insulating your Loft Rafters: a Step-By-Step Guide

      Insulation

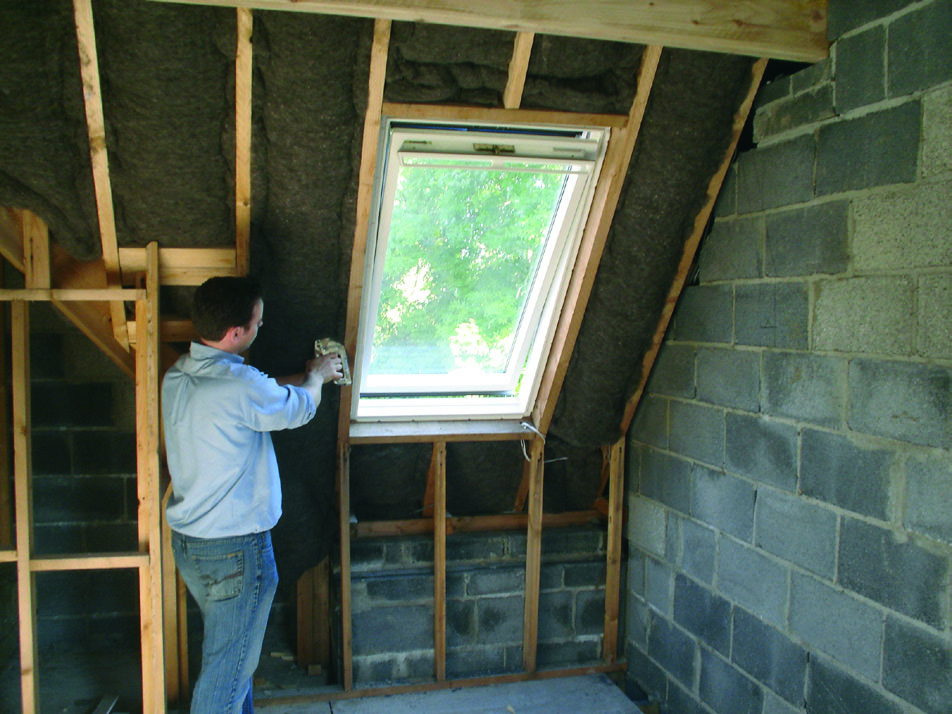
    Key points before you start

    Insulating the rafter space will give you a warm loft. This means insulating between or below the sloping beams that form the construction and support a sloping roof. The rafters are joined together by a horizontal ridge board at the top and tied together by ceiling joists at the bottom.

    Having chosen to insulate your rafters and potentially use the loft space as an extension of your living area, you need to be aware of some safety features before you read on:

    1. Ensure if you are placing heavy objects or walking in the loft space you have fix boards to your joists, otherwise there is a danger you may fall through the ceiling.
    2. Be aware of pipes and electrical cables.
    3. Making the loft warm is not a substitute for a full professional conversion.

    Insulating your rafters as a DIY job

    If your loft is easy to access, the insulating process should be pretty straightforward and can be undertaken as a DIY job. However, if you have any doubt in your own ability to carry out the work, we recommend getting a professional to do it.

    There are two ways you can do this as a DIY job:

    Normally, people use mineral wool or insulation boards to insulate the rafter space. We prefer recycled insulation for obvious reasons.

    If you are planning to use wool then it is imperative you wear protective clothing, goggles and a face mask, since the wool is an irritant.

    Preparing the loft space ready to insulate

    Before you get to the business-end of installing the product you need to make sure you have prepared the workspace in the loft and have also bought the right quantity of materials. There is a quick step-by-step guide below on what you should do before you begin any work:

    Once you have all the space figured out you will need to do an equipment check.  Here is what we recommend you find before starting:

    If you are handling insulation boards then you may also require the following:

    Another option are loft lifters, which are easy-to-install joist extenders that raise your loft boarding in order to allow extra insulation between your joists.

    Remember: safety should always be paramount. Stop working if you start to feel unwell and consult a professional. Do not look to undertake any work under the influence of alcohol!

    Measuring the size of your rafter coverage

    After you have cleared bulky objects, you will be able to see the area more clearly. When measuring your loft space here is a simple guide:

    DIY rafter insulation

    Before you apply the insulating material you will need to measure and leave a space of about 50mm between the roof (breathable membrane or tiled) and your insulating material so air can travel freely through, otherwise you could have issues with condensation and damp.

    The depth of rafter will obviously influence the thickness of insulation you can fit between them, but you can always extend the rafter by attaching a wooden extension to it, since the more insulation you can fit in place, the warmer the loft space will be.

    Installing rigid boards

    What materials can you use to insulate below the rafters?

    If you have shallow rafters or just don’t care about losing the headroom, then fixing material on the underside of the rafters is the much easier way to insulate at rafter level. Here you don’t have issues with condensation or worrying about leaving a gap in the roof membrane.

    Installing rigid boards

    Installing reflective foil

    The reflective foil installation is the easiest of the processes, however the thermal insulation result is the poorest.

    Pin It on Pinterest