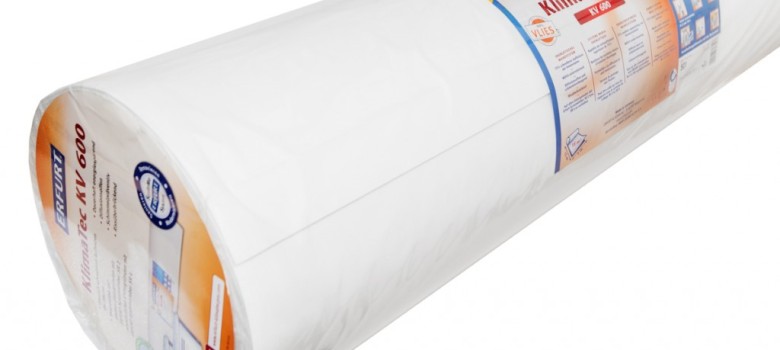
Options to insulate the walls of your home
Up to 35% of heat in the home is lost through the walls, therefore insulating them will massively lower your energy bills.
If your home was built after 1935, the chances are you have cavity walls; these are insulated very easily by injecting them with cavity wall insulation.
Several holes are drilled in the outside of the wall, and insulating beads or wool insulation are then injected into the cavity between the two skins of brick.
If you live in an older house or you know that you have solid walls (there are some exceptions to the post- 1935 rule), the insulation process is a little bit trickier.
Basically, in this instance you need to either insulate the walls externally or internally.
Insulating internal solid walls causes a lot of disruption in the home since you need to move radiators and furniture – but probably the major reason some people decide it is not for them is because it steals room space.
External wall insulation is often the preferred insulation method on solid wall properties. You can have a plain smooth finish (any colour) or brick slips.
>>> See what solid wall insulation looks like <<<
Both external and internal wall insulation need to be at least 100mm thick, otherwise they really aren’t going to greatly improve the energy efficiency. Making your wall 100mm thicker on the inside obviously will make the room significantly smaller, especially if you need to insulate more than one wall. Hence, you might want to consider insulating using thermal liner (sometimes referred to as thermal wallpaper) as an alternative solution.
What is Thermal Liner?
Thermal liner is basically a thin material that is used to help maintain heat in a room. It is made from wood fibres interwoven with durable textile fibres. This gives you is a very strong, flexible material that when attached to the walls is said to increase the energy efficiency of the room in question.
Does Thermal Liner increase the energy efficiency of walls?
I used the Wallrock KV600 Thermal Liner in my home but I think I need to set the scene a little. I have a pre-1900 maisonette situated in South London. It is near a fairly busy road, so buses and lorries driving by have actually caused quite a few cosmetic cracks in the ageing plasterboard of one of the bedrooms. In addition, this room genuinely gets freezing in winter, but the room isn’t massive so I was looking at keeping it warm without compromising on space. Thermal liner is definitely a compromise between solid wall insulation and loss of space, but it can be the best option for homes like mine, where space and energy use are at a premium.
Installing the Thermal Liner
Firstly the thermal liner is very easy to attach to the walls. Click on the link below to access the thermal liner hanging instructions
>>> KV600 Thermal Liner Hanging Instructions <<<
As recommended, I used the specially formulated Wallrock insulation adhesive to hang it on the walls; this is strong stuff and you need a lot of it but it does hold it in place (although there is a bit of holding until the adhesive sets). It is a little strange that the adhesive comes in tubs of 5kg and 10kg, but the recommendation is to use 6kg per roll of KV600 – it means that you need to go for the 10kg pack, even if you want to do just one roll, so you will have excess adhesive.
The video below shows you exactly how the Wallrock thermal liner is hung on the walls.
The KV600 is about twice the price of the normal Wallrock thermal liner, however the rolls are twice the size so each one covers an area of 15m2. The main advantage for me though is that it is a little bit thicker (4mm as opposed to 3.2mm thick), which is the key to increased energy efficiency. Once it is up on the walls you can paint over it as required.

One of the added advantages of installing the Wallrock KV600 Thermal Liner was its ability to cover the cosmetic cracks in the room. Now since I live on this busy road, large vehicles are going to continue to drive past my flat. The thermal liner has the ability to move very slightly so gone are the days of visible cracks in the room.
One of the things I could not accurately assess is the savings it has made on my bills. While certainly increasing the comfort of the room in question, I cannot say whether there have been significant savings on my bills – mainly because the bloody energy companies keep putting my bill up! Therefore it is impossible for me to say it will pay back within a certain timescale.However I can conclusively say it does increase the energy efficiency of the walls in my home!
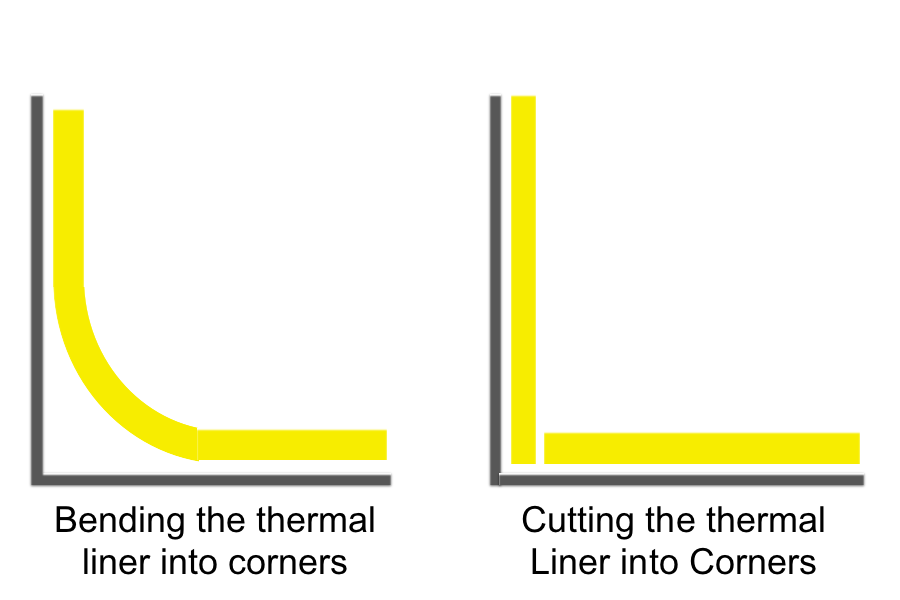
As a final tip – if you are going round the corners of rooms with the thermal liner, I suggest cutting it as per the diagram below.
This ensures that the thermal liner fits more snuggly around the room!
Advantages of Wallrock Thermal Liner (KV600)
- Wallrock thermal liner is significantly cheaper than either internal or external solid wall insulation
- A noticeable increase in energy efficiency – the room certainly doesn’t get cold as fast when the heating turns off
- Wallrock thermal liner covers the cracks and ‘moves’ with the building so the room will remain crack free (fingers crossed!)
- It does a job and doesn’t steal significant square footage of the room.
Another option is AeroTherm insulation paste. Just a 1mm layer on walls can reduce heat loss from rooms by 35%.





Thanks James – I thought this was a really useful read – we had this installed in our lounge and it has made a very noticeable difference. Our decorator highlighted that the key to putting this on the walls was to put as much adhesive on the liner as possible to hold it firmly in place – just something I thought might be useful to share!
I used the KV600 and there was a notable difference in room temperature once job was finished in my spare room. You really need to use very sharp scissors or a stanley knife to cut it though otherwise the fibres snag!
Also, the instructions are telling the truth about needing 5L of wallrock power adhesive per roll so make sure you use lots.
It is really good stuff though, this thermal liner – a nice alternative to solid wall insulation.
Hi Paul – thanks for your comment!
We used it in the spare bedroom of my home too – you are quite right with regards to using a sharp knife! It is good stuff to work with provided you cut it well, since the corners of the room need to be cut very accurately. Bending the material around corners simply doesn’t work!
Hi,
I hired a decorator to hang my wallrock thermal liner kv600. Unfortunately, it did not go so well. Immediately after he left it became obvious that the liner was coming off the wall at almost all of the seams. What’s more worrying is that there are very clearly some quite large bubbles underneath the liner as well (many at least 0.5m wide and quite long as well). It seems that the glue was not applied thickly enough or dried before the liner was stuck to the wall (walls were sized + PVAed before the liner was applied).
The thing has not come off the wall as yet but I am worried that in might in due course – as well as creating cavities for the mold to grow…
Do you have any advice on how to proceed? The decorator has the intention of sticking the seams back on with the reminder of the glue but I am worried about the bubbles under the liner. Should he strip it all and start from scratch? How would he do that? Any advice appreciated!
Cheers
Kaska
Hi Kay,
First thing to ask is whether you have used the approved thermal liner adhesive: http://www.thegreenage.co.uk/energy-saving-shop/wallrock-thermal-liner-adhesive/
Standard PVA glue will not be strong enough to hold the thermal liner, so we always recommend using the approved glue.
If you have air bubbles though, you will definitely need to strip it off and start again. Sorry.
Kind regards,
Alan
Is there a thicker product than this that would improve the efficiency a bit more? 4mm seems really thin!
Hi Sue, so the KV600 reduces the U-Value by about 0.4. If you wanted to increase the efficiency further then you should look at internal solid wall insulation. We also have another product called Aero-Therm, which is applied as a gel as opposed to a wallpaper and has similar insulation qualities. The problem with a thicker wallpaper would be that the weight of it would drag it off the walls. Hope this helps.
I have just hung my first roll of KV600 and a good tip I found to work was use a warm electric iron over each strip it removes creases and helps the adhesive dry quicker it’s the first time i have ironed wall paper but it works.
Thanks for the tip Brian!
Is this a possible solution for a small rear room with 3 external walls that suffers from condensation and hence mould problems?
Hi Katie, thanks for getting in touch. The thermal liner (KV600) would certainly help with this – mainly because the walls would no longer be cold to touch, therefore warm moist air wouldn’t condense on them.The paste all contains both fungicide and biocide to help stop mould.
Hi. We’ve used kv600 on all external walls of our stone house after great success in our previous home but the corners are still running in water (condensation) particularly along the decorators caulk seam. We have tried anti condensation paint but this doesnt seem to have fixed this. Would the aero therm work? Could we ‘paint it’ over the fibreliner? We are working on dehumidifing the propery and ventilating too but wondered if adding aerotherm on ‘bridge areas’ or corners over the kv600 and fibreliner would be effective, possible or a waste of money. Many thanks.
Is it usual for stone houses to have condensation problems? I lived in one for some years, an old house, and there were never any condensation problems.
De humidifiers definietly work and a drier room atmosphere will feel warmer, we have used them for years. Internal dry lining has rendered the de humidifiers redundant. Method used horizontal batten formed air gap covered with double sided bubble foil then vertical batten formed air gap then foil backed plasterboard works really well. If the work is done DIY, cost effective,
I’m considering insulating our dormer rooms which are really very cold in winter because of the flat (read: uninsulated roof and uninsulated tiled external wall. I therefore read this with some interest. Can this be used on ceilings as well and has anyone done it with success? Is it possible to use either 2 layers of this product to increase the insulating effect and/or could it be used as an additional layer on top of something like Sempatap? I know this will probably sound a bit OTT but believe you me the upstairs dormer rooms are freezing and I’m at my wits end in trying to find a cost effective solution – hence the last question.
Any help would be appreciated.
PS : I couldn’t find any information on the company website re the thermal values. Is it just me or……?
Hi
I need to insulate my internal walls and searching the web I have come across a product called Wallrock KV600 Thermal Liner and another one called Erfurt with 4mm thickness,.
My questions are, what is the different between Wallrock KV600 and Erfurt both with 4mm thickness?
Cand I use Erfurt Mav 4mm Polystyrene first on the wall and the apply the KV600 on top so I can end up with 8mm at the end of the project?
Thank you very much
You will need to contact the makers of Wallrock kv600 and ask them if their adhesive is suitable to use over polystyrene as some adhesives melt polystyrenes ….I assume that you will be papering over the wallrock with a standard wallpaper, if so remember that anything stuck to a wall is only as good as the paste connecting it to the wall so the Erfurt Mav will need to be a suitable strength paste also.
I need to insulate my Park Home internally will Wallrock Thermal Liner save on my fuel bills?
Hi I have a room lined with standard lining paper that is painted with emulsion, I have some cracks and have removed some of the paper to repair them, I have now seen the wall rock liner and would like to use this on the wall and over the lining paper, is this ok to do?
I JUST LOVE YOUR WAY OF PUTTING THINGS! YOU MADE ME REALLY LAUGH
There’s no value for thermal conductivity, it just says it will be warmer! Thanks but this is not helpful. Even 1% is “warmer” but that is not cost effective
I see what you’re saying, but it does say in the blog that James was using Wallrock to make the room warmer, rather than to save money! The only figure Wallrock provides is that ‘When Wallrock Thermal Liner is applied to a solid wall dwelling with a U Value of 2.1 W/m2K the resulting U Value is improved (i.e. reduced) to 1.79 W/m2K.’
WHAT IS THE DIFFERENCE BETWEEN WALLROCK FIBRELINER KV600 & THE GRAPHITE ONE PLEASE?
Hi Linda. They are made out of very different materials – the graphite one is polystyrene, and KV600 is made from wood fibres. KV600 is not much thicker than normal wallpaper, but the polystyrene one will add thickness to your walls.
thank you so much for this great information which was very well explained and to the point!
Thanks so much,,.I’m looking at buying a solid stone house with a bad energy report because of no insulation,and you have put my mind at rest!
HI Jean, just read your post and wondered when you made it, if you bought the house and how you have got on with insulation. I bought a stone cottage over 2 years ago and am thinking of insulating, It would be great to know your experience. Many thanks Chrissy
Hi, i am thinking of getting this to warm an outside wall , my first question is do you have to cut internal and external corners ? Also can you apply wallpaper stright on top of it and can you use ordinary wall paper paste to hang the paper ? cheers for any help
Hello, I applied the Warlock KV600 a few years ago and now mould has formed on the paper. I managed to rip off one section and the underneath is completely mouldy. This was not supposed to happen with the product. can anyone advise me. Thanks.