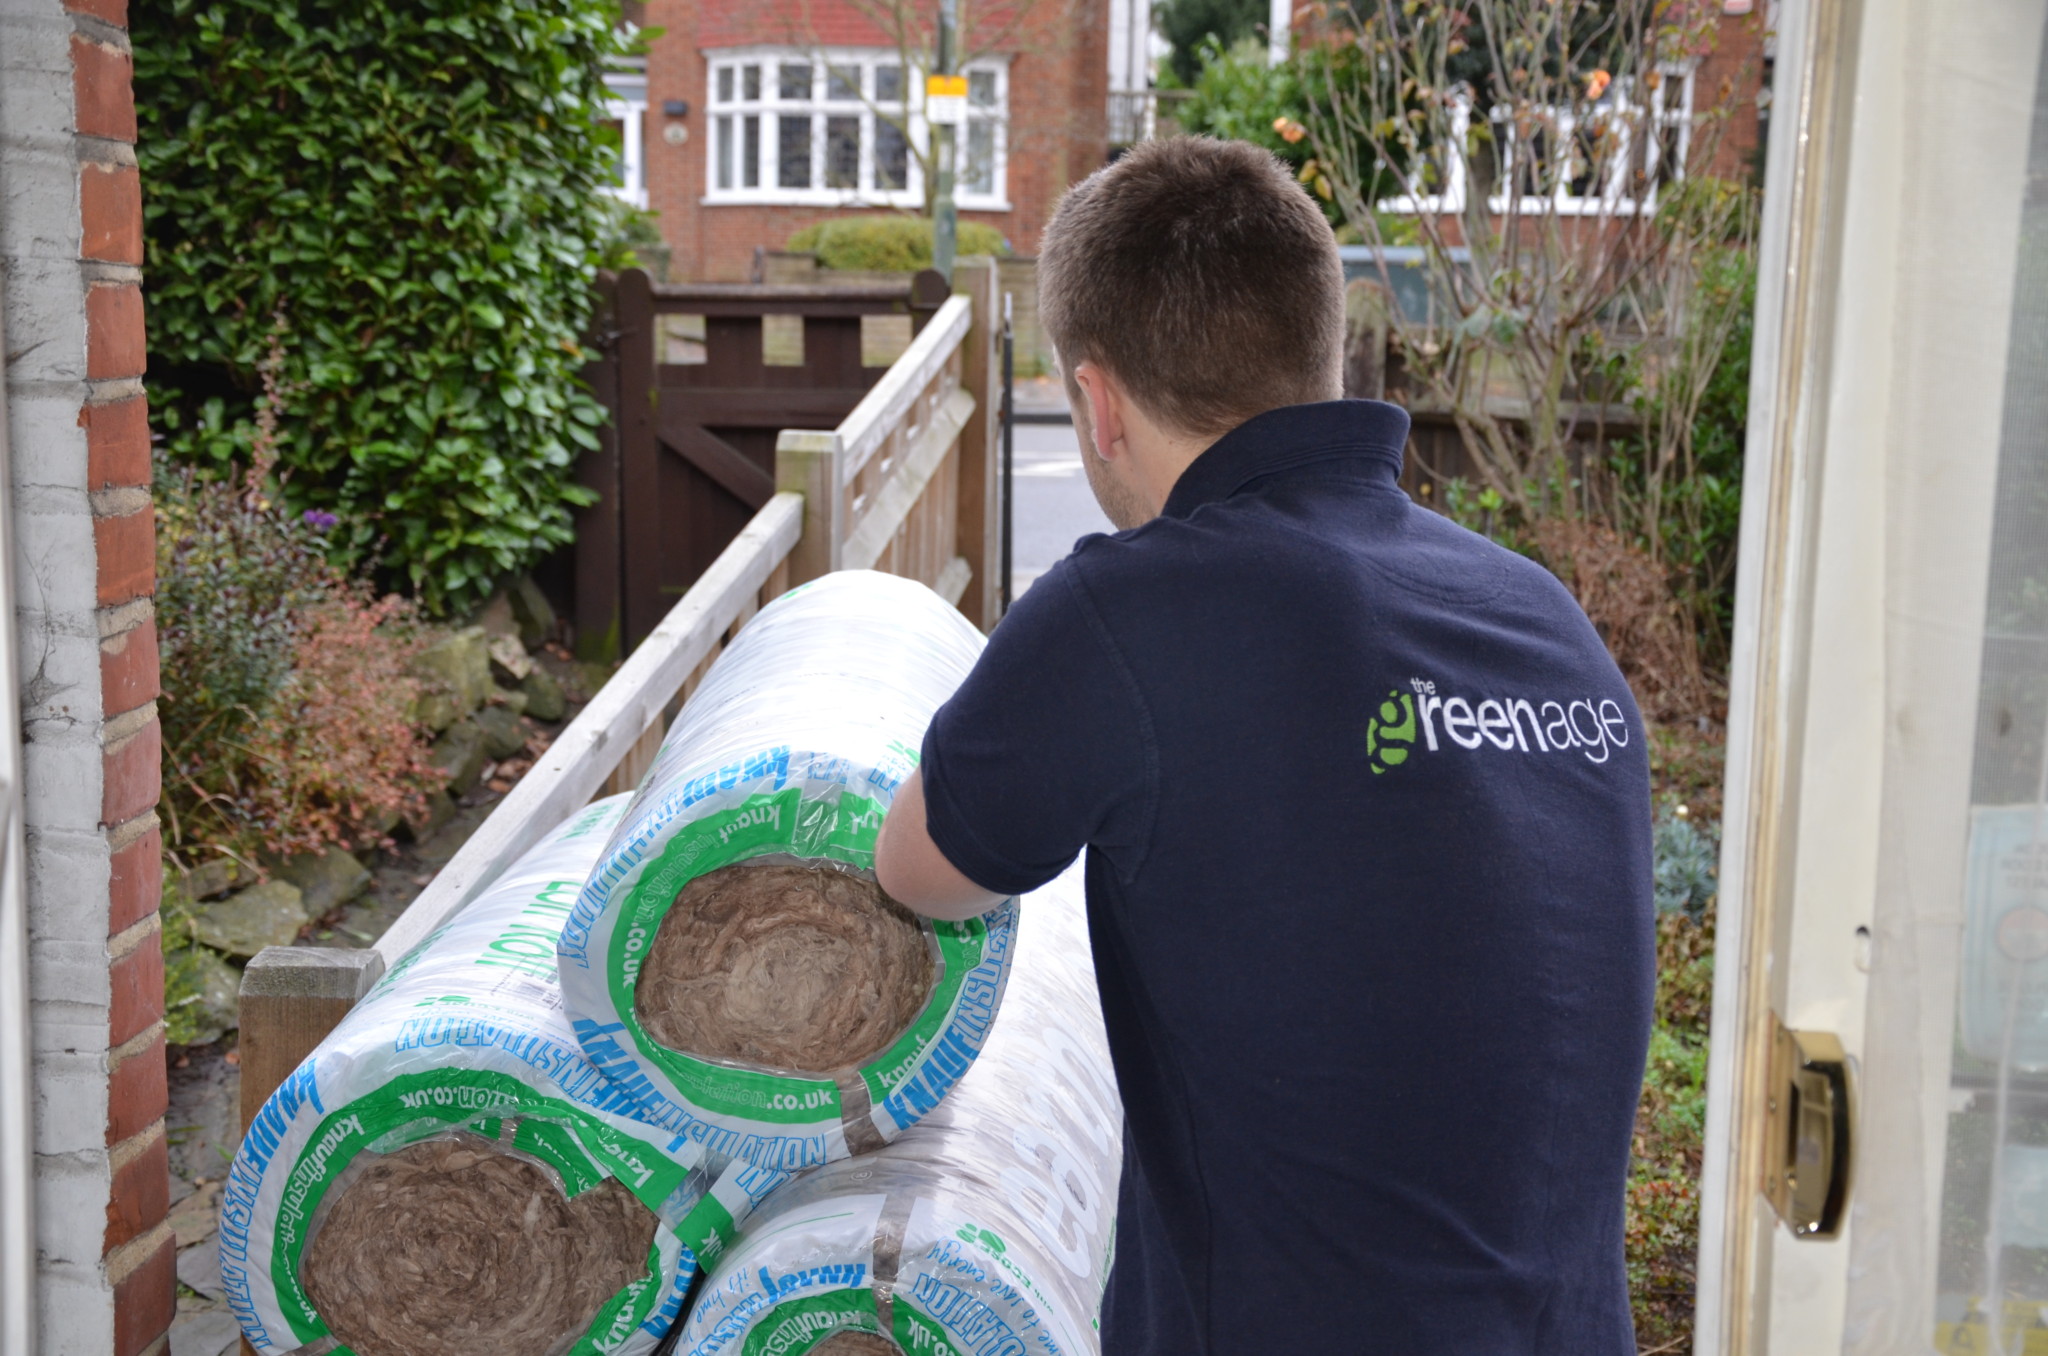
Insulating your loft is one of the best ways to improve the EPC rating of your home. If you have a virgin loft (i.e. 25mm or less of insulation) then insulating it will produce massive savings on your energy bill and the great thing is that for many of us, the energy companies offer this insulation free.
Without proper loft insulation, a lot of the warmth produced by your heating system escapes through the roof of your property; in fact, as much as 25% of the heat in an uninsulated house is lost in this way. Loft insulation acts as a barrier, slowing the movement of heat out of the property during the winter and into the property during the summer.
Even if you can’t get it installed for free, it is an incredibly easy DIY job. In the tabs above, you can find out exactly how to do it.
The first decision to make is whether you are looking to create a warm loft or cold loft. The majority of us just use the loft space for storage so normally a cold loft will more than suffice, but for some we use the loft space for a games room or a study. To be honest, insulating your loft as a cold loft is far easier than trying to produce a warm loft – mainly because you don’t need to fight gravity. The method of insulating your loft varies considerably whether you have decide to push forward for a warm loft or a cold loft, but since the vast majority go for a cold loft lets start there – at the joists.
Insulating your loft at the joists
The purpose of insulation is to produce a barrier that slows the movement of heat either in or out of the property. When you produce a cold loft, you need to lay insulation directly above the ceiling to produce this barrier to slow the movement of heat out of the home during the winter and visa versa in the summer to prevent the home overheating.
The latest building regulations stipulate you need to reach a U-value of 0.16 to conform – now for most of us who don’t talk ‘U-values’, this simply means you need a 300mm blanket of wool insulation (if you decide to use rigid insulation board like celotex or Kingspan then you can achieve this u-value with less thickness).
What materials can you use to insulate joists?
Mineral wool
We describe the main types of wool insulation in detail here. Each have their own advantages and disadvantages, but all of them work in a similar way. The wool traps air, which provides an insulating barrier. They are all fairly easy to work with, in that they can be cut to measure, shaped to fit around immovable objects and also rolls of wool insulation are cheap.
The main issue with wool insulation is that it compresses if you put any weight on it, which lowers its insulating efficiency. If you lay wool insulation to a depth of 270mm, it is also difficult to locate the joists, which you should use as support if you are in the loft space. Never stand between the joists, otherwise you will more than likely come through the ceiling!
Wooden boards can then be laid over all the insulation if you need to make the loft usable for things like storage. The insulating mineral wool used normally comes in rolls of blanket, which is a consistent thickness and width.
Sheep wool insulation
If you are using sheep wool insulation you will get the added benefits of the material being able to absorb moisture as well. Warm air rises from the heated rooms below and condenses when it comes into contact with cold insulation materials. Unlike other wool products, sheep wool can absorb some of this moisture and protect the joist timbers from rotting, without affecting its own insulating properties.
Loose-fill loft insulation
Insulating your loft floor using loose-fill is great as a top-up process for a pre-insulated space. It tends to be light material such as recycled newspapers and mineral wool, which can be spread to cover any gaps between the joists. You simply open the bags of insulating material and pour into any spaces that were previously lacking an adequate level of insulation. This process is a fairly simple do-it-yourself job.
Rigid insulation boards
These boards, produced by companies like Celotex, are ideal for insulating loft spaces. They are more expensive than the wool, however they offer double the insulating capacity (therefore where you would normally use 270mm of wool, you would only require 135mm of the insulating board). In addition, since they are rigid it is easy to store items directly on top of them without laying board on top of them first. They can be cut to size using a saw to fit between the joists and also drilled to allow room for light fittings.
Blown fibre insulation
Another type of loft insulation is blown fibre insulation, which must be installed by a professional. An installer will use specialist equipment to blow insulation material into the gaps that require it.
Having a carpet of insulation in your roof will significantly reduce heat loss out of your home. The reason why we are such advocates of loft insulation and consider it the no.1 method of saving energy in the home is basically because the insulation is incredibly cheap to buy and the process of producing a cold loft is so easy.
Now a couple of important things to mention; while this is certainly the cheapest way to go, the loft space itself will be very cold in the winter. This means that anything you really value should be kept in the home itself, not in the loft. In addition you need to insulate any pipework and cold water tanks up in the loft as these may now be liable to freezing and the cost of repairing bursting pipes will far outweigh the energy savings produced!
For detailed instructions on how to insulate your loft to produce a cold loft please click the tab here.
Insulating your loft at the rafters
Gravity is a pain – it makes producing a warm loft that much harder. Unfortunately if one tries to insulate between the rafters by squishing in lots of wool insulation then 9 times out of 10 it will just fall out.
However if your heart is set on creating a warm loft space then it is definitely possible. There are four main ways to insulate your rafters; the first is to use netting and wool insulation. Using solid insulation board is again a really good way to minimise heat loss out of your home. The third way is simply to use reflective foil stapled to the rafters – this doesn’t produce significant energy savings but is by far the simplest way to go, requiring just reflective foil and a staple gun. You might want to use reflective foil anyway even if you do opt for a cold loft.
What materials can you use to insulate between rafters?
The materials you should use to insulate the rafter space will depend on the way you have chosen to insulate, however the products used will tend to be denser and more rigid than those used for joists.
If you are looking to insulate between the rafters you can use both wool or insulation boards.
If you are looking to insulate below the rafters then you may choose to use insulation boards or reflective foil.
Normally the process you decide on depends how deep the actual rafters are. If the depth is rather shallow the best option will be to insulate below the rafters. You can in theory increase the depth yourself by attaching planks of wood top of the rafter, but then you are giving yourself more work and adding complexity to the process.
Mineral wool for insulating between the rafters
This can be glass wool, rock or mineral wool and it comes in rolls. You will need to wear protective material, a mask and have the adequate tools to fix this to the space between the rafters. The material is then fixed to the space between the rafters, whilst ensuring there is gap to the roof membrane to avoid condensation.
The difficulty in creating a warm loft with mineral wool insulation is basically due to the thickness of wool insulation needed to hit the necessary U-value as specified by building regulations (300mm) although to be honest, if you are doing this yourself, you are not required by law to conform. The way to keep the insulation in place is to use a net that you can then staple to the rafters which acts as a hammock for the insulation.
Sheep wool for insulating between the rafters
If you are using sheep’s wool, which is not an irritant, then you can handle the material without wearing protective clothing. If you are using sheep wool insulation you will also get the added benefits of the material being able to absorb moisture. Warm air rises from the heated rooms below and condenses when it comes into contact with cold insulation materials. Sheep wool, unlike other wool products, can absorb some of this moisture and protect the rafter timbers from rot, without it affecting its own insulating properties. When insulating rafters, a more rigid form of sheep’s wool insulation can be used, which is more suited to rafter insulation.
Insulation boards for insulating between or below the rafters
Insulating board can be fitted between the rafters or below the rafters. Note: Because the material is thick, if you are going below the rafter space you will certainly lose headroom in the loft space. If your rafters are shallow then you have no choice and have to insulate below.
These boards, produced by companies like Celotex or Kingspan, are ideal for insulating loft spaces. They are more expensive than the basic mineral wool, however they offer double the insulating properties (therefore where you would normally use 200mm of wool, you would only require 100mm of the insulating board). They can be cut to size using a saw to fit between the spaces and drilled through for cabling.
Reflective foil for insulating below the rafters
A thin layer of reflective material is placed below the rafters to prevent heat escaping from the property. This is the most simple way to insulate your loft via the rafters, but obviously the insulating properties on this type of insulation are very limited compared to either mineral wool or insulating board.
As mentioned, the foil is by far the easiest way to insulate your loft; you simply staple it to the rafters. It is worth starting at the apex of the ceiling and then working down the rafters, overlapping the foil to achieve a continuous reflect surface. You can then tape over the joins.
Spray foam
A layer of foam is sprayed into the rafters and sets hard. This can only be installed professionally.
When professionals come in and install spray foams, they can achieve high thermal efficiency with very little depth. The two downsides of this firstly that it is very expensive compared to the other methods and also it doesn’t allow the roof to breath, locking in the water next to the timber – which as we have mentioned previously can lead to problems.
While having a warm loft space is great because you can then use the space – you are now heating an extra ‘room’ that you wouldn’t normally heat if you insulated just above the ceiling (i.e. a cold loft) – which means your heating bill will be higher.
Benefits
A warmer home.
Can be done cheaply.
Potential savings on your energy bills.
CO2 saving of 210kg to 730kg p/a.
Limitations
None
Installing loft insulation
Interested in installing loft installation? The Green Homes Grant is a Government run scheme, offering grants of up to £10,000.
If you are interested in this scheme, we advise you look in to this on the Government website.
Not all windows need to be draught-proofed. Double or triple glazed windows installed since 2002 should be sufficiently well-built and installed so as not to require any. Older double glazing and single glazed windows can be draught-proofed, however. If you are unsure on the age of your double glazing, you should check for either a FENSA certificate, which you will have received with any windows installed since 2002, or a stamp in the metal seal of the window.
Where to look for draughts
The gaps between the window and the frame
Caulk on the outside of the window frame
The area around any locks or catches
Although the potential for draughts to occur around the edge of one window is not equal to that of an external door, the accumulated draught from every window in your house can account for huge amounts of energy loss. Therefore it is crucial to draught-proof these areas. In order to complete a successful draught-proofing of a window, you must firstly pinpoint the gaps that require work. After locating the area that requires draught-proofing, there are a few methods to consider.
How can I draught-proof my windows?
How should I draught-proof a window that opens?
Firstly, compression seals provide a professional finish and prevent draughts, as well as dust and moisture entering the home. The seals are sometimes held by metal, plastic or wooden carriers, which are fixed onto the frames through pre-drilled fixing holes. This maintains the ‘memory’ or ‘bounce-back-ability’ of the seal, enabling it to return to its original shape even after periods of crushing, due to normal everyday use of the window. The carrier is cut to length and must be less than 25mm from the cut end to avoid any snagging on unwanted items such as clothing. However they may also be glued to the frame. While these compression seals, as well as the similar tubular seals, provide excellent performance on narrow window gaps, they are not the best option when draught-proofing sash windows on larger properties.
How should I draught-proof a window that doesn’t open?
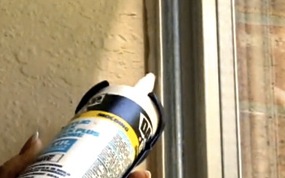
The best method for draught-proofing a window that does not open is a silicone-based sealant. After the gaps in the framework have been located and cleaned to remove any dust that may reduce the longevity of the draught-proofing method, a gunned silicone sealant can be easily applied. This is a cheap and easy way to DIY draught proof.
How should I draught-proof a sash window?
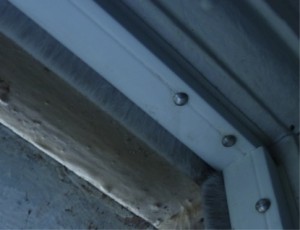
If you are looking to draught-proof a sash window or if the gaps between the window and its frame are not consistent due to seasonal changes, brush strips may provide the best solution. While mainly used in the draught-proofing of doors, it is not rare to see this method around larger windows. This solution involves brushes or blades fixed into a carrier, which is pinned onto the frame. While they may be painted to reduce their visibility, this does decrease their efficiency. However the brushes or blades may be contained using wooden carriers, which may provide a more aesthetically-pleasing solution to window draughts.
Another method of draught-proofing your window, and common when taking the DIY approach, is low-friction seals in loose strips or carriers. This solution involves the rubbing of wipers or blades, which are fixed onto the frame, against the closing window. While they may also be fixed using an adhesive-based foam strip, this method (although cheap) does not comply with British standards and is therefore not recommended.
Using gunned silicone as a sealant
A DIY-friendly and relatively cheap solution to your window draught-proofing needs is gap-filling seals with gunned silicone sealant. In order to ensure that maximum draught-proofing is achieved, you must cover the part of the window that comes into contact with the frame in a release agent. This prevents the sealant from sticking to the window as opposed to the frame. The window is then shut to provide a temporary mould for the sealant before it sets. While it provides an efficient solution to the draught-proofing issue, if it isn’t carried out correctly, the result may look untidy.
As we mentioned in our Introduction, there are two main ways to insulate your loft: one is via the rafters and the other is by insulating your joists. Insulating the joists is often the easier of the options and especially makes sense if you have no real plans to use the loft space.
Key points before you start
If your loft is easy to access, the insulating process should be pretty straightforward and can be undertaken as a DIY job. However, if you have any doubt in your own ability to carry out the work, we recommend getting a professional to do it.
Normally, people use mineral wool (either glass fibre or Rockwool) to do the job and if you intend to do the same it is imperative you wear protective clothing, goggles and a face mask, since the wool is an irritant.
You can use sheep wool insulation, which is much nicer to handle, 100% sustainable and actually is more breathable than the other types of wool insulation. If you are happy to pay a little extra we really recommend using this.
As a final warning, never stand between joists otherwise you will more than likely come through the ceiling which is never ideal. Using a board supported by several joists is the best way of working in the loft area regardless of whether you are insulating the joists or the rafters.
Preparing the loft space ready to insulate
Before you get to the business end of installing loft insulation up in your roof, you need to make sure you have prepared the loft space and also bought the right quantity of materials to do the job. Below is a quick step-by-step guide on what you should do before you begin any work – but before this a quick word of warning!
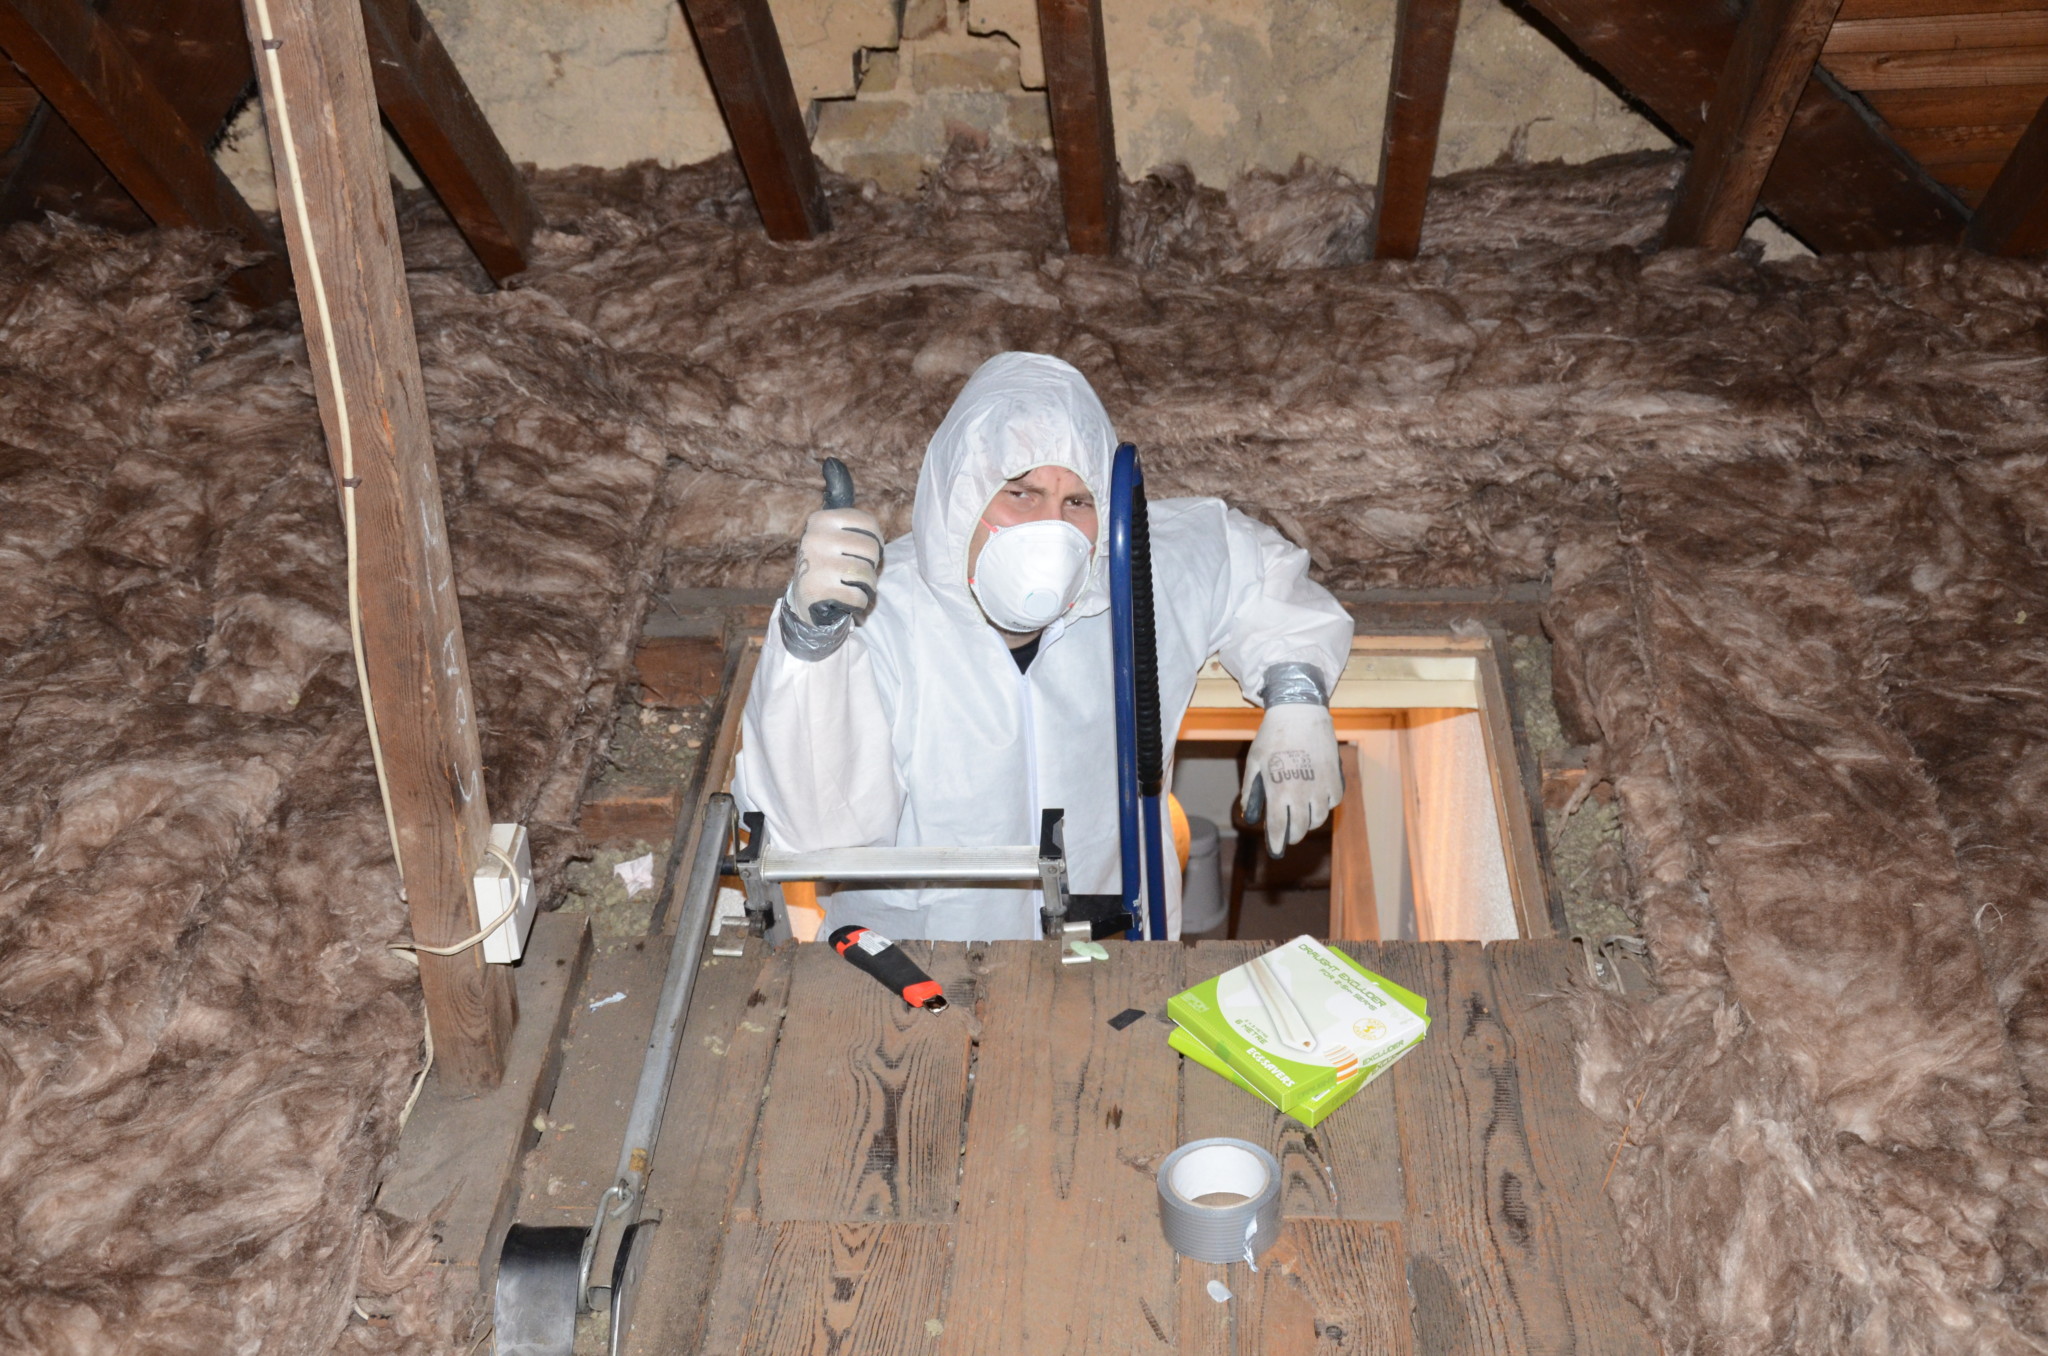
Please remember not to step in between the joists – otherwise you will end up falling through the loft! Make sure you only stand of the joists themselves, ideally using a plank as a kneeling board.
A kneeling board should straddle several joists, thereby spreading the weight more evenly and reducing the load on the joist structure. The board should go across at least 3 joists to ensure it spreads the weight sufficiently. We also recommend covering your skin with suitable clothing and using a face mask, as stray fibreglass can act as an irritant if it comes into contact with skin.
Before installing the loft insulation:
Clean the space between the joists by vacuuming between them, removing any dust that may have settled there over time.
Make sure you pay attention to any cracks, dry rot or damage to the joists. If the are looks unsafe to work in, stop what you are doing and immediately seek professional help to repair these areas.
Ensure good lighting in the loft to provide decent visibility to help you do the work.
If you have boards fixed to your joists you need to remove these before you begin insulating the loft space.
Once you have the loft space ready to insulation we recommend doing a quick equipment check – below is a list of all the equipment you will need:
Tough pair of scissors to cut the loft insulation
Measuring tape
Protective overalls and gloves when handling mineral wool (otherwise it is itchy!)
Safety goggles
A disposable mask
The protective overalls, gloves, goggles and mask are really worth using – the mineral wool insulation most people tend to use to insulate the loft is incredibly itchy, so making sure your skin is covered is a good way of avoiding this.
Using sheep wool insulation is another way to get around the itch issue.
Measuring the size of your loft
After you have cleared bulky objects you can see the area more clearly on what you can insulate. When measuring your loft space you need to start with the following:
Take a measuring device and measure the whole area of your loft (this is simply the width multiplied by the length).
Take into consideration the thickness you want to insulate to and if there is any pre-existing insulation in place, we recommend using 300mm if using wool insulation and 150mm if using the rigid insulating boards like Celotex or Kingspan.
Measure the width of your joists – for example our wool insulation comes in two widths 380mm and 570mm – the idea is you go for the one that is closest to width of your joists so it minimises cutting.
Measure the height of your joists – normally this is about 100mm. This means that if you are looking to insulate to a depth of 300mm in total, you will first lay down a layer of 100mm thick wool between the joists, then use 200mm thick wool laid across the joists at a 90 degree angle.
Write down these measurements on a piece of paper and then take them with you to a DIY shop to buy the insulation or visit an online retailer. Just a word of warning: insulating wool is really bulky and so unless you have a huge car, you might be better off having it delivered directly to your home.
Installing loft insulation between the joists
Insulating the loft at joist level is actually pretty easy to do as a DIY job, but if you feel uncomfortable doing the work then please call in a professional. Since different insulation products have slightly different insulating properties, building regulations use a U-value that needs to be attained to conform. This allows you to calculate the thickness of your chosen insulation product required to conform with building regulations, for example if you opt to use mineral wool, you will need to use 270mm-thick insulation to reach the 0.16 U-value specified in building regs.
To insulate your loft at joist level, please follow the steps below:
STEP 1: The first thing to do is to check whether there are light fittings that protrude between the joists (e.g. a GU10 spotlight will always have the fitting protruding into the loft), if there are, these will require capping prior to laying any insulation. These caps, sometimes referred to as downlight fire hoods or insulation guards, allow sufficient space around the light fitting for the heat to dissipate to stop the light getting too warm. Each light fitting will require a cap to prevent this overheating – they are simply placed over the light fitting and then you are good to go with the insulation.
STEP 2: The first layer of wool insulation needs to be laid between the joists, so you need to measure the distance between the joists to ensure you can get the right width of product. Typically the gap between the joists is either 380mm or 570mm so you will need a width of insulation similar to this, so it can fit snugly between the joists. Most insulation you buy will be partially perforated, allowing you to cut the roll of insulation easily to produce either 2 rolls that are 570mm wide or 3 rolls that our 380mm wide. If the insulation isn’t partially perforated, you will need to use scissors to cut it to the necessary thickness.
STEP 3: Once the insulation is the correct width, you need to roll it out between the joists; lightly press the insulation material to fit between the joists, but be careful not to overdo it and compress the material. Joists tend to be only about 100mm high (although this can vary), so match the insulation thickness you buy with the joist height – once installed, the insulation should come up to the top of the joists. You will need to work the insulation around and over any downlight caps that may now be present.
STEP 4: You now need to spread an additional 170mm – 200mm thick insulation at 90 degrees to the joists. Starting at the furthest point from the loft hatch slowly unroll the insulation over the top of the joists – make sure you use kneeling boards to spread the weight load and reduce the risk of ceiling collapsing as you move around in the loft space. This second thicker layer of insulation should have no gaps between the strips that you lay out – it should produce a continuous layer of insulation – you will no longer be able to see the joists. This will take the total thickness of the insulation in the loft to 270mm – 300mm as specified by building regulations. You may like to install even thicker than this, but the energy savings of doing so will be negligible.
STEP 5: As a final step you will need to insulate the loft hatch, by strapping on some material to the top of the hatch. This can be stapled to the top of the loft hatch, helping to preserve a consistent thermal barrier. You can also fit draught proof strips on the outside of the hatch to stop gusts of cold air in the winter. A really easy way to do this is to fill a black bag with insulation and then tape this down to the top of the hatch using thick tape.
Although 270mm – 300mm is the optimum depth recommended for mineral wool, but if you are planning on using one of the other insulating materials such as loose fill, it is worth reading the guidelines provided by the manufacturer to ensure you use a sufficient volume to give the required depth. Putting more than 270mm on insulation within your loft (e.g. 350mm) will help you heat your house for less, but the savings equal the cost of laying the additional insulation so you may deem this unnecessary.
Storing items in the loft but still insulating to building regulations
As we have said, the more insulation the better and to adhere to building regs you need 270mm of wool insulation as a minimum. One of the issues with putting this much insulation in the loft space is that you lose sight of the joists. Many people like to use the loft space as storage, however, so will insulate only to the top of the joists and then attach chipboard directly to the joists making a solid, walkable surface. Obviously if you install 300mm this is not possible, so prior to STEP 4 above, you will need to install loft stilts (or loft lifters).
These are relatively simple to install, and are essentially strong plastic stilts that raise the height of the joists, allowing you to install the extra insulation and then attach chipboard on top of the them. This allows you to still produce a useable surface while also maximising the thickness of insulation you install.
Using rigid insulation board as loft insulation
Some people may prefer to use rigid insulation board to insulate the loft space – for example Celotex or Kingspan – the process is pretty similar to above, although you will need less depth to achieve the same insulation levels (than mineral wool). You will also need a hacksaw to cut the insulation to size. If you do decide to use rigid insulation board, then you will still need to use chipboard if you want to walk on it.
Insulating water tanks in the loft
One issue that arises from insulating the loft space just above the ceiling (i.e. in the joists) is that the loft space itself will become incredibly cold. During very cold weather the temperature could even become sub-zero, which if you have water tanks in the loft, could be a big issue!
If you do have cold water tanks in the loft, first of all, never insulate underneath them; always allow heat to travel up through the roof into the bottom of the cold water tank. Also, it is worth insulating the cold water tanks themselves and lagging any pipework you can see in the loft that sits above the insulation you have installed in the joists. The kit required to insulate the cold water tanks is known as the Byelaw 30 and can be purchased from any good DIY store.
Internal wall insulation is a great option in solid wall properties where external insulation is not practical or permissible; for example in listed buildings, conservation areas, where you wish to preserve the look of the building, where access restricts external work, or in flats.
How does internal insulation work?
There are a couple of methods to insulate a solid wall internally and all will decrease the floorspace of a room (as per the thickness of the insulation board or stud wall you use). We recommend getting a professional in to complete this type of work, and you do not undertake it as a DIY job unless you are very experienced.
An alternative to conventional internal wall insulation is using insulating wallpaper such as Wallrock Thermal Liner, which at only 4mm gives you some of the benefits of internal solid wall insulation, but has a far smaller impact on the size of your room. It doesn’t have the same insulating properties as proper internal wall insulation, but it is a much cheaper option.
Internal insulation and damp
Unfortunately, internal insulation will not be particularly effective against damp, when compared to external insulation. We recommend that any damp issues be dealt with before insulation is installed. All internal insulation should be installed with a vapour membrane.
Insulating directly to the wall
Fixing the insulation directly to the wall is ideal if floorspace is at a premium, but must only be done where there are no damp issues whatsoever, and the existing plaster is smooth and even. This approach is the most straightforward, as the plasterboard with insulation is attached to the wall using screws or adhesive. This approach requires a solid form of insulation such as Celotex or Kingspan, rather than wool type insulation. The table below shows the various U-values for different types of insulation.
Insulation material
Thickness of insulation
50mm
100mm
125mm
150mm
Expanded polystyrene
0.55
0.33
0.28
0.24
Polyurethane / Phenolic foam / Polyisocyanurate
0.65
0.39
0.33
0.28
Foamed glass (with plaster finish)
0.57
0.33
0.28
0.24
Insulating between battensSource: Energy Saving Trust
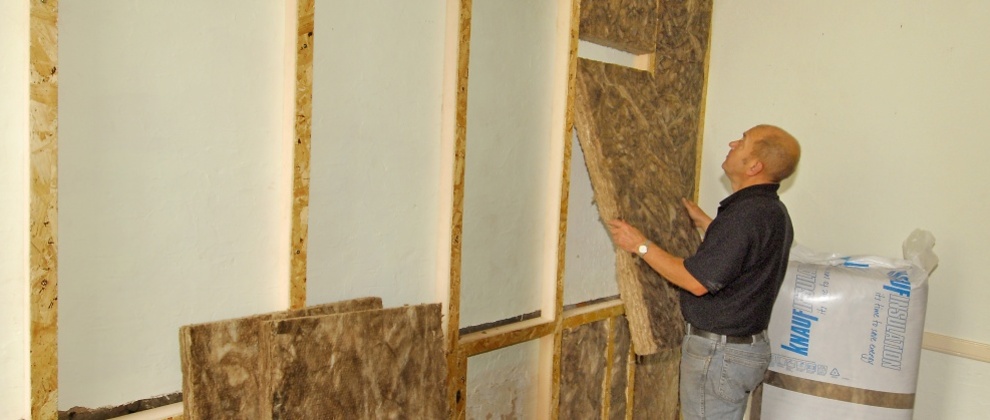
In this internal solid wall insulation method, timber battens are fitted between the wall and the plasterboard, with insulation between. This provides an optimum thickness of insulation and allows either rigid board insulation or wool type insulation to be fitted, making it a versatile and efficient way to insulate the wall.
Insulation material
Thickness of insulation
50mm
100mm
125mm
150mm
Mineral wool1
0.55
0.39
0.33
0.28
Polyurethane / Phenolic foam / Polyisocyanurate2
0.65
0.39
0.33
0.28
* Values assuming construction: 215mm existing solid brickwork with plaster finish (U = 2.1W/m2K) 1 Source: EST; 2 Source: Celotex
Source: Energy Saving Trust
Stud wall with insulation
This form of internal solid wall insulation is generally recommended for properties with uneven internal walls and those with damp issues. It also uses up the most internal floor space compared with the other options. This is because it leaves a gap of around 30mm between the outer wall and a stud wall, to which the insulation is attached. Timber stud can use many types of insulation with sheep wool, rock wool, Celotex or Kingspan fixed to the back of the plasterboard.
Reducing thermal bridging
It is really important that the installer avoids thermal bridging. With so much wood used in the installation, it is easy for this to form cold bridges, which allows the heat to dissipate from the room through the poorly insulated supporting frame. A good installer will avoid this by taking particular care around the door and window reveals, as well as the windowsill.
Cost and financing internal wall insulation
As a general rule, internal wall insulation will cost around £70-100 per metre, depending on the material you use.
Currently, internal wall insulation is being offered as part of the Green Homes Grant which last until March 2022. This grant covers up to £10,000 of the full cost, so it is worth looking in to!
Think we missed something? Do you have a different opinion?
If your house was built prior to the 1930s, the chances are that it will have solid walls – simply a solid layer of masonry bricks. Insulating your walls – regardless of whether they are cavity or solid (or even timber-framed) – is a great way to make your home more energy efficient. The insulation will minimise heat loss in the winter, saving you money on your heating bills. It will also stop your home getting too warm in the summer, helping to keep your home at a more comfortable temperature.
According to research, twice as much heat could be lost through an un-insulated solid wall as through an un-insulated cavity wall. However, the great news is that solid walls can be insulated, both internally and externally.
The science behind insulation
If hot air and cold air are partitioned by a wall, heat will transfer through the wall, eventually cooling the room until an equilibrium is reached (where the outside temperature is equal to the inside temperature). In reality this very rarely happens, because rooms tend to be heated; so as heat escapes through the wall, more hot air is supplied by your heating system, keeping it at a comfortable ambient temperature. If the thermal gradient is larger, for example on a cold and wintry day, the movement of the thermal energy across the wall will be accelerated.
Insulating a solid masonry wall helps to provide a thermal barrier, which helps to slow the movement of heat escaping out into the external environment. Less heating is therefore needed to keep the house at the required temperature.
Types of solid wall insulation for your home
Both internal and external insulation are great at keeping your home warmer, lowering your heating bills and cutting carbon emissions. However, both solutions have a different impact on your home, which is explained in the following section:
Internal solid wall insulation
There are a couple of methods to insulate a solid wall internally, which are either to use a rigid insulation board or build a stud wall. We recommend you get a professional in to complete this type of work, and you do not undertake it as DIY unless you are very experienced. Internal solid wall insulation can be as thick as 100mm, so your room will ‘shrink’ wherever it has an external supporting wall.
One way to avoid losing floor space is by using insulating wallpaper, which at only 10mm gives you some benefit of internal solid wall insulation, without impacting on the size of your room. However, the insulating wallpaper will not give you the same performance of dry-lining with the insulation boards unfortunately.
Advantages of internal wall insulation
Cheaper than external insulation
No aesthetic change to the outside of your home
Works well when the home itself is going through a process of internal renovation
Disadvantages of internal wall insulation
Will reduce the room you have in the living areas by up to 10cm, depending on the materials used
Won’t necessarily get rid of any damp problems, which need to be tackled separately
External solid wall insulation
For external wall insulation, you need to employ a professional and you also need to consider local building regulations. This is because this process involves covering the original brickwork and could significantly alter the current appearance of the property, making out of step with the local area. Once any planning permission has been granted, the home can be insulated using an adhesive material which is fixed to the wall, then plastered over.
The finish applied to the external wall can be any combination of texturing, painting, tiling, brick slips, masonry work and/or cladding.
Advantages of solid wall insulation
Less disruption to the household, as the work is carried out outside
Renews your home’s external appearance and increases the lifetime of the brickwork
Complements other refurbishment work
An opportunity to fill cracks and holes in the brickwork, which will help reduce draughts(see Draught Proofing for more information)
Disadvantages of solid wall insulation
More expensive than internal insulation
Planning permission may be required
Any work needs to comply with local building regulation
May not solve all damp issues
Work is not recommended if the building is not structurally sound
Costs of solid wall insulation
Around £100/m2.
Additional costs for downpipes, gas pipes, boiler flues and dishes.
Subject to render strength – additional cost to remove old/weak render.
Potential requirement for scaffolding – around £15/m2.
Measuring the effectiveness of solid wall insulation
The R-value is the measure of thermal resistance used in the building and construction industry today. The higher the R-value, the better the insulating properties of a material – so you should be looking to insulate your house with materials displaying a high R-value. Confusingly, you may hear the word U-value also bandied around. This is exactly the opposite, describing the ability of a material to conduct heat, so you want your insulating material to have a low U-value.
Installing solid wall insulation
Interested in getting solid wall installation? Lucky for you, we work in partnership with EWI Store who specialise in external wall insulation systems! They have a great team who are always happy to help with your enquiries.
A home can lose as much as 35% of its heat through uninsulated external walls. By investing in cavity wall insulation, you can significantly reduce the heat loss from your home. The concept of insulating a cavity wall is really very simple – it involves filling the cavity between the two skins of masonry bricks with an insulating material, which slows the movement of heat through the wall. Maintaining the heat inside your home keeps you warm and cosy when you need to be. It also works in reverse by keeping your house cooler in the summer months.
Installing cavity wall insulation in your home will not only help to decrease your heating bills by saving energy lost through the walls, it will also help to reduce your carbon footprint by limiting the amount of CO² and other greenhouse gases emitted from your property.
Many houses since the late 1930s were built with a cavity between the inner and outer walls. Because of this cavity, many of Britain’s homes have thermal performances which are well below the standards required by current building regulations. These properties suffer from unacceptably high levels of heat and energy loss through the walls. A system was introduced in the 1970s to inject insulation into these cavity walls.
Can I get cavity wall insulation?
There are two things you need to determine to see whether you can benefit from retrofitting cavity wall insulation in your home.
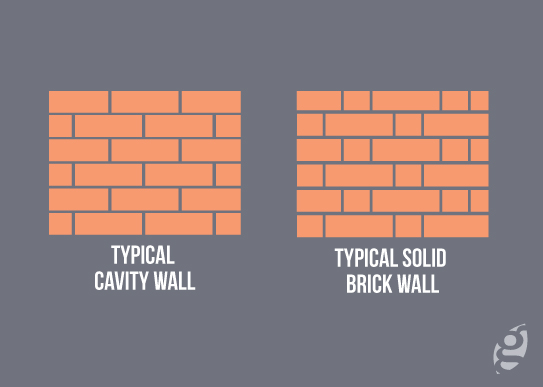
The first thing is to work out if you actually have cavity walls – this might seem stupid, but you can not inject insulation if there isn’t a cavity and they do look quite similar to solid walls!
A cavity wall is made up of two masonry brick walls running parallel to one another with a space (cavity) between them of at least 50mm. Masonry bricks are very absorbent, so moisture absorbed by the outer wall typically drains through the cavity, rather than coming into the home, helping to prevent damp issues. This type of wall construction became the norm in the 1930s superseding solid walls and as time has gone on, the size of the cavity between the two skins of brick has continued to grow – a typical cavity wall now is between 280-300mm thick.
You can easily identify a cavity wall by the pattern produced by the brickwork, which is known as stretcher bond, where are the bricks are running in the same direction as one another – there are no ‘half bricks’. This is obviously harder to do if your walls are cladded or painted and in this case you might need to call in a professional (although sometimes you can see original brickwork in the loft space). In addition cavity walls tend to be over 250mm in width, with more recent cavity walls closer to 300mm. If you can see lots of half bricks in your wall, you have a solid wall with no cavity, so unfortunately cavity wall insulation is a no-go. In this case, you could look into external wall insulation as an alternative.
Once you have established that you have cavity walls, you need to determine the size of the cavity and whether it has previously been insulated. A registered installer will need to come and carry out a boroscope inspection. This involves drilling a test hole into the wall and checking with a camera to see if the cavity has previously been filled and the size of the cavity (ideally over 50mm). If this shows the cavity is unfilled, you could indeed benefit from cavity wall insulation.
Although some builders began insulating cavity walls in the late 1970s, it only became compulsory under building regulations to do so during the 90s. As such there are many properties in the UK that currently have unfilled cavity walls. The good news it that these can be insulated very easily!
How does cavity wall insulation work?
If a hot room is partitioned from the cold by a wall, heat will move through the wall, eventually cooling the room until an equilibrium is reached, where the outside temperature is equal to the inside temperature. In reality this very rarely happens, because rooms tend to be heated. This means that as some heat escapes through the wall, more hot air is supplied, keeping it at a comfortable ambient temperature. If the thermal gradient is larger, (e.g. on a cold and wintry day), the movement of thermal energy across the wall will be accelerated.
Insulating a cavity wall helps to provide a thermal barrier, which slows the flow of heat out of a room considerably. By slowing down the rate at which heat escapes from the home, less heating is needed to keep the house at the required temperature. In the summer, the reverse happens; hot air outside the home can’t get in as easily, which means you don’t need to use energy to keep the home cool. Therefore in both summer and winter, cavity wall insulation can make an enormous difference to your energy bills. The process is relatively quick and inexpensive, so it is certainly worth considering.
How do you insulate cavity walls?
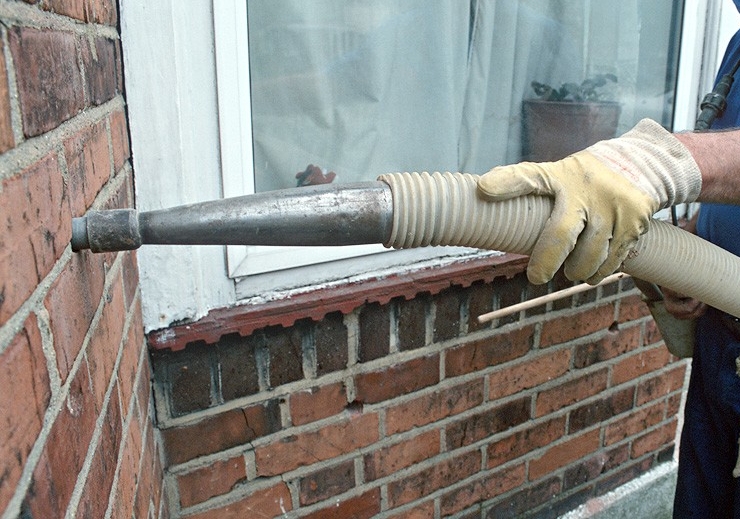
The first thing to note is that you cannot retrofit cavity wall insulation as a do-it-yourself job – it is a job that needs to be carried out by a professional.
Once the cavity has been confirmed by the boroscopic inspection, the installer will drill a series of 22mm diameter holes into the mortar between the bricks. With specialist equipment, the installer will then inject the cavity with the insulating material, through each of these holes. Once the whole of the cavity wall has been filled, the mortar will be made good either with plugs or mortar created to match the existing colour, so the job will be barely noticeable.
The insulating material pumped into the cavity is normally a type of glass wool, or in some instances insulating beads and once installed will offer insulation for the life of the building. The whole process should only take about 2 hours but obviously if the cavity wall area is especially large you will need to leave more time for the job to be completed.
What materials are used for cavity wall insulation?
Expanded polystyrene (EPS) foam, loose polystyrene beads, or wool. EPS is the most expensive option for a reason; it is a premium product and we would always recommend spending the extra money for the best results.
Savings from cavity wall insulation
Although the savings from cavity wall insulation vary greatly from property to property, for an average size three bedroom home, the energy savings from installing cavity wall insulation should amount to £250 per year. With an installation cost of £600-1000, the savings you create from installing the cavity wall insulation should pay for the work in under 4 years.
Getting cavity wall insulation in the Green Homes Grant
If you are eligible, you can now get a grant of up to £10,000, using the Green Homes Grant scheme. The grants are available until March 2022 and are being offered to properties in England.
There are two grants within the Green Homes Grant. First is the £5000 which most are eligible for if they have cavity walls. However, if you are receiving one of the below benefits, then you may be eligible for the £10,000 grant.
Income Support
Income-Based Jobseeker’s Allowance (JSA)
Income-Based Employment and Support Allowance (ESA)
Contribution-Based Employment and Support Allowance (ESA)
Housing Benefit
If you are interested in the Green Homes Grant, we advise you look at the Government website.
Paying for cavity wall insulation yourself
Unfortunately schemes like the Green Deal have now finished, but the Green Homes Grant is still available for cavity wall insulation.
If you are interested in getting cavity wall insulation installed, we work in partnership with EWI Store who have a network of approved installers. So please fill in the form at the bottom of this page, and we will be in contact with you shortly.
Benefits
Insulating your cavity walls will help you to heat your home more efficiently, saving about £250 for a typical 3 bed home.
Cavity wall insulation will payback in 3 – 4 years for the investment giving lower heating bills .
According to the Energy Saving Trust, cavity wall installation can reduce carbon dioxide emissions (CO2) by 560kg, according to the Energy Saving Trust.
Approved cavity wall installation work is guaranteed for 25 years by the CIGA (Cavity Insulation Guarantee Agency).
Limitations
Cavity wall insulation may not be suitable within your home, if it has a wall exposed to strong rainy wind.
Do not undertake the installation if the home suffers from damp problems – seek an assessment from a professional surveyor first
Cost
Cavity wall insulation can cost anywhere between £600 – 1000 (however with subsidies, the cost may end up at the lower end of this estimate – speak to your Energy provider).
Installing Cavity Wall Insulation
Need cavity wall insulation? We have scoured the country for the best tradespeople, so that we can make sure we only recommend those we really trust.
If you would like us to find you a local insulation installer, just fill in the form below and we will be in touch shortly!
Draught proofing (or draught exclusion) is one of the cheapest and easiest ways to cut energy costs in the home, whether you live in a house or a flat. The concept is really simple: stop cold air coming in and prevent warm air from escaping, using things like draught excluders. Keeping the warm air inside will save you money on your utility bills as the existing heating system will need to work less hard to keep the home at the required temperature.
Draughts or gaps in the home act like unwanted ventilation shafts, allowing cold air to seep in and hot air to escape. When the household heats their home, these uncontrolled ventilation gaps let expensive hot air escape.
Although more often than not, some heat escapes regardless of the actions of a householder, additional temporary draughts occur by leaving doors, windows and letterboxes open.
Potential savings from installing draught proofing
It is estimated that installing draught proofing measures in an average UK home could save the household £60 per year on heating bills.
According to the Energy Saving Trust, if every home were to do this in the UK, the total energy savings could be worth as much as £190 million, and the energy saved would heat nearly 400,000 homes.
You will be able to find draughts just about anywhere in your house that links directly to the outside. You could easily be in front of one now. They are found by doors, windows, loft hatches, keyholes, electrical fittings on the ceilings, under the floorboards, piping leading outside and any drilled holes for cabling that leads outside. Remember that day when you had that cable or Sky TV installed and the drilling that took place?
The best way to deal with these draughts is to close the gaps using draught excluders and block the holes.
Some rooms in the home need natural ventilation, such as bathrooms, kitchens or rooms with an open fire. These types of rooms generate a lot of condensation and by blocking the ventilation outlets, you may also encourage damp and mould to form, which may end up being unpleasant and costing you additional money to fix.
Draught proofing – DIY vs. professional jobs
Draught proofing pays for itself in just a couple of years in most cases, by reducing your energy consumption and therefore your energy bills. Draught proofing can be a fairly simple home DIY job, although for more complex measures, help may be required.
Obviously, if you are uncomfortable carrying out the work yourself we strongly recommend getting in a professional to complete the work regardless. A professional should be able to identify draughts very quickly, and will know what to fill them with, therefore saving you a lot of time and energy.
Think we missed something? Do you have a different opinion?
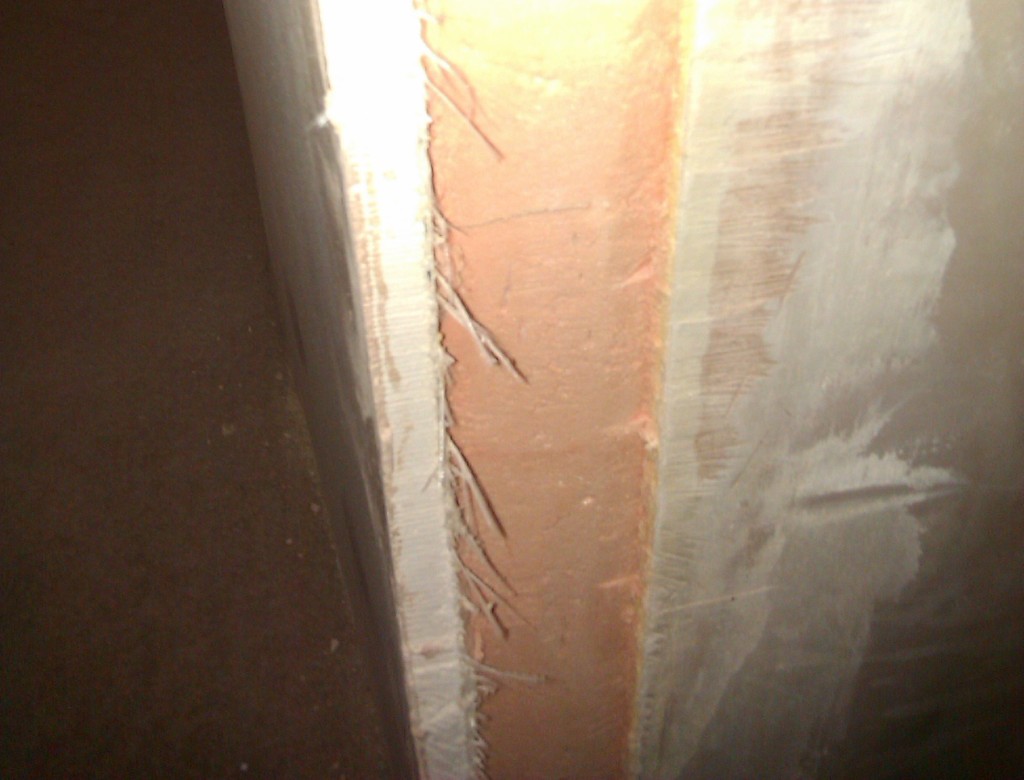
Older properties tend to have a few visible cracks in their walls. If you have any really significant cracks, we would advise booking an appointment with a building surveyor to ensure the structural integrity of the building.
If they are small and don’t pose any structural threat then you can fill them to stop draughts, which will help improve the energy efficiency and thermal comfort of the property. While the amount of heat loss that may occur through these cracks is relatively small compared with that of windows and doors, the ease in which they can be draught-proofed makes them a popular focus.
Cracks can change size, depending on seasonal changes or shifting pressures on the structure. This means they need to be filled using flexible filler products that allow for a certain level of movement – if you just use Polyfilla, the crack will reopen.
If it’s a crack that will stay at a constant width, rigid filler provides a smoother, more professional finish and effectively removes any draught that may have been present previously. Once the crack is filled and the filler has dried, it can be sanded down and painted to match the rest of the wall.
For larger cracks and gaps, foam-based filler products should be used. This foam expands once it is squeezed into the crack, creating an airtight seal. Once the foam has set solid it can be sanded down and painted to match the surrounding area. It is difficult to get the same level of professional finish as with a rigid filler.
Heating costs are on the up, and in the UK we have a challenge to keep warm whilst not spending an absolute fortune on our energy bills. In addition to this challenge (now into our 2020’s) as a nation we have stringent carbon targets to meet later on this decade.
With UK properties being one of the leakiest in Europe, external wall solid wall insulation is a fantastic energy efficiency measure to help up not only reduce carbon, but keep heating bill rises in check.
Why choose external solid wall insulation?
Most properties built prior to 1930 were constructed with solid walls, so they don’t have cavities that can be injected with insulation. These solid wall properties can be insulated with external solid wall insulation. The purpose of insulating in this manner is to slow the movement of heat out through the walls, thereby dramatically reducing heating demand.
The embedded video produced by us and one of our partners shows the typical external wall insulation installation process.
In most cases, homeowners get in a professional to install solid wall insulation; it is not normally considered a DIY job. Because the insulating process involves covering the original brickwork, the process can significantly alter the appearance of the property. Since the outside walls are highly visible, it is advisable to get someone who knows what they are doing to install it!
There are many types of insulation products that can be attached to the outside of the home: expanded polystyrene, mineral wool and phenolic resin (K5), woodfibre and even cork! Expanded polystyrene (known as EPS) is certainly the most popular, since it is the most cost effective means of carrying out the works. Phenolic resin (K5 boards) is used when space is a premium, since you can use less of this type of insulation to achieve the required U-value.
Mineral wool can also be used to insulate solid walls and some people choose it because it not only provides an open vapour system, but it is a great acoustic insulator. If it is picked for this reason, it is very important that no acrylic render is used to finish the project, since it is not breathable and therefore defeats the object!
You may choose to use woodfibre if you want the most breathable and natural insulation materials – however the system itself is very expensive compared to the EPS system.
External wall insulation must adhere to building regulations
When solid wall insulation is installed on the external walls of the home, it must adhere to building regulations. In this case it is referring to the thermal performance of the insulation; the solid wall insulation must achieve a U-value of 0.30 watts/m2k. With expanded polystyrene, this means that at least 90mm of insulation needs to be used – but obviously the thicker the material, the better its insulating performance.
For example, according to our competent U-value assessor, James Alcock a typical solid brick wall would require 90mm of the EPS system to achieve the desired retrofit building regulations u-value. Whereas to achieve the same value only 60mm of the K5 insulation board & system would be required.
For mineral wool you need 110mm of insulation to achieve the required U-value and for the the woodfibre insulation you would require 110-120mm of insulation to achieve the same energy efficiency standards.
External wall insulation sometimes needs planning permission
According to the planning portal, planning permission is not normally required for installing solid wall insulation, provided the external appearance of the property doesn’t change. If your property is brick and unpainted, changing its colour with render will require planning permission. Also, if the building is listed or is in a conservation area you should consult your local planning authority.
From our experience of installing solid wall insulation across London, it seems there is no standard approach to how the councils judge what is acceptable and what isn’t, so if in doubt, it is probably worth asking the question!
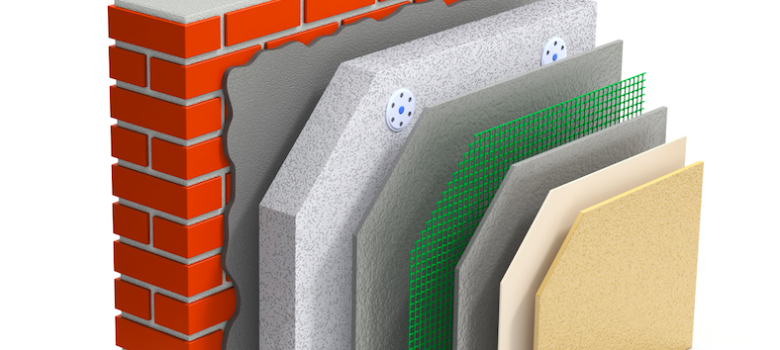
Firstly, if the property has existing render, a render test must be carried out to see if it is strong enough to hold the insulation. If not, all the existing render will need to be removed prior to attaching the insulation to the brickwork. If the render test shows that the existing render is firmly held in place, the render can simply be smoothed, ready for the insulation to be applied directly on to it.
Another important step prior to installing any external wall insulation is to remove any pipework from the outside of the building. These will be reinstalled at the end of the process (and maybe extended in some instances as necessary); this is one of main reasons that the insulating process is expensive and time-consuming.
Applying the external wall insulation and finishing
The process is relatively complex, but the basic steps are outlined below:
Insulating panels are fixed to the wall using adhesive mortar.
Plastic capped fixings are driven through the insulating panels and around their perimeter into the wall to tie the panels securely to the wall.
Mortar is then applied over the insulating panels and the fixings.
An insulating mesh is then sunk into the mortar to hold the panels in position.
The mortar is sanded and painted with primer to prepare it for the render
The Coloured render finish is applied (available in any colour).
Below you can watch a video where we demonstrate how solid walls are insulated externally:
What external wall insulation and finishes are possible?
As the insulation goes on the outside of your house, it is important that you get the finish that you want.
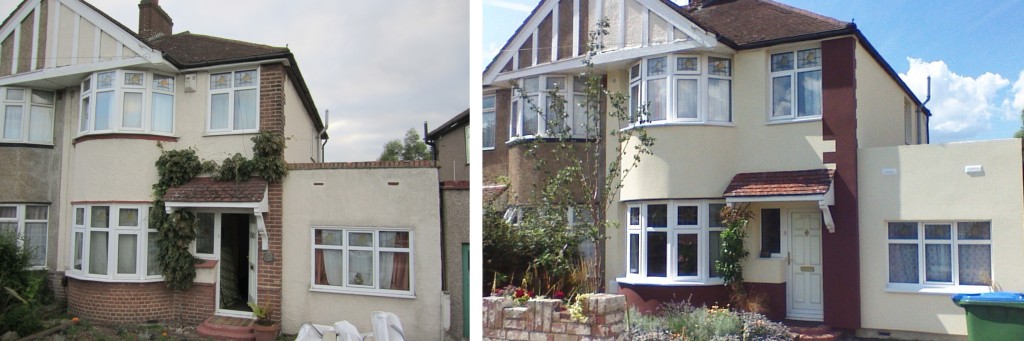
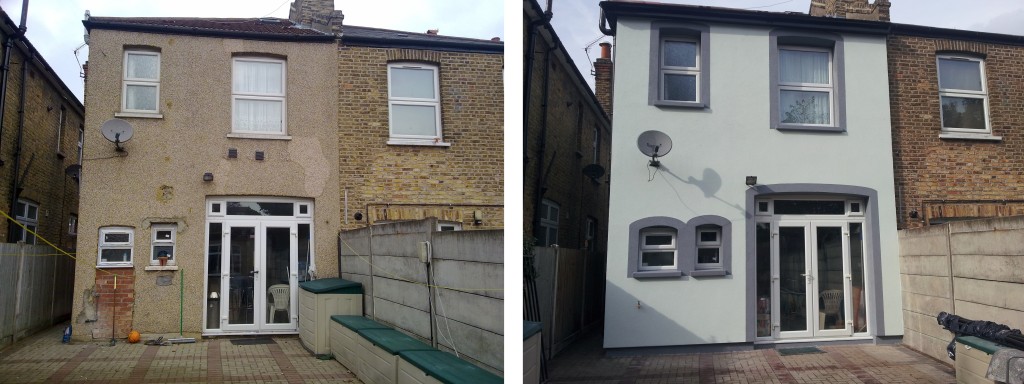
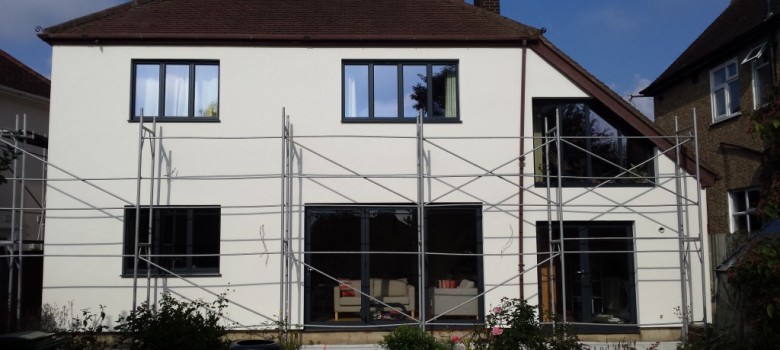
A house pre and post solid wall insulation
On the whole, the most cost-effective way of insulating your solid walls is to finish it with a simple white render. However there is a huge variety of finishes possible: smooth, textured or painted, tiled, panelled, pebble-dashed or finished with realistic brick slips.
External solid wall insulation and damp
External wall insulation is a great way to protect against penetrating damp, creating a new weatherproof layer on the outside of the building, and slowing the movement of heat through the walls. Another advantage of solid wall insulation is that it will cause the temperature of the walls themselves to rise. This means if there is lots of water vapour in the air (from cooking or washing for example), this will no longer condense on these walls.
While obviously this is a benefit, it is still important to consider ventilation in the home – regardless of whether you insulate or not. This can be done by installing more vents or by making behavioural changes like opening windows and doors while cooking.
Cost and financing external wall insulation
The cost of solid wall insulation is roughly £100/m2, averaging between £6000 – £12,000 for a standard semi detached house, so it is not cheap. However, it can be really worthwhile in the long run. There are occasionally local council grants available for eligible people, and some companies offer finance so it is worth checking.
Currently, the Government Green Homes Grant is available to apply for if you meet the eligibility requirements. For external wall insulation, your property must be solid wall and it must be located in England to be eligible for the Green Homes Grant. The grant offers up to £10,000 off the full cost of the installation which will bring down the cost significantly, and in some cases the grant will cover the entirety of the cost. This scheme is running until March 2022, so there is still plenty of time to get your hands on it!
Advantages of external solid wall insulation
The insulation will take the U-value of your walls down to just 0.3w/m2k, equivalent to a brand new cavity wall built today – therefore your heating bills will be significantly lower.
Solid wall insulation stops penetrating damp.
The insulation can improve the appearance of your home – especially if you are replacing pebbledash.
It can also really help reduce noise entering the home, so if you live on a busy road it might be just the thing
Since the walls get warmer, they act as a heat store so rooms will take longer to cool down.
For a more detailed look at the advantages of solid wall insulation please click here.
Installing external solid wall insulation
Interested in getting external wall installation? Lucky for you, we work in partnership with EWI Store who specialise in external wall insulation and render systems! They have a great team who will be happy to advise you on any queries, and can help find local approved installers.
EWI Store are also helping with Green Homes Grant enquiries, and can help you find Trustmark approved installers who are offering the grant.
Double Glazing
Insulation
What is double glazing?
All properties lose heat through their windows. Installing energy efficient double-glazing is an effective way of reducing your energy bills and keeping your home warmer and quieter.
Double-glazed windows use two sheets of glass with a gap between them which creates an insulating barrier, whilst triple-glazed windows have three sheets of glass. Both options can deliver a high level of energy efficiency; it is not the case that you have to use triple-glazing to gain the most energy efficient window.
The space between the glass panes can be filled with either a vacuum (quite rare nowadays because they require excellent sealing, otherwise the vacuum diminishes so the efficiency decreases), or a heavy inert gas such as Argon, Krypton or Xenon. Both these methods are trying to create a more effective insulating barrier, known scientifically as increasing the R-value (which is the measure of thermal resistance).
Energy efficient double-glazed windows are available in a variety of frame materials (including uPVC and more traditional wood) and styles. These windows vary in their energy efficiency, depending on how well they stop heat from passing out through the window, how much sunlight travels through the glass and the amount of air that can leak in or out around the window.
Some double-glazing window and door manufacturers helpfully use a window energy rating scheme to show the energy efficiency of their product. This is similar to the one you may have seen on appliances such as your fridge, or washing machine. A-rated windows are the most efficient. To check a window’s energy efficiency before you buy, look at its energy label.
Questions to ask yourself before investing in double glazing:
1. How energy efficient are the windows?
When choosing replacement double-glazed windows, you can check their energy efficiency by looking at the Energy Saving Trust Recommended logo and British Fenestration Rating Council (BFRC) energy label. The higher the energy rating, the more energy efficient it is. The Energy Saving Trust endorses any windows rated B or above. Unfortunately, at the moment there is no obligation for window manufacturers to label their products; however by opting for a highly-rated window you know you will be buying the most efficient.
For a list of all types of double-glazed/triple-glazed windows and their frame material and energy rating, visit the BFRC website.
2. How many layers of glass is best?
Double glazing has two layers of glass with a gap of around 16mm between them. There’s also the option of triple glazing, which has three layers of glass. Both A-rated double and tripled-glazed windows are available.
3. What type of glass is best?
The most energy efficient glass for double-glazing is low emissivity (Low-E) glass. This often has an unnoticeable coating of metal oxide, normally on one of the internal panes – next to the gap. It lets sunlight and heat in but cuts the amount of heat that can get out again.
4. What is between the panes?
Very efficient windows might use gases like argon, xenon or krypton in the gap, or a vacuum between the two sheets of glass.
5. What keeps the panes apart?
All double-glazed windows have pane spacers set around the inside edges to keep the two panes of glass apart. For a more efficient window, look for pane spacers containing little or no metal – often known as ‘warm edge’ spacers.
The BFRC window energy rating scheme checks all the components to ensure the final window achieves the energy efficient standard claimed. This means that you just need to look for the A-G ratings and remember A is best! Alternatively, just look for the Energy Saving Trust Recommended logo which will only be found on glazing that is B rated or above.
6. Which frame suits your home?
The frame you choose will depend on your home and your personal taste. For all frame materials there are windows available in each energy rating.
uPVC frames are the most common type. They last a long time and can be recycled.
Wooden frames can have a lower environmental impact, but require maintenance. They are often used in conservation areas where the original windows were timber framed.
Aluminium or steel frames are slim and long-lasting. They can be recycled.
Composite frames have an inner timber frame covered with aluminium or plastic. This reduces the need for maintenance and keeps the frame weatherproof.
7. Do you need ventilation?
Because replacement double-glazed windows will be more airtight than the original single-glazed frames, condensation can build up in your house due to the reduced ventilation.
If there is not a sufficient level of background ventilation in the room, some replacement windows will have trickle vents incorporated into the frame that let in a small amount of controlled ventilation.
Condensation can sometimes occur on the outside of new low-e glazing. This is because low-e glass reflects heat back into the home and as a result the outside pane remains cool and condensation can build up in cold weather – you don’t need to worry about it.
Benefits of installing double glazing
Lower energy bills: replacing all single-glazed windows with energy efficient double-glazing could save you around £135 per year on your energy bills.
A smaller carbon footprint: by using less fuel, you’ll generate less of the carbon dioxide (CO2) that leads to global warming.
A more comfortable home: energy efficient glazing reduces heat loss through windows and means fewer draughts and cold spots.
Peace and quiet: as well as keeping the heat in, energy efficient windows insulate your home against unwanted outside noise.
Reduced condensation: energy efficient glazing reduces condensation build-up on the inside of windows.
The costs and savings of double glazing will be different for each home and each window, depending on the size, material and installer. Savings will also vary depending on how much you currently pay for your heating fuel; these savings are based on a gas-heated home.
Installing double glazing
When you plan an installation, you need to know about building regulations and what to do if double-glazing doesn’t suit your property, as well as how to maintain your windows. When you think about replacement glazing, you need to make sure your windows are installed correctly and comply with all the relevant regulations.
Building regulations
Under building regulations in England and Wales new and replacement windows must meet certain energy efficiency requirements:
New and replacement windows in existing homes in England and Wales must be at least WER band C or U-value 1.6 In Scotland must be at least WER band C or U value 1.6 In Northern Ireland must be at least WER band E or U value 2.0 or centre pane U value 1.2.
However, if you live in a conservation area, have an ‘article four’ direction on your property or have a listed building, additional regulations are likely to apply. Before you do any work, make sure you check with your local planning office. An ‘Article 4’ direction removes the right of permitted development, meaning that you will have to apply for planning permission before replacing any windows. This is often applied in conservation areas.
How to comply with regulations
To make sure regulations are complied with, there are certain rules about the way you can install windows:
For DIY installations you must apply for building control approval before installing the windows. For professional installations, your installer should be registered with a competent persons scheme or register the installation through Local Authority Building Control.
Competent Persons schemes in England and Wales are the Fenestration Self-Assessment Scheme (FENSA), the British Standards Institution (BSI) or Certass Glazing Scheme.
Find registered installers
FENSA guarantees that its installers and frames comply with building regulations. To find a FENSA registered installer, visit the FENSA website.
Certass is another scheme that registers and approves installers. To find a Certass registered installer visit the Certass website.
Ask your installer when you will get a certificate after installation is completed, which demonstrates the installation has been completed in compliance with building regulations.
Other options for improving the energy efficiency of your windows
If you can’t install double-glazing (e.g. if you live in a conservation area or in a listed building) you have other options:
Heavy curtains
Curtains lined with a layer of heavy material can reduce heat loss from a room through the window at night and cut draughts. They will save some energy, but should only be used as a short term measure.
This could be something to think about when re-decorating!
Secondary glazing
Secondary glazing works by fitting a secondary pane of glass and frame, inside the existing window reveal. This is likely to be less effective than replacement windows, as the units tend to be not as well sealed, however it is considerably cheaper than double-glazing. Low emissivity glass is available for secondary-glazing, which will improve the performance.
Benefits
Double glazing keeps the heat in your house, reducing your utility bills as less heating is required to heat your house.
Approximately £150 per annum can be saved based on a 3 bed semi-detached & a B-rated product or above, this has the potential to lower CO2 emissions by 680kg per year.
Double glazing acts as a sound proofing mechanism, which makes it an ideal solution if you live near a busy road.
There are many different designs available for you to choose from to match the style of your home. Secondary glazing (which acts in a similar fashion to double glazing) can even allow you to keep your original windows in their current form.
Limitations
Double-glazed windows on occasion can get moisture trapped inside them if they are not installed properly, or are not completely air tight so have to be repaired / replaced.
During the summer, double glazing can end up trapping too much heat in the house making it uncomfortably warm.
Cost
The cost of double glazing your house depends on how many windows you are replacing, the type of frame you use (e.g. wood, uPVC) and the size of each of the frames. As rough guide, a sash uPVC window will cost you approximately £700, while a wooden framed equivalent will cost about £1,100.
The Energy Saving Trust endorses any windows rated B or above.
This website uses cookies. By continuing to use our website you agree to our Data Protection Policy, which you can view here.OK
Privacy & Cookies Policy
Privacy Overview
This website uses cookies to improve your experience while you navigate through the website. Out of these, the cookies that are categorized as necessary are stored on your browser as they are essential for the working of basic functionalities of the website. We also use third-party cookies that help us analyze and understand how you use this website. These cookies will be stored in your browser only with your consent. You also have the option to opt-out of these cookies. But opting out of some of these cookies may affect your browsing experience.
Necessary cookies are absolutely essential for the website to function properly. This category only includes cookies that ensures basic functionalities and security features of the website. These cookies do not store any personal information.
Any cookies that may not be particularly necessary for the website to function and is used specifically to collect user personal data via analytics, ads, other embedded contents are termed as non-necessary cookies. It is mandatory to procure user consent prior to running these cookies on your website.


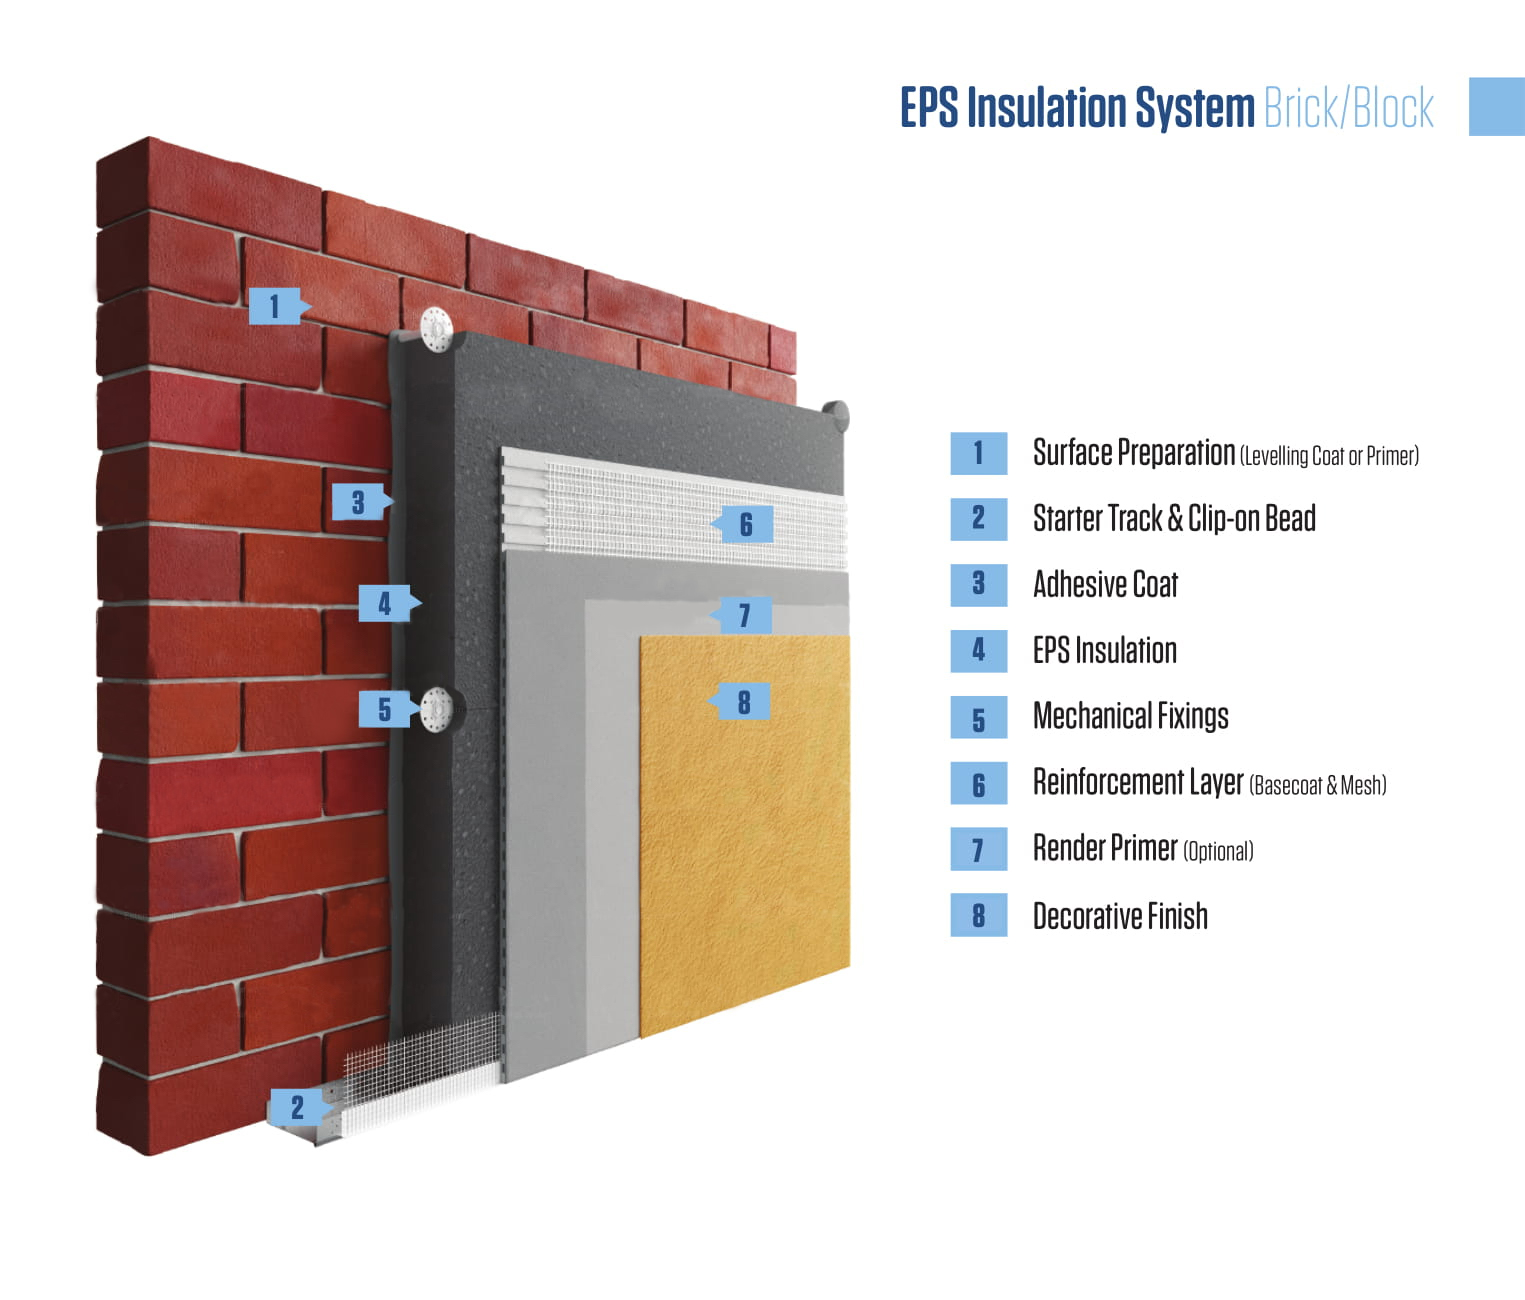 Firstly, if the property has existing render, a render test must be carried out to see if it is strong enough to hold the insulation. If not, all the existing render will need to be removed prior to attaching the insulation to the brickwork. If the render test shows that the existing render is firmly held in place, the render can simply be smoothed, ready for the insulation to be applied directly on to it.